Making yogurt at home is an ancient art that modern technology has transformed from a finicky, weather-dependent chore into a precise, reliable science. While countertop yogurt makers have their place, discerning home chefs are increasingly discovering that warming drawers—originally designed for keeping dinner plates toasty—offer unparalleled temperature stability for culturing perfect batches of creamy, probiotic-rich yogurt. The secret lies in their ability to maintain consistent low heat for extended periods, something most conventional appliances struggle with.
As we look ahead to 2026, the warming drawer market has evolved dramatically, with manufacturers recognizing the growing demand for multi-functional kitchen tools that excel at specialized tasks like fermentation. Whether you’re crafting thick Greek-style yogurt, experimenting with non-dairy alternatives, or maintaining heirloom starter cultures, understanding what separates a mediocre warming drawer from an exceptional one for yogurt making is crucial. This comprehensive guide walks you through the essential features, scientific principles, and practical considerations that will help you identify the perfect model for your fermentation needs.
Top 10 Warming Drawers for Yogurt Making
Detailed Product Reviews
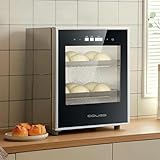
1. Folding Bread Proofing Box with Temp Control (50-113℉) & 48H Timer, Sourdough Proofer Box with Stainless Steel Rack, 4 Preset Modes Dough Proofer for Sourdough, Making Bread,Yogurt,Pizza,Kombucha

Overview: This electric proofing box brings commercial-grade fermentation control to home kitchens at an accessible price point. With precise temperature adjustment from 50-113°F and a 48-hour timer, it creates optimal conditions for sourdough, yogurt, pizza dough, and even kombucha. The unit features three-sided heating and a stainless steel rack for even warmth distribution.
What Makes It Stand Out: The three-zone heating system (front, back, bottom) eliminates cold spots that plague simpler models. Four beginner-friendly presets for bread, yogurt, sourdough feeding, and activation take guesswork out of fermentation. The NTC sensor maintains consistent temperatures, while safety features like auto-shutoff at 130°F and a memory function that recalls your last settings add professional touches rarely seen at this price.
Value for Money: At $52.99, this proofer undercuts most electric competitors while offering superior features. It replaces unreliable oven-light methods and expensive commercial units, paying for itself through consistent results and reduced waste. The versatility across multiple fermentation types provides exceptional utility for the investment.
Strengths and Weaknesses: Pros: Even three-sided heating prevents dough hotspots; comprehensive safety features; intuitive preset modes; memory function saves time; multi-purpose functionality for various fermented foods. Cons: Plastic construction may raise durability concerns with heavy use; interior capacity limits extra-large batches; preheating time varies with ambient temperature.
Bottom Line: An outstanding entry-level electric proofer that delivers precision and versatility without breaking the bank. Perfect for home bakers ready to upgrade from manual methods and explore serious fermentation projects.
2. theMilkman® Yogurt Making Incubator 2 Quart

Overview: This non-electric yogurt incubator takes a refreshingly simple approach to fermentation. Using a stainless steel, wide-mouth container with superior insulation, it maintains temperature for up to 10 hours without any power consumption. The half-gallon capacity produces substantial batches for families or meal prep enthusiasts.
What Makes It Stand Out: The zero-electricity operation sets it apart in a market dominated by plug-in appliances. Simply add hot water to the outer chamber and the insulated design does the rest. The wide-mouth stainless steel interior ensures easy cleaning and eliminates plastic contact with cultured foods. Its straightforward design means no complicated controls or potential electronic failures.
Value for Money: Priced at $57.97, it sits in the mid-range but eliminates ongoing energy costs. The durable stainless steel construction promises years of service, making it more economical long-term than electric models that may need replacement. For dedicated yogurt makers, the simplicity and reliability justify the price.
Strengths and Weaknesses: Pros: Completely energy-free operation; excellent heat retention for full incubation cycles; hygienic stainless steel interior; wide mouth facilitates easy filling and cleaning; foolproof mechanism with no electronics to fail. Cons: Limited to yogurt making only; no temperature adjustment capability; requires careful initial water temperature management; less versatile than multi-purpose proofers.
Bottom Line: Ideal for purists focused exclusively on yogurt making who value simplicity and energy efficiency over multi-functionality. A reliable workhorse that produces consistent results without electricity.
3. Bread Warming Mat with Pure Cotton Towel, Bread Dough Heated Proofing Mat (20.9" x 10") Adjustable Temperature, Sourdough Heating Pad for Food Warming, Dough Proofing, Yogurt Baking etc.

Overview: This minimalist heating mat offers an affordable entry into controlled fermentation. The 20.9" x 10" waterproof pad pairs with a generous cotton towel to create a cozy microclimate for dough rising. With adjustable temperature settings, it handles proofing, yogurt fermentation, and food warming with straightforward simplicity.
What Makes It Stand Out: Extreme portability defines this product—it rolls up for drawer storage and works anywhere with an outlet. The included pure cotton towel creates a natural insulation layer that retains moisture and warmth simultaneously. Unlike enclosed boxes, this open design allows easy monitoring and accommodates oversized bowls or unconventional containers.
Value for Money: At $27.99, it’s the most budget-friendly option for temperature-controlled proofing. It eliminates the guesswork of room-temperature rising without the investment in a full proofer box. For occasional bakers or those with storage constraints, the low price and minimal footprint make it an attractive starting point.
Strengths and Weaknesses: Pros: Highly affordable and accessible; ultra-compact storage; versatile for multiple fermentation types; simple operation; waterproof surface for easy cleaning. Cons: Requires manual monitoring and towel management; less precise temperature control than enclosed units; limited capacity for multiple batches; no timer function; heat loss in drafty environments.
Bottom Line: A practical, no-frills solution for casual bakers seeking better results than ambient proofing. Best suited for those prioritizing budget and storage over precision and automation.
4. LIXOOMER Collapsible Bread Proofing Box with 68-115°F Temp Control & 48H Timer, Bread Making Kit with Dough Warming Box, Includes 7 Kitchen Baking Accessories

Overview: This upgraded collapsible proofer positions itself as a complete bread-making solution. Featuring an expanded temperature range of 68-115°F and a 48-hour timer, it includes seven professional accessories like a bread lame, Danish whisk, and dough scraper. The clear viewing window and five-layer insulation promise commercial-quality results.
What Makes It Stand Out: The odor-free, food-safe materials address a common complaint about heated plastic. Six preset time options (6-48 hours) and enhanced overheating protection (140°F cutoff) provide greater control than budget alternatives. The inclusion of professional tools creates an all-in-one kit, while the viewing window lets you monitor progress without disrupting the environment.
Value for Money: At $69.99, it commands a premium over basic models but includes $30+ worth of quality accessories. The improved material quality, better temperature range, and enhanced safety features justify the price increase for serious home bakers. It bridges the gap between amateur and professional equipment.
Strengths and Weaknesses: Pros: Superior materials eliminate plastic odors; comprehensive accessory package; clear monitoring window; wider temperature range; robust safety features; collapsible design saves space. Cons: Higher price may not suit beginners; included tools may duplicate existing equipment; slightly larger footprint when expanded.
Bottom Line: An excellent value-packed upgrade for committed bakers wanting professional features and tools in one purchase. The quality improvements and accessories make it worth the premium over entry-level models.
5. TDSYOCG 40L Electric Dough Proofer, Bread Proofer Warming Box with Temperature and Humidity Control, A Commercial Fermentation Machine for Proofing Bread, Sourdough, and Making Yogurt with Results
Overview: This commercial-grade 40L proofer brings professional bakery capabilities to serious home kitchens or small businesses. Independent digital control of temperature (20-50°C) and humidity (60-90%) with dual displays offers unprecedented precision. The multi-layer design accommodates large batches, while surround heating and PTC humidification ensure uniformity across all levels.
What Makes It Stand Out: Humidity control is the game-changing feature missing from consumer models. The massive 40L capacity with two racks handles multiple trays simultaneously, transforming batch preparation. Advanced sensors provide real-time readings, and the energy-smart design with insulated walls enables safe, unattended overnight fermentation for complex sourdough schedules.
Value for Money: At $358.55, this is a significant investment, but it replaces commercial equipment costing twice as much. For avid bakers, small-scale caterers, or fermentation enthusiasts, the time savings and consistent professional results deliver strong ROI. The build quality and precision justify the premium for those who use it regularly.
Strengths and Weaknesses: Pros: Professional humidity and temperature control; enormous 40L capacity; even heating across multiple levels; energy-efficient operation; safe for unattended use; versatile for all fermentation types. Cons: High price point prohibitive for casual users; large countertop footprint; may be overkill for single-loaf bakers; significant weight reduces portability.
Bottom Line: A powerhouse for serious enthusiasts or micro-bakeries demanding professional results. The humidity control and capacity make it unbeatable for complex fermentation projects, though hobbyists may find it excessive.
Why Warming Drawers Are Revolutionizing Home Yogurt Making
The transformation from dedicated yogurt makers to warming drawers represents a fundamental shift in how home fermenters approach their craft. Unlike single-purpose appliances that sit idle 90% of the time, a quality warming drawer serves multiple functions while providing the precise thermal environment that beneficial bacteria crave. The key advantage lies in their superior insulation and heating element design, which distributes warmth evenly across the entire cavity rather than concentrating it in one spot. This eliminates the hot spots that can kill delicate cultures or create grainy textures in your finished product.
Professional chefs have long used warming drawers for proofing bread and holding sauces at service temperature, but home yogurt makers are now leveraging this same technology for 8-12 hour fermentation cycles. The difference is night and day: whereas basic yogurt makers might fluctuate by 5-7°F during operation, a well-engineered warming drawer typically maintains temperature within 1-2°F of your target setting. This consistency means you can reproduce the same tangy, silky results batch after batch, building confidence in your home dairy operation.
Understanding the Science of Yogurt Cultivation Temperature
The Goldilocks Zone: 110-115°F Explained
Thermophilic yogurt cultures—the strains that create that classic thick, tangy yogurt—thrive in a surprisingly narrow temperature band. Below 105°F, the bacteria become sluggish, extending fermentation time and allowing undesirable microorganisms to compete. Above 120°F, the heat-sensitive Lactobacillus bulgaricus and Streptococcus thermophilus begin to die off, resulting in thin, runny yogurt or complete fermentation failure. The sweet spot of 110-115°F provides optimal metabolic activity, allowing cultures to convert lactose into lactic acid efficiently while producing the complex flavor compounds that distinguish exceptional homemade yogurt.
This temperature precision becomes even more critical when working with heirloom or direct-set cultures that have specific thermal preferences. Bulgarian-style cultures prefer the lower end around 108°F, while some Greek-style starters perform best at 112-114°F. A warming drawer that can reliably hold these micro-differences gives you the flexibility to explore diverse yogurt traditions without compromising quality.
How Temperature Fluctuations Ruin Your Batch
Even brief temperature swings can sabotage your yogurt-making efforts. When heat cycles on and off with wide amplitude—common in inexpensive appliances—the bacterial colony experiences stress. This stress response manifests as inconsistent texture, excessive whey separation, or off-flavors ranging from overly sour to unpleasantly bitter. The proteins in milk are equally sensitive; temperature instability causes casein micelles to aggregate unpredictably, creating that dreaded grainy mouthfeel instead of smooth, spoonable yogurt.
During the critical first two hours of fermentation, when cultures are establishing dominance, temperature consistency is paramount. A drawer that drops even 3-4°F can slow bacterial growth enough to allow ambient kitchen microbes to gain a foothold, compromising both safety and flavor profile. Quality warming drawers use PID (Proportional-Integral-Derivative) controllers that anticipate temperature changes rather than simply reacting to them, maintaining the steady-state environment your cultures need to flourish.
Key Features to Look for in a Yogurt-Making Warming Drawer
Precise Temperature Control Systems
The heart of any yogurt-worthy warming drawer is its temperature control system. Look for models boasting digital thermostats with increments of 1°F or less—this level of granularity allows you to dial in the exact temperature your specific culture prefers. Analog dials with vague “low-medium-high” settings simply won’t cut it for serious fermentation work; they’re designed for keeping food warm, not for precision culturing.
Advanced models feature proportional control rather than basic on/off cycling. This means the heating element modulates its output continuously, preventing the temperature oscillations that plague simpler designs. Some high-end units even display real-time temperature feedback, showing you the actual interior temperature rather than just the set point. This transparency helps you verify performance and make informed adjustments based on your results.
Digital vs. Analog Thermostats: Which Wins?
While analog thermostats have their place in basic food-warming applications, digital systems are non-negotiable for yogurt making. Digital controls offer repeatable accuracy—you can note the exact setting that produced your best batch and return to it with confidence. Many digital systems also incorporate temperature probes that sample air temperature multiple times per minute, adjusting output to maintain stability within ±1°F.
That said, not all digital systems are created equal. Seek out models with “soft start” technology that gradually ramps up to target temperature, preventing thermal shock to your milk base. The interface matters too: backlit displays are easier to read during early morning yogurt prep, and some units offer smartphone connectivity for monitoring long cycles remotely. Just ensure the app provides actual temperature data, not just timer functions.
Temperature Range and Stability
A suitable warming drawer for yogurt needs a minimum temperature setting no higher than 90°F and a maximum of at least 140°F. This range accommodates everything from activating room-temperature cultures to proofing sourdough bread. For yogurt specifically, the drawer must maintain 110-115°F continuously for 8-12 hours without drift.
Stability is measured in temperature variance over time. Premium models advertise “±1°F stability,” meaning the actual temperature stays within one degree of the set point. This specification is more important than maximum temperature capability. Ask manufacturers for temperature logging data or look for independent reviews that use data loggers to verify performance claims. Some units achieve stability through dual-element heating (one main, one micro-adjustment) and strategic venting that prevents heat stratification.
Humidity Control: The Overlooked Factor
While temperature gets all the attention, humidity plays a crucial role in yogurt quality. Excessive moisture loss during fermentation creates a skin on your yogurt’s surface and can lead to excessive whey separation. Conversely, too much humidity prevents proper thickening. The ideal relative humidity for yogurt fermentation is 70-80%.
Quality warming drawers address this through passive or active humidity management. Passive systems include vent holes you can open or close to regulate moisture escape. Active systems might incorporate small water reservoirs that create gentle steam, maintaining ambient moisture without making your yogurt watery. Some models feature humidity sensors that automatically adjust ventilation—this is a premium feature worth considering if you’re serious about texture perfection.
Capacity and Interior Dimensions
Think beyond jar count when evaluating capacity. Consider the interior height—tall enough for quart jars with airspace above? Wide enough to accommodate multiple containers with airflow between them? Standard warming drawers range from 27 to 30 inches wide, but interior height varies dramatically from 4 to 8 inches.
For yogurt making, a deeper drawer (6+ inches) offers more flexibility. You can culture in larger vessels like glass casserole dishes for family-sized batches, or stack multiple layers of jars using a rack system. Measure your preferred fermentation containers before shopping. Remember that overcrowding impedes air circulation, creating cold spots and uneven fermentation. A good rule of thumb: your jars should occupy no more than 70% of the drawer’s floor space for optimal results.
Drawer Configuration and Flexibility
The best warming drawers for yogurt offer adjustable or removable racks that let you customize the interior layout. Look for at least two rack positions, preferably with a flat “plate warming” mode that removes racks entirely. This versatility matters when switching between culturing single large batches and experimenting with multiple small test batches using different milk types or starter cultures.
Some models feature split drawers—two independent compartments with separate temperature controls. This is a game-changer for serious fermenters who want to culture yogurt at 112°F while simultaneously proofing bread at 85°F. Even if you don’t need dual zones initially, this flexibility future-proofs your investment as your fermentation hobbies expand.
Material Matters: Construction Quality for Consistent Heat
Stainless Steel Interiors and Heat Retention
Interior material directly impacts thermal performance and food safety. Commercial-grade 304 stainless steel is the gold standard—it heats evenly, cleans easily, and won’t react with acidic yogurt whey. Avoid models with non-stick coatings, which can degrade over time and potentially release compounds into your fermentation environment.
Stainless steel’s thermal mass also helps buffer temperature fluctuations. Once heated, it radiates warmth gently, reducing the frequency of heating element cycles. Look for brushed or satin finishes that resist fingerprints and wipe clean without streaking. Seamless interior construction is a plus—fewer crevices mean less chance for bacteria to colonize areas you can’t sanitize effectively between batches.
Insulation Properties to Consider
A warming drawer is only as good as its insulation. Quality units use multi-layer insulation with R-values of 4-6, comparable to a good refrigerator. This prevents heat loss through the sides and top, which is crucial for maintaining stable temperatures during overnight fermentation. Poor insulation forces the heating element to work harder, creating more temperature swings and higher energy consumption.
Check the door seal quality—a thick, compressible gasket prevents heat escape and keeps ambient kitchen air from infiltrating. Some premium models feature double-walled construction with air gaps or even vacuum panels for maximum efficiency. While you can’t easily measure insulation thickness in a showroom, the weight of the unit often correlates with insulation quality; heavier typically means better-insulated.
Safety Features That Matter for Extended Fermentation
Automatic Shut-off vs. Continuous Operation
Here’s a critical consideration: many warming drawers include automatic shut-off timers for safety, typically defaulting to 4-hour cycles. For yogurt’s 8-12 hour requirement, you need a model that allows continuous operation or can be programmed for extended cycles. Some units max out at 8 hours, which works for quick-fermenting cultures but limits your flexibility.
Look for models with “stay on” or “infinite” settings specifically designed for fermentation applications. If automatic shut-off is non-negotiable, ensure the timer can be set for at least 12 hours. Better yet, find units that remember your last setting, so you don’t have to reprogram it every time. Smart models can send phone alerts when the cycle completes, which is perfect for timing your yogurt’s transition to refrigeration.
Child Locks and Overheat Protection
Since yogurt fermentation often runs overnight or while you’re away, safety features provide peace of mind. Child locks prevent curious little hands from opening the drawer and disrupting the temperature environment—or worse, getting burned by warm jars. These locks should engage automatically when the unit reaches operating temperature.
Overheat protection is equally important. Should the thermostat fail, a thermal cutoff switch should disconnect power before temperatures reach dangerous levels. The best systems include redundant sensors—if one fails, a backup prevents runaway heating. Some models even log error codes you can reference if something goes wrong, helping with troubleshooting and warranty claims.
Energy Efficiency and Operating Costs
Wattage Considerations for 8-12 Hour Cycles
Warming drawers typically draw 500-800 watts when actively heating, but energy consumption over a yogurt cycle depends heavily on insulation quality. A well-insulated 600-watt unit might only heat 20% of the time during a 10-hour cycle, consuming about 1.2 kWh total. A poorly insulated 800-watt model could heat 60% of the time, using 4.8 kWh for the same batch.
Calculate estimated operating costs: at $0.13 per kWh, the efficient unit costs roughly $0.16 per batch versus $0.62 for the inefficient one. Over a year of weekly yogurt making, that’s an $8 difference—not huge, but it adds up, especially if you ferment other foods. More importantly, lower wattage cycling means gentler heat application and better temperature stability.
Standby Power Consumption
Don’t overlook phantom load—the electricity drawn when the unit is plugged in but not heating. Quality warming drawers use less than 1 watt in standby, while some older or cheaper designs can draw 5-10 watts continuously. Over a year, that difference amounts to 40-90 kWh, or $5-12 annually. Look for Energy Star certification or specific low-standby specifications in product literature.
Some smart models offer “vacation mode” that reduces standby draw to near zero. While this seems minor, it reflects overall engineering quality and attention to efficiency that typically correlates with better temperature control systems.
Integration with Your Kitchen Workflow
Built-in vs. Freestanding Models
Built-in warming drawers install seamlessly under your wall oven or cooktop, creating a cohesive look and saving counter space. They typically offer larger capacities and more robust construction but require professional installation and are permanent fixtures. Electrical requirements vary—some need dedicated 240V circuits while others run on standard 120V outlets.
Freestanding units plug into any outlet and can be stored when not in use, ideal for renters or those with limited kitchen space. However, they often have thinner insulation and less precise temperature control. For yogurt making, a built-in model generally provides superior performance, but a high-quality freestanding unit can absolutely deliver professional results. Consider your long-term kitchen plans and fermentation ambitions when deciding.
Placement and Ventilation Requirements
Warming drawers need proper airflow to operate safely and efficiently. Built-in models require specific clearances—typically 1-2 inches on sides and top, and sometimes a vent cutout in the toe kick. Installing one in an enclosed cabinet without adequate ventilation can cause overheating and premature component failure.
For yogurt making, consider placing the drawer away from your main cooking zone. The heat and steam from stovetop cooking can affect the drawer’s ability to maintain stable temperature if it’s installed directly beneath. Some fermenters prefer locating their warming drawer in a pantry or auxiliary kitchen area where ambient conditions are more stable. Always follow manufacturer specifications for clearance, and if you’re retrofitting, ensure your electrical circuit can handle the load without sharing with other high-draw appliances.
Advanced Features Worth the Investment
Programmable Timers and Smart Controls
Beyond basic countdown timers, sophisticated warming drawers offer programmable temperature profiles. Imagine starting your milk at 115°F for the first two hours (optimal culture activation), then automatically dropping to 108°F for the remaining 6-8 hours (perfect for flavor development). This level of control mimics commercial yogurt production and can dramatically improve consistency.
Smart connectivity takes this further, allowing you to monitor and adjust settings from your phone. Look for apps that provide real-time temperature graphs, not just on/off status. Some systems integrate with kitchen platforms like SmartThings or Apple HomeKit, enabling automation like “start yogurt cycle when I leave for work.” Just ensure the smart features don’t compromise core reliability—Wi-Fi connectivity should be a bonus, not the main selling point.
Multiple Zone Heating
Dual-zone warming drawers represent the pinnacle of fermentation flexibility. With two independent compartments, you can culture yogurt at 112°F while simultaneously incubating kefir at a cooler 78°F, or proof sourdough at 85°F. Each zone needs its own heating element, thermostat, and display, which adds cost but delivers unmatched versatility.
Even single-zone drawers can benefit from multiple heating elements. Models with bottom and side elements create more uniform heat distribution, eliminating the temperature gradient that can cause jars in the back corner to ferment differently than those near the front. Some premium units use infrared sensors to map interior temperature and adjust element output accordingly, ensuring every jar cultures at exactly the same rate.
Common Mistakes When Using Warming Drawers for Yogurt
Even the best equipment fails when used incorrectly. The most frequent error is preheating the drawer too hot before adding jars. Always set your target temperature and let it stabilize for at least 30 minutes, then verify with an accurate thermometer. Adding jars to an overheated environment shocks cultures and can cause curdling.
Another mistake is opening the drawer during fermentation to “check progress.” Each opening drops temperature by 5-10°F and can add 30-60 minutes to your cycle as the system recovers. Resist the urge to peek—trust your timer and temperature settings. If you must check, do it quickly at the 6-hour mark when cultures are well-established and more temperature-resilient.
Overloading is equally problematic. Jars need air space between them for even heating. A packed drawer creates cold zones and can extend fermentation time by hours. Follow the 70% rule, and if making large batches, consider using a shallow, wide container rather than many small jars to improve heat penetration.
Maintenance and Cleaning Best Practices
Your warming drawer will develop a slight yogurt aroma over time—this is normal and harmless if cleaned properly. After each batch, wipe the interior with a solution of equal parts water and white vinegar to neutralize odors and prevent biofilm buildup. Never use abrasive cleaners or scouring pads on stainless steel interiors; they create microscopic scratches where bacteria can hide.
Monthly deep cleaning is essential. Remove racks and wash them separately in hot, soapy water. Clean the interior with a baking soda paste for stubborn stains, then rinse thoroughly and dry completely before next use. Check the door gasket monthly for cracks or food debris that could compromise the seal. Some manufacturers offer replacement gaskets—worth considering every 2-3 years for optimal performance.
If your drawer develops a persistent sour smell, run it empty at 150°F for one hour with a bowl of water and lemon juice inside. This steam-cleaning method sanitizes without harsh chemicals. Always ensure the unit is completely dry before storing, especially if you won’t use it for extended periods.
Alternative Uses: Getting More Value From Your Investment
A yogurt-optimized warming drawer is a fermentation powerhouse beyond dairy. Use it to incubate homemade tempeh at 88-90°F, culture water kefir at 78°F, or proof artisan bread dough with precise humidity control. The stable low-heat environment is perfect for melting chocolate without a double boiler, softening butter evenly, or even dehydrating herbs at the lowest settings.
During holiday cooking marathons, your drawer can proof dinner rolls while your oven handles the main course. It’s ideal for tempering eggs for custard, keeping sourdough starter at peak activity, or even incubating homemade cheese cultures. Some creative users report success with natto fermentation (100°F) and koji cultivation (86°F). The key is having that precise temperature control that makes these specialized applications possible.
Frequently Asked Questions
How long does it typically take to make yogurt in a warming drawer?
Most thermophilic yogurt cultures require 8-12 hours at 110-115°F, though timing depends on your milk type, starter potency, and desired tartness. Whole milk ferments faster than skim, and fresh active cultures work more quickly than older ones. Start checking at 8 hours by gently tilting a jar—when the yogurt pulls away from the side in a single mass, it’s ready. For Greek-style thickness, you may need the full 12 hours.
Can I use a warming drawer for non-dairy yogurt alternatives?
Absolutely, though temperature requirements vary. Coconut and almond milk yogurts often prefer slightly cooler temperatures (105-108°F) and may need longer fermentation times. Soy yogurt cultures typically thrive at standard dairy temperatures. The key is using a warming drawer with precise low-end control and experimenting with small batches to dial in the perfect timing for your preferred milk alternative.
What’s the ideal jar placement strategy for even fermentation?
Arrange jars in a single layer with at least 1/2 inch of space between each container. Place them away from the door and walls if possible, as these areas experience slightly more temperature fluctuation. If using multiple racks, rotate jar positions halfway through for uniform results. Avoid stacking jars directly on top of each other unless your drawer specifically includes a stacking rack designed to maintain airflow.
How do I calibrate my warming drawer temperature for accuracy?
Place a reliable digital thermometer probe in the center of the empty drawer, set the unit to 110°F, and wait 45 minutes for stabilization. Compare the thermometer reading to the drawer’s display. If there’s a consistent offset (say, the drawer reads 110°F but actually holds 113°F), you can either adjust the set point accordingly or look for models with user-accessible calibration settings. Repeat this test annually, as thermostats can drift over time.
Will using my warming drawer for yogurt void the warranty?
Most manufacturers don’t specifically prohibit fermentation use, but it’s wise to check warranty language. Some brands explicitly mention “proofing and fermenting” as intended uses. Avoid models with warnings against “extended low-temperature operation.” Keep your manual and purchase receipt, and document any temperature irregularities immediately. Using the drawer as intended for food preparation, including fermentation, should not void coverage.
How does altitude affect yogurt making in a warming drawer?
Altitude primarily affects milk’s boiling point and evaporation rate, not the fermentation temperature itself. However, drier high-altitude air increases moisture loss during culturing. Compensate by using jars with tight-fitting lids and consider adding a small water pan to the drawer to maintain 70-80% humidity. Your warming drawer’s temperature control remains accurate regardless of altitude, though you may need to extend fermentation time by 30-60 minutes above 5,000 feet.
Can I ferment other foods simultaneously with yogurt?
Yes, if your drawer maintains a consistent temperature and you keep items separated. Kefir, buttermilk, and some cheese cultures can share the 110-115°F zone. For different temperature requirements, you’ll need a dual-zone drawer. Always use covered containers to prevent cross-contamination of cultures and flavors. Never ferment strongly aromatic foods like kimchi alongside yogurt, as flavors can transfer even at low temperatures.
What’s the difference between a warming drawer and a proofing drawer for yogurt?
While both maintain low temperatures, proofing drawers typically max out around 100°F—too cool for yogurt. Warming drawers reach 140-200°F and offer the 110-115°F sweet spot yogurt needs. Some appliances combine both functions with expanded temperature ranges. When shopping, verify the drawer can maintain 115°F continuously; many “proofing” modes cycle too aggressively for stable yogurt fermentation.
How often should I replace the door gasket on my warming drawer?
With weekly use, expect to replace the gasket every 2-3 years. Signs of failure include visible cracks, hardening of the rubber, or difficulty maintaining stable temperatures. A simple test: close the drawer on a dollar bill—if you can pull it out easily with the door closed, the seal is compromised. Replacement gaskets typically cost $20-40 and can be installed with basic tools, restoring temperature stability and energy efficiency.
Are there any milk types that don’t work well in warming drawer yogurt making?
Ultra-high temperature (UHT) pasteurized milk often produces inconsistent results because the proteins are already denatured. Raw milk works beautifully but requires longer heating to 180°F first for food safety. Lactose-free milk needs special cultures and may require added thickeners. The biggest challenge is ultra-filtered milks like Fairlife—they’re already concentrated, so you need to reduce starter amount and fermentation time to avoid over-thickening. Standard pasteurized whole, 2%, or skim milk perform most reliably.