The modern kitchen has evolved from a fixed workspace into a dynamic culinary studio where adaptability reigns supreme. As open-concept living continues to blur the lines between cooking, dining, and entertaining, homeowners and designers alike are abandoning one-size-fits-all appliances in favor of solutions that bend to their specific needs. Modular cooktops represent this revolution—offering a bespoke approach to kitchen design that traditional ranges simply cannot match. These innovative systems allow you to mix, match, and reconfigure cooking elements like building blocks, creating a personalized command center that grows and changes with your lifestyle.
Whether you’re designing a compact urban galley or a sprawling gourmet island, understanding the nuances of modular cooktop technology will empower you to make decisions that impact both daily functionality and long-term home value. This comprehensive guide dives deep into the critical factors that separate exceptional modular systems from mediocre imitations, exploring everything from technical specifications to aesthetic integration. We’ll walk through the essential considerations that professional kitchen designers evaluate, helping you navigate power requirements, ventilation complexities, and configuration strategies without getting locked into specific product recommendations.
Top 10 Modular Cooktops
Detailed Product Reviews
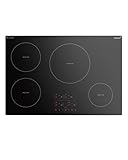
1. Empava Double/Dual Induction Cooktop 2 Burner, Shatter-proof Flat Glass Top, Bridge-SYNC, 3 Preset Modes, Bulit-in/Countertop, 110~120 Volt Plug in Electric Stove for Kitchen, RV, Outdoor Camping

Overview: The Empava Double Induction Cooktop delivers professional flexibility in a compact 110-120V package. With Bridge-SYNC technology, shatter-proof glass, and 18 power levels, it’s engineered for versatile cooking from simmering to searing. The unit functions as two independent burners or one large cooking zone, making it ideal for kitchens, RVs, or outdoor setups where space and power efficiency matter.
What Makes It Stand Out: Bridge-SYNC technology sets this apart, allowing you to combine zones for griddles or large pans while maintaining even heat distribution. The three preset modes—Melt, Keep Warm, and Simmer—eliminate guesswork and constant adjustments. Safety features include auto shut-off and child lock, while the shatter-proof ceramic glass withstands intense heat and rigorous testing.
Value for Money: At $174.82, this cooktop sits in the mid-range for induction appliances. You’re paying for premium features like Bridge-SYNC and 18 power levels typically found in higher-end models. Compared to basic electric cooktops, the precision and efficiency justify the cost, though the shared 1800W limit between zones means you can’t max out both simultaneously.
Strengths and Weaknesses: Strengths include exceptional flexibility, robust safety features, durable construction, and intuitive preset modes. The 18 power levels offer precise control. Weaknesses stem from the shared 1800W power cap when both zones operate, limiting simultaneous high-heat cooking. Induction requires magnetic cookware, which may necessitate additional investment.
Bottom Line: Perfect for small spaces and discerning cooks who value precision and versatility. The Empava excels in safety and flexibility, making it ideal for families, RV enthusiasts, and apartment dwellers willing to invest in quality induction cooking.
2. VEVOR Electric Cooktop, Built-in Electric Stove Top, with Glass Panel, Knob Control, 11 Heat Levels, for Diverse Cooking Requirements (12inch-2burners/110V)

Overview: The VEVOR 12-inch Electric Cooktop offers straightforward, reliable cooking performance at an accessible price point. This 110V ceramic cooktop features two burners with independent knob controls, delivering 1800W combined power across 11 heat levels. Designed for built-in installation, it prioritizes simplicity and universal cookware compatibility.
What Makes It Stand Out: The knob-controlled interface distinguishes this model in a market dominated by touch panels. This tactile approach benefits elderly users and those with vision impairments, providing reliable feedback and eliminating complex button sequences. The independent burner control allows simultaneous multi-pot cooking with copper, cast iron, or stainless steel cookware.
Value for Money: At $82.90, this represents exceptional value for a dual-burner electric cooktop. It’s among the most affordable options while maintaining essential safety features and decent power output. The lack of advanced features like timers or preset modes is expected at this price, making it a budget-friendly alternative to induction models that cost twice as much.
Strengths and Weaknesses: Strengths include unbeatable affordability, intuitive knob controls, broad cookware compatibility, and multiple safety protections. The 11 heat levels provide adequate control for most cooking tasks. Weaknesses include no digital timer, lower individual burner power (1000W and 800W), and basic aesthetic appeal. The ceramic surface may not heat as evenly or responsively as induction.
Bottom Line: An excellent choice for budget-conscious buyers, rental properties, or users preferring traditional controls. While lacking advanced features, it delivers reliable performance where it matters most—consistent heating and straightforward operation.
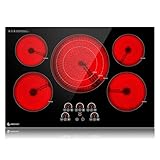
3. VEVOR Built in Electric Stove Top, 30 inch 4 Burners Ceramic Cooktop, 240V Glass Radiant Cooktop with Sensor Touch Control, Timer & Child Lock Included, 9 Power Levels for Simmer Steam Slow Cook Fry

Overview: The VEVOR 30-inch Electric Stove Top brings serious cooking power to home kitchens with four independent zones totaling 7200W. This built-in ceramic cooktop features digital sensor touch controls, nine power levels, and a 1-99 minute timer. Operating on 220-240V, it’s designed for permanent installation and accommodates any cookware type.
What Makes It Stand Out: The 7200W total power output delivers restaurant-grade performance, allowing true simultaneous high-heat cooking across all four burners. Unlike induction, this radiant cooktop works with aluminum, copper, cast iron, and non-magnetic stainless steel without restriction. The sensor touch panel provides precise temperature control, while the child lock and residual heat indicator enhance family safety.
Value for Money: Priced at $172.99, this cooktop offers remarkable value for a 30-inch, four-burner unit. Comparable models often exceed $250, making this an attractive option for serious home cooks. The requirement for 220-240V power may add installation costs, but the performance-per-dollar ratio remains excellent.
Strengths and Weaknesses: Strengths include massive power output, universal cookware compatibility, comprehensive safety features (overheat protection, auto shut-off, child lock), and intuitive touch controls. The timer function adds convenience. Weaknesses include requiring 220-240V connection, potential need for professional installation, and larger cutout dimensions limiting placement options.
Bottom Line: Ideal for ambitious home chefs needing maximum versatility and power. If you have the required electrical setup, this VEVOR model delivers professional capabilities at a consumer-friendly price, handling everything from delicate sauces to high-heat searing.
4. 12 Inch Induction Cooktop 2 Burners, 120V 1800W Electric Stove with Bridge Function & 9 Power Levels, Built-in/Countertop Induction Burner for Kitchen, RV, Outdoor Camping

Overview: This 12-inch Induction Cooktop delivers modern cooking technology in a compact, versatile package. Operating on 120V with 1800W maximum output, it features two burners with bridge functionality, nine power levels, and three preset cooking modes. The slide touch control interface and multiple safety functions make it suitable for kitchens, RVs, and outdoor applications.
What Makes It Stand Out: The innovative slide touch control offers a more intuitive adjustment method than traditional button presses, allowing quick power level changes with a simple finger swipe. The bridge function combines zones for larger cookware, while preset Melt, Keep Warm, and Simmer modes automate temperature maintenance. Safety features include auto shut-off and child lock protection.
Value for Money: At $98.99, this induction cooktop undercuts many competitors while retaining premium features like bridge function and preset modes. It represents an affordable entry into induction cooking, offering energy efficiency and precise control typically found in higher-priced models. The 1800W shared power limitation is expected at this price point.
Strengths and Weaknesses: Strengths include attractive pricing, responsive slide controls, flexible bridge function, useful preset modes, and strong safety features. The compact size suits small spaces. Weaknesses include the shared 1800W power cap limiting simultaneous high-heat cooking, and induction’s requirement for magnetic cookware, potentially adding expense.
Bottom Line: A compelling choice for first-time induction users or space-constrained settings. The combination of advanced features and sub-$100 pricing makes this an excellent value proposition for apartments, RVs, or supplemental cooking needs.
5. RecPro RV Built In Gas Cooktop | 2 Burner or 3 Burner | RV Cooktop Stove | 6,500 and 8,000 BTU Burners | Cover Included (Stainless Steel, 3-Burner)

Overview: The RecPro RV Built-In Gas Cooktop addresses the unique demands of recreational vehicle cooking with purpose-built design and robust construction. Available in two or three-burner configurations, this stainless steel unit features 6,500 and 8,000 BTU burners, a folding splash cover, and flexible ignition options. It’s engineered specifically for RV installations where space, durability, and reliability are paramount.
What Makes It Stand Out: This cooktop’s RV-specific design includes a convenient folding cover that protects the cooking surface and prevents splashes during travel. The choice between electronic or manual ignition provides backup starting methods—crucial for off-grid adventures. Backlit aluminum knobs with engraved markings ensure visibility and durability in mobile environments where vibration and wear are constant concerns.
Value for Money: At $287.95, this commands a premium over residential cooktops, but the RV-specific engineering justifies the cost. Standard cooktops lack the vibration resistance, compact dimensions, and travel-friendly features essential for mobile living. The included cover and dual ignition options add value absent in generic alternatives.
Strengths and Weaknesses: Strengths include purpose-built RV design, durable stainless steel construction, flexible burner options, protective cover, and dual ignition systems. The BTU ratings are adequate for RV cooking needs. Weaknesses include higher price point, requirement for propane connection and ventilation, and lower heat output compared to residential gas ranges.
Bottom Line: Essential for RV owners seeking a reliable, space-efficient cooking solution. While pricey compared to residential units, its specialized features and durable construction make it worth every penny for mobile lifestyles. Not recommended for stationary home use.
6. Duxtop Built-in Induction Cooktop, Portable Countertop Burner, Sensor Touch Induction Burner, 170-Minute Timer, Safety Lock, 1800W BT-200T1/8600BI

Overview: The Duxtop BT-200T1/8600BI bridges the gap between portable convenience and permanent installation. This versatile induction burner delivers 1800W of power through a sleek sensor-touch interface, offering both temperature and power modes for precise cooking control. Its lightweight design enables easy transport, while the built-in option provides a seamless kitchen upgrade for compact spaces.
What Makes It Stand Out: The dual built-in and countertop functionality is rare at this price point. Fifteen preset power levels (200-1800W) and fifteen temperature settings (140°F to 460°F) provide exceptional precision typically found in premium models. The 83% energy efficiency rating significantly outperforms gas and traditional electric stoves, while the 170-minute timer and safety lock add professional-grade convenience and child-safety protection.
Value for Money: At $83.10, this unit delivers remarkable versatility. Comparable single-purpose induction hot plates cost $60-80, while built-in units start around $150. You’re essentially getting two appliances in one, making it an economical choice for renters, small kitchens, or as a supplementary cooking surface without permanent commitment.
Strengths and Weaknesses: Strengths include exceptional energy efficiency, precise dual-mode controls, versatile installation options, comprehensive safety features, and effortless glass surface cleaning. The lightweight portability enhances its utility. Weaknesses include single-burner limitation, requirement for induction-compatible cookware, and 1800W maximum that may struggle with high-heat searing. The sensor panel may be sensitive to moisture.
Bottom Line: This Duxtop model excels as a flexible cooking solution for space-constrained environments. Whether you need a portable burner for occasional use or a permanent single-burner upgrade, its feature set and build quality justify the modest investment. Ideal for dorms, RVs, apartments, or as a supplemental burner for holiday cooking.
7. Ranein Induction Cooktop 30 Inch, Build-in 4 Burners Electric Stove Top, 9 Power Settings, Max 7800W, Sensor-Control Induction Hob with Multiple Safety Protections, Compatible with Magnetic Cookers
Overview: The Ranein 30-inch induction cooktop brings commercial-grade performance to residential kitchens with four independent burners delivering 7,800W of combined power. Designed for flexibility, it functions as either a built-in or freestanding countertop unit. The sensor-control interface and sleek glass surface deliver modern aesthetics while accommodating multiple pots simultaneously for serious home cooking.
What Makes It Stand Out: Four-zone cooking at this power level under $270 is compelling. The six integrated safety protections—including child lock, auto shut-off, and overheat prevention—exceed typical residential standards. Lightning-fast heating response rivals gas cooktops while maintaining induction’s superior energy efficiency. The scratch-resistant glass surface withstands rigorous daily use.
Value for Money: At $269, this represents exceptional value compared to brand-name four-burner induction units costing $400-800. You get 7,800W total power, advanced safety systems, and versatile installation without the premium price tag. For families seeking induction benefits on a budget, it’s a strategic investment that doesn’t compromise core performance.
Strengths and Weaknesses: Strengths include high total wattage, multi-burner flexibility, comprehensive safety suite, rapid heating, easy-clean surface, and dual installation options. The 30-inch width fits standard cutouts. Weaknesses include requiring induction-compatible cookware, potentially complex DIY installation, limited to nine power settings per burner (fewer than some competitors), and no bridge element for griddles.
Bottom Line: This Ranein cooktop delivers professional capacity at consumer pricing. Perfect for families transitioning from gas or electric who want speed, safety, and efficiency. While installation requires planning, the performance-per-dollar ratio is outstanding. Verify your cookware compatibility before purchasing.
8. RecPro RV Built In Gas Cooktop | 2 Burner or 3 Burner | RV Cooktop Stove | 6,500 and 8,000 BTU Burners | Cover Included (Stainless Steel, 2-Burner)

Overview: Purpose-built for recreational vehicles, the RecPro gas cooktop offers RV owners authentic flame cooking in a compact, durable package. Available in two or three-burner configurations, the stainless steel model features a 6,500 BTU and 8,000 BTU burner pairing. The integrated folding cover and backlit aluminum knobs demonstrate thoughtful mobile-living design considerations.
What Makes It Stand Out: RV-specific engineering sets this apart from residential units. The included splash-prevention cover is essential for mobile environments, while the dual ignition system (electronic or manual) ensures reliability even off-grid. Engraved aluminum knobs withstand vibration and temperature extremes better than plastic alternatives. The flexible sizing options accommodate various RV kitchen layouts.
Value for Money: At $174.95 for the two-burner model, pricing aligns with RV appliance market rates. While more expensive than basic residential hot plates, the RV-specific features—cover, rugged construction, and dual ignition—justify the premium. For RVers, the durability and space efficiency deliver solid long-term value.
Strengths and Weaknesses: Strengths include purpose-built RV design, included protective cover, durable metal knobs, flexible ignition options, and appropriate BTU outputs for mobile living. The stainless steel finish resists corrosion. Weaknesses include requiring propane ventilation, lower BTU output compared to residential ranges, limited to RV or tiny home applications, and gas lines needing professional installation for safety.
Bottom Line: This RecPro unit serves RV owners exclusively, excelling within that niche. Don’t consider it for stationary homes—its value emerges in mobile contexts where space, durability, and propane compatibility matter most. The two-burner configuration suits couples or small families. Invest in professional installation to ensure safe operation.
9. AMZCHEF Electric Cooktop 36 Inch,5 Burners Built-in Electric Stove Top,Max 9000W Ceramic Glass Countertop with Touch Control,9 Heating Level,Max 3000W Triple Zone,Safety Lock
Overview: The AMZCHEF 36-inch ceramic cooktop delivers expansive cooking capacity with five burners totaling 9,000W, including a versatile triple-zone element reaching 3,000W. Unlike induction, this ceramic glass surface works with any flat-bottomed cookware—eliminating compatibility concerns. The built-in design and touch controls provide a streamlined, modern aesthetic for large kitchens requiring maximum flexibility.
What Makes It Stand Out: The triple-zone burner adapts to pot sizes from 6 to 12 inches, offering unmatched versatility. Universal cookware compatibility is the headline feature—use iron, stainless, copper, ceramic, or glass without performance penalty. Nine heating levels provide granular control, while the hot surface indicator adds critical safety. The 9,000W total output rivals professional ranges.
Value for Money: At $349.99, this undercuts comparable 36-inch ceramic cooktops by $100-200. The triple-zone feature and 3,000W maximum typically appear in $500+ units. For households with mixed cookware collections, avoiding induction-replacement costs creates additional savings. One-year warranty and lifetime technical support enhance value.
Strengths and Weaknesses: Strengths include universal cookware compatibility, large cooking surface, powerful triple-zone burner, comprehensive safety features (ETL certified), and competitive pricing. The 220-240V requirement suits modern electrical systems. Weaknesses include lower energy efficiency than induction, slower heating response, potential for glass surface scratching, and large cutout requirements (33.5" × 18.7").
Bottom Line: This AMZCHEF cooktop excels for cookware-diverse households prioritizing flexibility over induction’s efficiency. If you own cherished non-magnetic pots, the performance trade-off is worthwhile. Ensure your kitchen accommodates the cutout and voltage requirements. A smart choice for serious home cooks needing burner quantity and adaptability.
10. MegaChef Ceramic Infrared Double Cooktop, 25 Inch, Black

Overview: The MegaChef infrared double cooktop offers barebones countertop cooking at an entry-level price point. Measuring 25 inches with two burners, this unit prioritizes simplicity and portability over advanced features. Built-in handles facilitate transport, making it suitable for temporary setups, small apartments, or supplemental holiday cooking capacity without complex installation.
What Makes It Stand Out: The infrared ceramic heating element works with any cookware type, eliminating the compatibility issues of induction. The integrated handles and lightweight design emphasize portability rarely seen in double-burner units. At under $50, it’s among the most affordable two-burner options available, making countertop cooking accessible to budget-conscious consumers.
Value for Money: At $48.27, value is defined by extreme affordability rather than performance. Comparable basic hot plates start at $35-60, but this offers two burners in a single unit. For occasional use, dorm rooms, or emergency backup, the price is compelling. However, durability concerns and limited power may necessitate earlier replacement than pricier alternatives.
Strengths and Weaknesses: Strengths include universal cookware compatibility, exceptional portability, simple operation, and rock-bottom pricing. The infrared heating provides more even warmth than coil elements. Weaknesses include unspecified power output (likely under 1500W total), basic temperature control, questionable long-term reliability, lack of safety features, and no timer or digital controls. The 25-inch footprint consumes significant counter space.
Bottom Line: Purchase this MegaChef unit for temporary or occasional use only. It’s a functional stopgap for those on tight budgets or needing mobile cooking capability. Don’t expect precision, power, or longevity. For daily cooking, invest $30-50 more in a reliable single-burner induction or coil unit. This serves specific niche needs adequately but falls short as a primary appliance.
Understanding Modular Cooktop Technology
Modular cooktops are segmented cooking systems composed of individual, self-contained modules that install flush within your countertop. Unlike traditional ranges with fixed configurations, these units function as independent appliances that can be arranged in virtually any linear or geometric pattern. Each module typically measures 12 to 18 inches wide and contains a single cooking function—such as gas burners, induction zones, or specialty surfaces like griddles or woks.
The true innovation lies in the integrated control systems and unified power management. While each module operates independently, they communicate through a central hub or proprietary connectivity protocol that allows for synchronized operation, shared timers, and cohesive safety systems. This architecture enables future expansion; you can start with two modules and add components years later without replacing the entire system, provided you’ve planned the infrastructure correctly during initial installation.
Key Benefits of Modular Cooktops for Flexible Kitchen Design
True Customization Without Compromise
Modular systems eliminate the forced compromises of traditional appliances. Instead of accepting a 36-inch range with four burners and a grill you’ll never use, you can specify precisely what you need—perhaps two high-BTU gas burners, an induction zone for delicate sauces, and a teppanyaki griddle for weekend entertaining. This à la carte approach ensures every square inch of cooking real estate serves a purpose in your culinary workflow.
Future-Proofing Your Investment
Kitchen trends and cooking styles evolve. The wok burner that seemed essential today might give way to a dedicated sous vide station tomorrow. Modular systems protect your investment by allowing component-level upgrades rather than complete appliance replacement. As technology advances—think improved induction efficiency or smart connectivity—you can swap individual modules while retaining the existing infrastructure, saving thousands in renovation costs.
Optimized Workflow and Ergonomics
Professional chefs design their stations around movement patterns, and modular cooktops bring this principle to residential kitchens. Place high-heat modules near your prep area for searing, position induction zones adjacent to the sink for easy pot filling, and install a griddle module facing your dining space for interactive cooking experiences. This strategic placement reduces steps, minimizes cross-traffic, and creates logical work zones that make cooking more intuitive and enjoyable.
Types of Modular Cooktop Modules
Gas Burner Modules
Gas modules remain the darling of serious home chefs, offering immediate visual feedback and tactile control. Look for dual-ring burners that can drop to a delicate simmer or crank past 20,000 BTUs for restaurant-quality sears. Sealed burners simplify cleaning, while open burners provide superior heat distribution for wok cooking. Consider modules with integrated flame-failure safety devices that automatically cut gas supply if the flame extinguishes.
Electric Radiant Modules
Electric radiant elements provide consistent, even heating ideal for tasks like candy making or long simmers. While less responsive than gas or induction, modern ribbon-style elements heat quickly and maintain steady temperatures. These modules often cost less than their induction counterparts and work with any cookware, making them practical for budget-conscious renovations or rental properties where tenants may have mixed cookware collections.
Induction Modules
Induction technology delivers unmatched precision and efficiency, transferring 90% of energy directly to the pan compared to 40% with gas. Single-zone induction modules offer pinpoint temperature control within one degree, while flex-zone modules can detect pan size and shape automatically. The cooktop surface remains cool to the touch, providing a significant safety advantage in households with children. However, induction requires magnetic cookware, so factor in potential pot and pan replacement costs.
Specialty Cooking Modules
This category transforms your kitchen into a culinary playground. Teppanyaki griddles provide expansive, even heating surfaces for pancakes or stir-fries. Deep fryer modules with integrated oil filtration systems eliminate countertop clutter. Wok modules feature specialized concave burners that cradle round-bottom pans for authentic high-heat cooking. Steam modules enable healthy, nutrient-preserving preparation methods. Consider your actual cooking habits before investing—specialty modules offer incredible utility but occupy permanent real estate.
Essential Features to Evaluate Before Buying
Power and BTU Output Specifications
Don’t just count burners—analyze the power curve. A module’s maximum BTU rating tells only part of the story; the low-end simmer capability matters equally. Look for gas modules that can maintain stable flames below 500 BTUs for delicate reductions. For induction, examine boost functions that temporarily draw extra power for rapid boiling, but verify your electrical panel can handle simultaneous boost operations across multiple modules without tripping breakers.
Control Interface and Precision
Touch controls offer sleek aesthetics and easy cleaning but may frustrate users who prefer tactile feedback. Knob controls provide intuitive operation but require cutouts that complicate countertop fabrication. Hybrid systems combine both approaches. Evaluate control granularity—can you adjust heat in precise increments, or does the system force you through preset levels? Some premium systems offer app-based control with programmable recipes that automatically adjust temperatures across multiple modules in sequence.
Bridge Elements and Flex Zones
Bridge technology allows you to combine two adjacent cooking zones into one larger heated surface, perfect for oblong pans or planchas. True flex zones use matrix-style heating elements that can detect multiple pans of varying sizes placed anywhere on the surface. This flexibility proves invaluable when cooking for crowds, as you can reposition pans without losing heating efficiency. Verify whether the bridge function activates automatically or requires manual selection—automatic systems offer superior convenience.
Safety Features and Certifications
Beyond basic child locks, advanced modular systems include pan detection that shuts off heating when cookware is removed, overflow sensors that cut power if liquids spill onto controls, and residual heat indicators that remain illuminated until surfaces cool. Look for UL or ETL certification specific to modular systems, as traditional cooktop standards may not address multi-module installations. Some systems offer vacation mode settings that lock all controls and reduce standby power consumption.
Smart Connectivity and Integration
Wi-Fi enabled modules allow remote monitoring, firmware updates, and integration with whole-home automation systems. Voice control through platforms like Alexa or Google Home lets you preheat modules while your hands are covered in dough. More sophisticated systems sync with range hoods, automatically adjusting ventilation speed based on heat output. However, evaluate the practicality—will you actually use these features, or are they flashy additions that add cost and complexity?
Configuration Strategies for Custom Layouts
Linear Arrangements for Galley Kitchens
In narrow galley kitchens, linear configurations maximize counter space while maintaining workflow efficiency. Place your most-used module at the center point between prep and plating areas. Standard 30-inch depth countertops accommodate two modules front-to-back or three modules side-by-side. Consider staggering module heights slightly—raising induction modules 1-2 inches above gas burners can improve ergonomics by reducing wrist strain when stirring multiple pots simultaneously.
L-Shaped Configurations for Corner Spaces
L-shaped installations transform awkward corner spaces into functional cooking zones. Position high-heat modules on the shorter leg, closer to the sink for easy water access, and place lower-heat or warming modules on the longer run. This creates a natural work triangle even in non-traditional layouts. Ensure adequate corner support—corner installations require reinforced cabinetry to support the cantilevered countertop sections where modules sit.
Island Integration for Open-Concept Living
Islands demand special consideration for ventilation and social interaction. Center-mount downdraft systems work but sacrifice some performance compared to overhead hoods. Alternative strategies include perimeter ventilation slots that draw air across the entire island surface. For interactive cooking, position modules on the side facing dining areas, but include a safety buffer zone of at least 12 inches between cooking surfaces and seating to prevent accidental burns.
Peninsula and Split-Level Solutions
Peninsula installations bridge kitchen and living spaces, requiring careful consideration of sightlines. Use low-profile modules that don’t obstruct views, and specify flush-mount installations that create seamless transitions. Split-level counters—with cooking surfaces at standard 36-inch height and prep areas at 30-inch height—create ergonomic zones but complicate module installation. Some manufacturers offer wedge-shaped trim kits that accommodate height transitions while maintaining weatherproof seals.
Sizing and Space Planning Considerations
Standard Module Dimensions and Grid Systems
Most manufacturers design modules around 15-inch width increments, allowing seamless integration. However, “standard” varies—European systems often use 30cm (11.8-inch) modules, while American brands favor 12-inch or 18-inch units. Before falling in love with a system, verify module dimensions align with your cabinetry layout. Some proprietary systems require specific cabinet depths or include control boxes that consume valuable under-counter storage space.
Countertop Depth and Overhang Requirements
While 25-inch deep countertops technically accommodate modules, 30-inch depth provides crucial buffer space between hot surfaces and the counter edge. For island installations, extend the countertop an additional 6-12 inches on the non-cooking side to create a landing zone for hot pans. Consider the overhang carefully—modules require support within 2 inches of their perimeter, which may necessitate additional substrate material beyond standard cabinet boxes.
Clearance Codes and Safety Zones
Building codes require minimum clearances between cooking surfaces and combustible materials. Gas modules typically need 30 inches to overhead cabinets, while induction may require only 24 inches. Horizontal clearances matter too—maintain at least 12 inches between gas burners and sink edges to prevent steam burns. For islands, local codes may require non-combustible surrounds extending 6 inches beyond module perimeters. Always verify requirements with your local building department before finalizing designs.
Ventilation Requirements for Modular Systems
Downdraft vs. Overhead Ventilation Performance
Downdraft systems integrate seamlessly into islands but capture efficiency drops significantly—sometimes to just 60% compared to 95%+ for overhead hoods. For serious cooking, specify overhead ventilation with CFM ratings calculated at 100 CFM per 10,000 BTUs of total cooktop output. If downdraft is your only option, choose systems with perimeter induction that captures vapors at the cooktop edge rather than center-mounted units that fight against natural heat rise.
Calculating CFM for Multi-Module Installations
Simply adding module BTU ratings often results in oversized, noisy hoods. Instead, apply a diversity factor—most chefs don’t operate all modules at maximum simultaneously. For four modules, calculate total BTUs then multiply by 0.75 to determine realistic ventilation needs. A system totaling 80,000 BTUs requires approximately 600 CFM (80,000 ÷ 10,000 × 100 × 0.75). Add 50 CFM for each foot of cooktop width to capture ambient heat and odors.
Makeup Air Systems and Building Code
Any ventilation system exceeding 400 CFM likely requires makeup air to prevent negative pressure that can backdraft gas appliances or draw garage fumes into living spaces. Heat-recovery ventilators (HRVs) provide efficient makeup air while maintaining climate control. Some building departments exempt induction installations from makeup air requirements due to lower actual contaminant production—verify locally, as this can save thousands in installation costs.
Electrical and Gas Supply Planning
Power Load Calculations and Panel Capacity
A single induction module may draw 40 amps at 240 volts. Four modules operating simultaneously require 160 amps—potentially exceeding your home’s entire service panel capacity. Work with an electrician to calculate load diversity realistically. Most residential installations use 200-amp service, but continuous loads like cooktops require derating to 80% capacity. Plan dedicated subpanels near the kitchen to reduce long wire runs and simplify future expansions.
Dedicated Circuit Requirements
Each module typically requires its own dedicated circuit, but some systems allow ganging under a single disconnect. Gas modules need 120-volt circuits for ignition systems, while induction demands 240-volt service. Run conduit with extra capacity—installing 1-inch conduit instead of ¾-inch costs marginally more but allows easy wire pulls if you upgrade to higher-power modules later. Position junction boxes within 6 feet of each module location to meet code and simplify service.
Gas Line Sizing and Pressure Regulation
Modular gas systems require ¾-inch minimum gas lines, even if individual modules use ½-inch connections. The larger trunk line prevents pressure drops when multiple burners operate simultaneously. Install a dedicated pressure regulator at the manifold serving the modules—kitchen gas pressure should be 7 inches of water column for natural gas or 11 inches for propane. Include accessible shut-off valves for each module; code requires them, and they simplify maintenance.
Material and Finish Options
Stainless Steel vs. Glass Ceramic Surfaces
Stainless steel modules offer professional aesthetics and durability but show fingerprints and require specific cleaners to prevent discoloration. Glass ceramic surfaces, common on induction modules, provide sleek, modern appearance and wipe clean easily but can scratch if you slide cast iron pans. Some manufacturers offer titanium-infused glass that resists scratching and thermal shock. For mixed installations, consider contrasting finishes—stainless gas modules paired with black glass induction create visual interest while defining functional zones.
Edge Treatments and Seamless Integration
Flush-mount installations require precise countertop cutouts and trim kits that create weatherproof seals. Beveled edge treatments make cleaning easier by preventing debris accumulation at module-countertop junctions. Some systems offer “barely-there” bezels as thin as 1/16 inch, creating nearly seamless surfaces. For retrofit installations, surface-mount modules with decorative side panels provide easier installation without countertop replacement but sacrifice the integrated look.
Color and Texture Customization
Beyond standard stainless and black, premium lines offer custom RAL color matching for module exteriors and knobs. Textured finishes like brushed bronze or matte black reduce visible smudging. Some manufacturers provide interchangeable knob inserts and handle accents, allowing you to update aesthetics without replacing functional components. Consider the long-term—trendy colors may date your kitchen, while classic finishes maintain appeal for resale.
Installation Best Practices
Professional Installation vs. DIY Complexity
While handy homeowners can install single modules, multi-module systems demand professional expertise. Certified installers ensure proper sealing, verify electrical load balancing, and coordinate with countertop fabricators for precise cutouts. The incremental cost—typically $200-400 per module—protects your warranty and prevents costly mistakes like improperly supported modules that crack countertops or gas leaks from misaligned connections.
Countertop Cutout Precision and Tolerances
Module specifications include cutout dimensions with tolerances as tight as ±1/32 inch. Stone fabricators must use CNC machines for accuracy; hand-cut installations risk gaps that compromise sealing. Provide installers with physical modules or manufacturer-approved templates, not just dimensional drawings. Schedule a “dry fit” before final installation—sliding modules into place to verify fit before applying sealants. This step prevents the nightmare of discovering mismatched dimensions with sealant already curing.
Sealing, Waterproofing, and Thermal Expansion
Use only manufacturer-specified sealants, typically high-temperature silicone rated to 500°F. Apply sealant to module flanges, not the countertop, to allow for thermal expansion—modules can expand 1/16 inch during operation. Include thermal breaks between modules in multi-unit installations; these small gaps filled with flexible sealant prevent stress fractures from differential expansion rates. For gas modules, apply thread sealant rated for fuel gas, not standard plumber’s tape, which can degrade and cause leaks.
Budget Planning and Cost Factors
Module Pricing Tiers and Value Proposition
Entry-level modules start around $800-1,200 per unit, while premium options exceed $3,000. However, compare total system cost against comparable professional ranges. A four-module induction system at $8,000 may seem expensive until you realize a comparable 48-inch pro range costs $12,000-15,000 and offers zero flexibility. Factor in the cost of avoided renovations—modular systems adapt to lifestyle changes without requiring new appliances.
Hidden Costs Beyond Module Price
Infrastructure costs add 30-50% to module prices. Electrical upgrades, gas line extensions, ventilation systems, and countertop modifications often exceed the cost of the modules themselves. Don’t forget control systems—some manufacturers charge separately for the master control panel that unifies modules. Trim kits, knobs, and sealing materials can add $200-500 per module. Obtain “installed” quotes, not just equipment costs, for accurate budgeting.
ROI and Resale Value Considerations
Modular cooktops appeal to discerning buyers but may confuse mainstream markets. In luxury markets, expect 60-80% ROI; in mid-range neighborhoods, ROI drops to 40-60%. Document your system thoroughly—save installation manuals, create a module map showing electrical and gas connections, and maintain service records. This documentation reassures future buyers and appraisers that the system is serviceable, not a proprietary nightmare.
Maintenance and Longevity
Cleaning Protocols by Module Type
Gas modules require burner cap removal and port cleaning with specialized brushes weekly. Induction glass surfaces need ceramic cooktop cleaner and razor blade scraping for burnt-on spills—never use abrasive pads that scratch the surface. Griddle modules demand seasoning like cast iron; scrubbing with soap destroys the non-stick patina. Create a maintenance schedule: daily wipe-downs, weekly deep cleans, and monthly inspections of seals and connections.
Component Replacement and Serviceability
One modular advantage is replaceable components. Burner valves, ignition spark modules, and induction coils can be swapped without replacing the entire unit. Verify parts availability before purchasing—European brands may have 6-8 week lead times for components. Choose systems with easily accessible service panels; some modules require complete removal from the countertop for minor repairs, costing hundreds in labor.
Warranty Coverage and Extended Protection
Standard warranties range from 2-5 years, but coverage varies wildly. Some cover parts only; others include labor. Electronic components often have shorter coverage than mechanical parts. Extended warranties for modular systems can be worthwhile, especially for induction modules with complex circuitry. Read fine print carefully—some warranties void if modules are installed in outdoor kitchens or if non-OEM parts are used for repairs.
Design Aesthetics and Kitchen Style Integration
Minimalist and Contemporary Kitchens
For minimalist spaces, specify induction modules with invisible controls that activate only when pans are present. Choose flush installations with waterfall countertop edges that conceal module perimeters. Integrated ventilation—either downdraft or ceiling-mounted—maintains clean sightlines. Limit the module palette to two finishes maximum; monochrome schemes with subtle texture variations create sophistication without visual clutter.
Professional-Grade Kitchen Aesthetics
Embrace the commercial look with brushed stainless modules featuring exposed rivets and heavy-duty knobs. Specify raised mounting with visible gasket seals that echo restaurant equipment. Add a stainless steel backsplash with integrated shelving for oils and utensils. Consider open shelving above instead of wall cabinets to showcase the cooking zone as a focal point. Use contrasting materials—soapstone countertops against stainless modules—to ground the professional aesthetic in residential warmth.
Transitional and Traditional Spaces
Integrate modular systems into traditional kitchens by specifying custom wood trim kits that frame modules like furniture. Choose knob styles that match cabinet hardware—many manufacturers offer traditional turned-wood knob options. Use modules with beveled edges that echo classic range details. Place modules within a furniture-style surround that mimics a hearth, maintaining the traditional kitchen’s architectural integrity while concealing modern technology.
Common Mistakes to Avoid When Choosing Modular Cooktops
Underestimating Total Power Requirements
The most frequent error is specifying modules based on average use, not peak demand. During holidays or dinner parties, you’ll likely operate every module simultaneously. Calculate your electrical service requirements using maximum simultaneous load, not typical use. Install 20% capacity beyond calculations—this prevents nuisance tripping and accommodates future module upgrades. Gas systems need 1-inch trunk lines, not ¾-inch, to handle multiple high-BTU burners without pressure starvation.
Poor Ventilation Planning That Compromises Performance
Many homeowners install inadequate ventilation, rendering powerful modules useless. A 20,000 BTU wok burner requires 200 CFM minimum; four modules may need 800+ CFM. Don’t rely on recirculating vents—they simply filter and return contaminated air. Plan ventilation early, not as an afterthought. Island installations without overhead structure should budget $3,000-5,000 for high-performance downdraft systems, not the $800 basic units that fail within months.
Ignoring Future Flexibility During Initial Installation
Failing to plan for expansion is a costly mistake. Run extra conduit, stub out additional gas lines, and install junction boxes for two more modules than currently planned. The incremental cost during construction—perhaps $500—is trivial compared to $2,000+ to open walls later. Choose control systems that support expansion; some entry-level hubs max out at four modules, forcing complete replacement to add a fifth. Document everything—photograph rough-in stages, label wires, and create an as-built diagram stored with your home documents.
Future Trends in Modular Cooking Technology
AI-Powered Cooking Assistance and Automation
Next-generation modules will incorporate thermal imaging cameras and weight sensors that recognize ingredients and suggest optimal cooking parameters. Imagine placing a steak on a module that automatically detects thickness, calculates sear time, and communicates with adjacent modules to coordinate side dishes. Early systems already offer guided cooking programs; expect full autonomy within five years, where modules self-adjust based on real-time food temperature feedback.
Sustainable Energy Integration and Solar Compatibility
As homes adopt solar panels and battery storage, modular cooktops will integrate with home energy management systems to optimize power consumption. Induction modules will automatically adjust output to stay within solar generation capacity, drawing from batteries only when necessary. Some manufacturers are developing DC-powered modules that connect directly to solar systems, bypassing inefficient AC conversion. Gas modules will incorporate hydrogen-blend compatibility, future-proofing for renewable gas infrastructure.
Modular Refrigeration and Complete Culinary Ecosystems
The modular concept is expanding beyond cooking to include refrigeration drawers, wine columns, and prep stations that use the same mounting and control systems. Soon you’ll design complete “culinary walls” where cooking, cooling, and storage modules interchange seamlessly. This ecosystem approach allows unprecedented kitchen reconfiguration—transforming a baking station into a cocktail bar by swapping modules in an afternoon, not a major renovation.
Frequently Asked Questions
What is the average cost of a modular cooktop system? A complete system typically ranges from $5,000 to $15,000 installed, including modules, ventilation, and infrastructure. Entry-level two-module induction systems start around $3,500, while premium six-module configurations with specialty units can exceed $20,000. The key is comparing total project cost against traditional ranges plus the value of flexibility and future adaptability.
Can I mix gas and induction modules in one configuration? Absolutely, and this hybrid approach is increasingly popular. Most manufacturers design control systems to handle mixed fuel types seamlessly. You’ll need both gas and electrical rough-ins, but the modules communicate through a unified interface. This combination offers the best of both worlds: gas for high-heat searing and visual feedback, induction for precise simmering and safety.
How many modules do I need for a family of four? Most families find three modules ideal: a two-burner gas module, a single induction zone, and a griddle or additional gas burner. This provides versatility without wasted space. However, avid cooks or entertainers often prefer four modules—adding a dedicated wok burner or second induction zone. Start with three, but rough-in for four to preserve future expansion options.
Are modular cooktops harder to clean than traditional ranges? Cleaning complexity depends on module type. Induction modules clean easiest—flat glass surfaces wipe clean quickly. Gas modules require more maintenance—removing grates and burner caps weekly—but individual components are smaller and more manageable than lifting a range top. The flush installation eliminates the crevice where ranges meet countertops, reducing grime buildup. Overall, maintenance time is comparable, but modular systems offer easier access to individual components.
Do modular cooktops require special countertops? Standard countertop materials work, but thickness and fabrication quality matter more. Stone countertops need minimum 1¼-inch thickness for proper module support. Laminate countertops require additional substrate reinforcement, as the particleboard core can sag under module weight. Butcher block needs sealing with heat-resistant, food-safe finishes. The critical factor is precise fabrication—any material works if cut accurately and supported properly.
Can I add modules later after initial installation? Yes, if you planned appropriately. Running extra electrical circuits, gas lines, and control system capacity during initial installation makes future additions straightforward—essentially plug-and-play. Without this foresight, adding modules requires reopening walls and countertops, often costing more than the module itself. Always install control hubs and junction boxes rated for 50% more capacity than your current module count.
What ventilation CFM is recommended for a 4-module system? Calculate based on total BTU output: add all module maximum BTUs, divide by 10,000, then multiply by 100 CFM. For a typical system totaling 60,000 BTUs, plan 600 CFM. Apply a 0.75 diversity factor if you won’t operate all modules at maximum simultaneously, yielding 450 CFM. Add 50 CFM per linear foot of cooktop width for ambient capture. Most four-module systems perform well with 500-700 CFM overhead ventilation.
Are modular cooktops energy efficient compared to traditional ranges? Induction modules are exceptionally efficient—90% energy transfer versus 40% for gas and 55% for electric radiant. However, system efficiency depends on usage patterns. Gas modules waste energy heating the kitchen, but gas itself often costs less than electricity per BTU. The modular advantage is using only what you need—heating one small induction zone rather than a full range surface. Most users see 15-25% energy savings after switching from traditional ranges.
How long do modular cooktop systems typically last? Quality modular systems last 15-20 years with proper maintenance. Gas modules often exceed 20 years as they contain fewer electronic components. Induction modules typically last 10-15 years before power electronics degrade. The advantage is replaceability—if an induction module fails after 12 years, you replace that one unit ($1,500) rather than the entire system. Traditional ranges often require complete replacement when major components fail after 10-15 years.
Can modular cooktops be installed in outdoor kitchens? Specialized outdoor-rated modules exist, but standard indoor units fail quickly in unprotected environments. Outdoor modules feature weatherproof seals, corrosion-resistant components, and enhanced ventilation for safety. They cost 40-60% more than indoor equivalents. Even with outdoor-rated equipment, protect modules from direct rain and extreme temperatures. Covered patio installations with partial walls perform significantly better than fully exposed locations. Always verify local codes—some jurisdictions prohibit gas appliances in certain outdoor configurations.