Tackling a kitchen upgrade yourself can feel like navigating a labyrinth of technical specs, safety codes, and horror stories about gas leaks. But here’s the truth: the rangetop landscape has evolved dramatically, and 2026’s newest models are engineered with you—the weekend warrior, the tool-belt aficionado, the “I can absolutely do this myself” homeowner—in mind. Manufacturers have finally cracked the code on demystifying installation, packaging sophisticated cooking power into systems that practically guide themselves into place.
This shift isn’t just about saving a few hundred dollars on professional installation fees. It’s about empowerment, customization, and the satisfaction of knowing every inch of your culinary command center because you placed it there yourself. Whether you’re converting from electric to gas, upgrading your cooking capacity, or building your dream kitchen from scratch, understanding what makes a rangetop genuinely DIY-friendly will transform your project from daunting to doable. Let’s dissect the features, technologies, and insider knowledge that separate a straightforward Saturday installation from a weekend-killing nightmare.
Top 10 Rangetops with Easy Installation Kits
Detailed Product Reviews
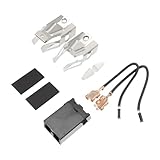
1. Supplying Demand 330031 5303935058 4 Pack Electric Range Top Burner Receptacle and Wire Replacement Kit

Overview: The Supplying Demand 330031 kit is a comprehensive replacement solution for failed electric range burner receptacles. This 4-pack addresses a common failure point where oil and grease compromise electrical connections, causing burners to malfunction or stop working entirely. Compatible with numerous major brands through extensive cross-referencing, the kit includes everything needed for complete receptacle replacement.
What Makes It Stand Out: This kit’s standout feature is its exceptional compatibility, replacing over 50 part numbers across brands. Unlike basic replacements, it includes dual bracket styles, high-temperature wire leads, connectors, screws, and heat-shrink insulators. The manufacturer provides video guidance for model verification, demonstrating commitment to proper installation. Supplying Demand packages these components in a complete kit rather than forcing multiple purchases.
Value for Money: At $15.59 for four complete receptacles, this kit costs under $4 per burner repair—significantly less than OEM parts or service calls. Considering each kit contains 8 wire leads, 8 connectors, and multiple brackets, the component value exceeds the price. Professional repair could cost $150-200, making this an economical DIY solution for multi-burner issues.
Strengths and Weaknesses: Strengths include comprehensive compatibility, complete parts inclusion, high-temp materials, and clear guidance. Weaknesses involve requiring electrical knowledge, the critical need for model verification, and time-intensive installation. Some users may find the multiple bracket options confusing without careful comparison to original parts.
Bottom Line: This kit is essential for DIY-savvy homeowners with multiple burner failures. The extensive compatibility and complete component set make it an outstanding value, but verify your model first and only attempt installation if you’re comfortable with basic electrical work.
2. 12200035 Range Top Burner Control Knob Kit Compatible with Whirlpool Cooktop AP4011301 7-3272 7-3272 7-4844

Overview: This 12200035 knob kit restores precise control to compatible Whirlpool cooktops where original knobs have cracked or worn out. Designed for extensive model compatibility across C-series, G-series, and numeric variants, these replacements address a common wear point in aging appliances. The kit ensures users regain accurate flame and heat adjustment capability.
What Makes It Stand Out: Manufactured from high-strength, heat-resistant plastic, these knobs undergo rigorous testing for frequent use and high-temperature endurance. The precision-engineered connection points ensure smooth valve operation across the full temperature range. Installation requires no professional tools or expertise, making it genuinely accessible for all users. The aesthetic design matches original equipment appearance.
Value for Money: At $38.99, this kit positions itself as a mid-range alternative to OEM parts. While pricier than generic options, the heat-resistant formulation and precise fit justify the cost compared to $50+ OEM knobs. Given that knob failure typically occurs in sets, purchasing a complete kit prevents mismatched replacements and future failures.
Strengths and Weaknesses: Strengths include durable heat-resistant construction, precise control restoration, simple tool-free installation, and extensive compatibility documentation. Weaknesses are the premium price point over basic replacements, plastic material (though high-grade), and potential discoloration over years of heat exposure. Some users may need to verify stem dimensions for perfect fit.
Bottom Line: Ideal for Whirlpool owners prioritizing durability and precise control. The investment pays off through reliable performance and matched aesthetics. Verify your model number before purchasing, but expect straightforward installation and restored functionality.
3. 1 Set Oven Accessories Terminal Block Range Receptacle Burner Receptacle Kit Refrigerator Accessories Range Top Burner Accessories Metal Oven Receptacle Kit Heating Stove Abs
Overview: This budget-friendly terminal block kit serves as a basic replacement for 330031-compatible range receptacles. The set provides fundamental components needed to restore electrical connection between burner elements and power supply. Marketed as a universal solution, it targets cost-conscious consumers seeking quick fixes for single-burner issues.
What Makes It Stand Out: The primary distinguishing factor is aggressive pricing at under $10, making it the most economical option for receptacle replacement. The kit focuses on essential functionality without premium packaging or extensive accessories. Its straightforward design appeals to users needing simple, no-frills repairs for secondary burners or temporary solutions.
Value for Money: At $9.99, this kit costs roughly half of brand-name alternatives. However, the vague product description and unspecified materials raise quality concerns. While suitable for occasional-use burners or emergency repairs, the long-term reliability remains questionable compared to kits with high-temp wire and detailed specifications. Professional installation might negate any savings.
Strengths and Weaknesses: Strengths include unbeatable price, basic compatibility with common receptacle types, and simplicity for straightforward replacements. Weaknesses involve minimal product information, unknown material specifications, lack of detailed instructions, and no included wire leads or advanced connectors. The generic branding offers no warranty clarity.
Bottom Line: Consider this only for non-critical burners or as a temporary fix. While the price is attractive, invest in a more comprehensive kit for daily-use burners or if you require high-temperature durability and clear installation guidance. Verify all specifications before purchasing.
4. Natural Gas Orifice Nozzle Conversion Kit,Fit for Blackstone 28-Inch and 36-Inch Griddles Propane to Natural Gas Kits,Brass Burner Nozzle Replacement Parts, Rangetop Combo

Overview: This brass nozzle conversion kit enables Blackstone 28-inch and 36-inch griddle owners to switch from propane to natural gas efficiently. Designed specifically for Blackstone’s popular outdoor cooking platforms, the kit includes 16 precision-drilled brass nozzles in varying sizes for main and side burners, plus installation tools. The conversion supports permanent natural gas line connections.
What Makes It Stand Out: The high-grade solid brass construction ensures corrosion resistance and high-temperature durability unmatched by aluminum alternatives. The comprehensive kit includes a dedicated nozzle tool and organized storage case—rare inclusions at this price point. Precisely drilled orifice diameters optimize combustion efficiency, eliminating backfire and uneven heating issues common in generic conversions.
Value for Money: At $13.29, this kit delivers exceptional value with 16 brass nozzles, a specialized tool, and storage case. Individual brass orifices typically cost $3-5 each, making this bundle economically compelling. The DIY-friendly design eliminates $150+ professional conversion costs, while the durable materials ensure long-term reliability and safety.
Strengths and Weaknesses: Strengths include premium brass construction, perfect Blackstone compatibility, complete tool inclusion, organized storage, and optimized combustion performance. Weaknesses involve specific model limitations (no AirFryer models, 1902 Culinary restrictions), DIY installation risks if not properly sealed, and requirement for natural gas line availability.
Bottom Line: An outstanding value for Blackstone owners ready to commit to natural gas. The quality materials and complete tooling make this a safe, cost-effective alternative to professional conversion. Ensure your model is compatible and follow installation instructions meticulously for leak-free operation.
Why Easy Installation Matters for DIY Enthusiasts
Understanding Rangetop Installation Complexity
Traditional rangetop installations were essentially contractor-only territory, requiring specialized tools, flexible gas lines, precise electrical connections, and enough code knowledge to make your head spin. The complexity stemmed from variable cabinet dimensions, inconsistent gas supply pressures, and electrical panels that rarely matched the appliance’s requirements. In 2026, forward-thinking manufacturers have standardized mounting systems and created modular connection points that eliminate guesswork. The real game-changer is the integration of self-diagnostic systems that communicate compatibility issues before you even tighten the first screw, preventing costly mistakes and dangerous misconfigurations.
The Rise of DIY-Friendly Appliance Design
The democratization of high-end kitchen appliances didn’t happen by accident. Consumer demand for transparency and control has pushed engineering teams to rethink every aspect of the installation process. We’re seeing magnetic alignment guides, color-coded connection systems, and even augmented reality apps that overlay installation steps directly onto your workspace. This trend reflects a broader movement toward user-centric design, where the assumption isn’t that you’ll hire a pro, but that you might want to tackle it yourself—and the product should support that ambition without compromising safety or performance.
Key Features That Define “Easy Installation”
Pre-Configured Gas Line Connections
The heart of any gas rangetop installation is the gas connection, and this is where modern designs truly shine. Look for models featuring captive nut systems that thread onto your existing gas line with minimal torque and integrated leak detection sensors that provide audible and visual confirmation of a secure seal. The best designs include a built-in pressure gauge that verifies proper gas flow before you even light the first burner, eliminating the bubble-test anxiety that plagued DIY installations for decades. These systems often come with factory-installed regulators set for either natural gas or propane, with clear labeling and simple conversion procedures.
Tool-Free Mounting Systems
Forget the days of needing a full socket set and a contortionist’s flexibility. Contemporary rangetops employ spring-loaded clamping mechanisms that secure the unit to your countertop from above. These systems typically engage with a simple quarter-turn of a large, ergonomic knob—no more lying on your back inside the cabinet trying to thread bolts you can’t see. Some premium designs use a cam-lock system that draws the rangetop downward, creating a seamless seal against the counter surface while simultaneously leveling the unit. This dual-action approach ensures both aesthetic perfection and structural stability without a single wrench.
Plug-and-Play Electrical Configurations
Electrical connections have historically been the DIY killer, but 2026’s models increasingly feature quick-connect terminals that are pre-wired from the factory. These systems accept either a direct wire connection or a standardized range cord, with clear, foolproof terminals that prevent reverse polarity issues. The most advanced units include a built-in circuit tester that illuminates when proper voltage and grounding are confirmed, taking the mystery out of whether your 240V supply is correctly configured. For gas rangetops with electric ignition, look for models that include a standard 120V plug for ignition power, separate from any high-voltage requirements.
Decoding Installation Kit Components
Standard vs. Premium Kit Inclusions
Not all installation kits are created equal, and understanding the difference can save you multiple trips to the hardware store. Standard kits typically include basic mounting hardware, a simple gas connector, and a generic sealant. Premium kits, however, are where the real value lies for DIY enthusiasts. These often contain flexible gas lines with pre-installed flared fittings, multiple adapter options for different gas line sizes, specialized sealing compounds rated for high temperatures, and even disposable leak detection solution. The premium tier might also include anti-tipping brackets with template guides and cable management clips to keep everything neat and code-compliant.
Adapter Fittings and Conversion Tools
The unsung heroes of any installation kit are the adapter fittings. A truly comprehensive kit will include both 1/2-inch and 3/4-inch NPT adapters, flare-to-pipe thread converters, and the specialized orifice spud wrenches needed for gas type conversions. For propane conversions, the best kits provide pre-calibrated orifices with thread-locking compound already applied, plus a clearly labeled adjustment screw for the regulator. Some cutting-edge kits even include a small bottle of gas line thread sealant that’s specifically formulated to work with both steel and brass fittings—a detail that matters more than you’d think when you’re standing in your kitchen at 9 PM on a Saturday.
Gas vs. Electric: Which Is Truly DIY-Friendly?
Natural Gas Considerations for Home Cooks
Natural gas rangetops offer unparalleled heat control, but they come with legitimate safety concerns that easy-install designs address head-on. The key is finding models with a sealed burner design that prevents spills from entering the burner box, making cleanup safer and simpler. Modern DIY-friendly gas rangetops feature standing pilot lights (or more commonly, electronic ignition systems) that are pre-adjusted for standard municipal gas pressure—typically 7 inches of water column. The installation kit should include a pressure regulator that’s already set to this specification, with a clear pressure tap for verification if you’re feeling particularly meticulous.
Propane Conversion Made Simple
If you’re running on propane, the conversion process has historically been a deal-breaker for DIYers. Today’s best designs flip this script by shipping with both natural gas and propane orifices in the same kit, plus a regulator that’s adjustable without disassembly. Look for rangetops where the conversion involves simply swapping orifices (often color-coded) and rotating a regulator cap 180 degrees. The manual should include a propane-specific leak test procedure and BTU output verification chart. Some manufacturers have even started including a small bottle of propane odorant to help you detect leaks during the initial pressurization—an innovation that adds a significant safety margin for first-time installers.
Induction and Electric Smooth Top Advantages
From a pure installation perspective, electric and induction rangetops are the undisputed champions of DIY-friendliness. The absence of gas lines eliminates the primary safety concern, and the electrical connections are becoming increasingly standardized. Induction models, in particular, are gaining traction in the DIY market because they require less precise ventilation than gas and often feature lighter-weight construction that’s easier to maneuver into place. The key consideration is ensuring your electrical panel can handle the load—most 36-inch induction rangetops require a dedicated 50-amp circuit, while gas models with electric ignition might only need a standard 15-amp outlet.
Ventilation Requirements Made Simple
Downdraft vs. Overhead Ventilation Compatibility
Your rangetop installation isn’t complete without considering ventilation, and this is where many DIY projects stumble. Easy-install rangetops in 2026 are increasingly designed with downdraft compatibility in mind, featuring integrated mounting points for retractable vent systems. These designs include pre-cut ductwork pathways and template guides that show exactly where to drill for downdraft installation. For overhead ventilation, look for models with built-in damper systems and standardized duct collar sizes (typically 6-inch round or 3.25x10-inch rectangular) that mate directly with most range hoods without custom transitions.
Clearance Specifications You Can’t Ignore
Every rangetop has non-negotiable clearance requirements, and the best DIY-friendly models make these impossible to miss. Top-tier units feature physical spacers or alignment tabs that ensure you maintain the required 30-inch minimum clearance to combustible surfaces above the cooking surface. The installation manual should include a full-size template that you can tape to your wall to visualize hood placement. Some manufacturers have developed AR apps that project the required clearances onto your actual space using your smartphone camera, turning a tape-measure nightmare into a visual confirmation that takes seconds.
Electrical and Gas Supply Prep Work
Circuit Requirements for High-Powered Rangetops
Before you even unbox your new rangetop, you need to verify your electrical infrastructure. For electric models, this means confirming you have a dedicated circuit with the correct amperage—typically 40-50 amps for induction, 30-40 amps for standard electric. The best installation kits include a voltage tester that plugs into your range outlet and confirms proper polarity and grounding. For gas rangetops with electric features, ensure you have a 120V GFCI-protected outlet within 3 feet of the installation location. Some jurisdictions require a dedicated circuit even for gas ignition, so check local codes before proceeding.
Gas Line Sizing and Shut-Off Valve Essentials
Gas supply preparation is where DIY installations succeed or fail. Your gas line must be appropriately sized—typically 3/4-inch for most 36-inch rangetops, though some high-BTU models require 1-inch lines. The installation kit should include a flexible connector rated for your unit’s total BTU output, but you must verify your shut-off valve is accessible and within 3 feet of the appliance location. Modern DIY-friendly designs accommodate both front and rear gas connections, with removable access panels that make valve installation straightforward. The kit should also include a sediment trap (drip leg) if your local code requires one, with clear instructions on orientation and placement.
Smart Features That Simplify Setup
Bluetooth-Assisted Calibration
The integration of smart technology has revolutionized the DIY installation process. High-end rangetops now feature Bluetooth connectivity that pairs with a smartphone app to guide you through calibration step-by-step. The app can detect when each burner is properly seated, when gas pressure is optimal, and even when your ventilation system is providing adequate airflow. This real-time feedback transforms installation from a static manual-reading exercise into an interactive process where the appliance itself confirms each step is completed correctly. Some systems can even detect the altitude of your installation and automatically adjust gas mixture ratios for optimal combustion.
Digital Installation Guides and AR Support
Paper manuals are becoming extinct, replaced by dynamic digital guides that update based on your specific model and configuration. The most advanced systems use augmented reality to project installation steps onto your actual workspace. Point your phone at the gas line connection, and the app highlights the exact fitting to use. Scan the countertop cutout, and AR overlays show whether dimensions meet specifications. This technology is particularly valuable for visualizing complex steps like regulator adjustment or orifice replacement, where a 2D diagram simply can’t convey the spatial relationships involved.
Safety Certifications and Code Compliance
UL and CSA Standards Explained
Every legitimate rangetop sold in North America must carry UL (Underwriters Laboratories) or CSA (Canadian Standards Association) certification, but not all certifications are equal for DIY installations. Look for models certified to UL 858 (Household Electric Ranges) or ANSI Z21.1 (Gas Appliances) with specific language in the manual about homeowner installation. The best manufacturers include a code compliance checklist in their installation kit, covering everything from electrical grounding methods to gas line shut-off valve placement. This documentation can be invaluable if a home inspector questions your work during a future sale.
Local Permit Requirements for DIY Projects
Before you start, understand that many jurisdictions require permits for gas appliance installations, even when performed by homeowners. The most DIY-friendly manufacturers anticipate this by including permit-ready documentation in their installation kits. This typically includes a pre-filled specification sheet with all relevant model numbers, BTU ratings, and installation clearances that you can submit to your building department. Some even provide a “homeowner installer affidavit” that satisfies local requirements for self-installed appliances. Ignoring permit requirements can void your homeowner’s insurance, so this isn’t a corner to cut.
Common Installation Pitfalls and How to Avoid Them
Leveling Challenges on Uneven Countertops
A rangetop that’s not perfectly level leads to uneven heating, poor performance, and potential safety issues. Modern DIY-friendly designs address this with oversized leveling legs that provide up to 1.5 inches of adjustment and built-in bubble levels integrated into the cooktop surface. The installation kit should include shims specifically rated for high-temperature applications, plus a flexible sealant that accommodates minor countertop imperfections. Some premium models feature a self-leveling frame that uses spring tension to automatically compensate for up to 3/8-inch of counter unevenness—a feature that can save hours of frustration.
Sealing and Insulation Mistakes
Improper sealing around your rangetop allows heat and combustion byproducts to escape into your cabinetry, creating fire hazards. The best installation kits include high-temperature silicone sealant and pre-cut insulation strips that fit the exact perimeter of the unit. For gas rangetops, pay special attention to the seal between the appliance and countertop—this prevents spills from dripping into the cabinet below and protects the gas controls from moisture. Electric and induction models require insulation pads to prevent heat transfer to surrounding surfaces. The kit should provide enough material for a proper seal plus a small margin for error, and the manual should include photos showing the correct bead size and placement.
Cost Analysis: DIY Savings vs. Professional Installation
The financial equation extends beyond the obvious labor savings of $300-$800. When you install yourself, you control the timeline, avoid scheduling hassles, and gain intimate knowledge of your appliance’s workings. However, factor in potential costs: permit fees ($50-$150), specialized tools you might need to purchase ($100-$300), and the value of your time. The real ROI comes from the premium installation kits that manufacturers now bundle with DIY-friendly models. These kits, which might add $75-$150 to the purchase price, contain components that would cost twice as much if purchased separately and can make the difference between a smooth installation and a frustrating ordeal.
Maintenance Access and Future-Proofing
A rangetop that’s easy to install should also be easy to service. Look for designs where the top panel lifts off without tools, exposing burners, igniters, and gas valves for cleaning and replacement. The installation kit should include spare igniter electrodes and burner seals, acknowledging that these are the most common failure points. For electric models, ensure the junction box is easily accessible without removing the entire unit from the countertop. Some forward-thinking designs include QR codes on internal components that link to replacement part ordering pages and video tutorials for common repairs, extending the DIY ethos beyond initial installation through the entire product lifecycle.
Warranty Implications of DIY Installation
Here’s a critical detail many DIYers overlook: installing the appliance yourself doesn’t automatically void the warranty, but improper installation does. Manufacturers of truly DIY-friendly rangetops have adjusted their warranty language to accommodate homeowner installations, provided you follow their procedures exactly. The installation kit plays a crucial role here—using the included components and documenting the process with photos can protect your warranty rights. Some brands now offer an extended warranty bonus (an additional year) if you register your installation through their app, which walks you through each step and creates a digital record of compliance. Always retain your installation manual with the completed checklist, as this serves as proof of proper installation if a warranty claim arises.
Frequently Asked Questions
Can I legally install a gas rangetop myself, or do I need a licensed professional?
In most jurisdictions, homeowners can legally install their own gas appliances, but you must obtain the proper permits and pass inspections. Requirements vary significantly—some areas allow homeowner installation with a simple affidavit, while others mandate professional installation for gas lines. Always check with your local building department before starting. Using a manufacturer-certified DIY installation kit doesn’t exempt you from local codes, but it does provide documentation that can satisfy inspector requirements.
What tools will I absolutely need that aren’t included in a typical installation kit?
Even the most comprehensive kits assume you have basic hand tools: a cordless drill with nut driver bits, a level (though some kits include a small one), adjustable wrench, tape measure, and utility knife. You may need a pipe wrench if you’re installing a new gas shut-off valve, and a non-contact voltage tester for electrical work. The one tool worth investing in is a digital manometer to verify gas pressure—while not strictly required, it provides peace of mind that pressure is within the 7-14 inches of water column range.
How do I know if my existing gas line is adequate for a new high-BTU rangetop?
Calculate your total BTU output (all burners combined) and compare it to your line capacity. A 1/2-inch gas line typically supports up to 70,000 BTUs over 10 feet; 3/4-inch handles up to 150,000 BTUs. If your rangetop exceeds these thresholds or your line run is longer than 20 feet, you’ll need to upgrade the line. Many installation kits include a gas load calculation worksheet. When in doubt, have a plumber assess your system before purchase—it’s cheaper than discovering inadequacies mid-installation.
What’s the difference between a standard 120V plug and the 240V required for electric rangetops?
The 240V circuit provides two hot wires delivering 120V each, creating the higher voltage needed for powerful heating elements. This requires a different outlet configuration (typically NEMA 14-50) and a dedicated circuit with heavier gauge wire (6 AWG for 50-amp service). You cannot simply adapt a standard 120V outlet. The installation kit for electric models should include a wiring diagram showing proper connections to your panel, but running new 240V service is often where DIYers should consider professional help.
How long should a DIY rangetop installation realistically take?
For a straightforward replacement using an easy-install kit, budget 2-3 hours if you have basic DIY skills and proper preparation. First-time installations involving new gas lines or electrical circuits can take 6-8 hours spread across two days (accounting for inspection appointments). The actual appliance connection typically takes 30-45 minutes; most time is spent on preparation, verification, and testing. Installation kits with AR guidance can reduce this by 30-40% by eliminating manual consultation time.
Are flexible gas lines safe for DIY installation, or should I use rigid pipe?
Modern flexible gas connectors certified to ANSI Z21.24 are perfectly safe when installed correctly and are actually preferred for DIY installations because they accommodate minor misalignments. The key is using a connector rated for your appliance’s BTU output and ensuring it’s not kinked or stressed. Installation kits include connectors specifically sized for the rangetop. Rigid pipe requires threading and precise measurements—skills most DIYers lack. Never reuse an old flexible connector; the corrugated metal fatigues over time and can fail.
What are the most common reasons DIY rangetop installations fail inspection?
The top three inspection failures are: 1) Improper gas shut-off valve location (must be in same room, within 6 feet, and accessible), 2) Missing or incorrectly installed sediment trap/drip leg, and 3) Inadequate electrical grounding or wrong outlet type for electric models. Premium installation kits include inspection checklists that address these exact issues. Taking photos at each step of your installation creates a visual record that can help resolve inspector concerns without requiring disassembly.
Can I install a rangetop on a kitchen island, or does that complicate the DIY process?
Island installations are absolutely DIY-feasible but require additional planning. You’ll need to run either gas lines or 240V electrical service through the floor, which may involve drilling through subflooring. Ventilation is the real challenge—island setups typically need downdraft systems or ceiling-mounted hoods with remote blowers. Many 2026 rangetop models include island installation templates and cable management systems specifically for this scenario. Factor in an extra 3-4 hours for island installations, and consider renting a right-angle drill for floor penetration work.
How do I test for gas leaks without professional equipment?
While a digital manometer is ideal, the soap bubble test remains the standard for DIY verification. Mix dish soap with water (a 1:1 ratio) and apply it to every connection using the brush included in quality installation kits. Turn on the gas supply and watch for growing bubbles, which indicate leaks. Never use a flame to test for leaks. Some premium installation kits now include a small spray bottle of leak detection fluid that’s more sensitive than soap solution. Always perform this test twice: once after initial connection and again after the appliance has been operating for 30 minutes, as thermal expansion can reveal leaks that weren’t initially present.
What should I do if I smell gas after installation but can’t find the leak?
If you detect gas odor, immediately shut off the gas valve, ventilate the area, and evacuate if the smell is strong. Don’t attempt to locate the leak yourself at this point. Small leaks below the detection threshold of soap tests can exist. Call your gas utility company’s emergency line—they’ll typically send a technician with electronic detection equipment at no charge. This isn’t a failure; it’s exactly what the safety systems are designed for. Once the leak is located, you can address it yourself if it’s a simple fitting issue, or call a professional if it’s more complex. Document everything for your installation records and warranty protection.