There’s something magical about gathering friends and family around a wood-fired pizza oven in your own backyard. The crackle of the fire, the aroma of bubbling mozzarella and charred crust, and the primal satisfaction of cooking with flame create an experience that gas grills simply can’t replicate. Outdoor brick pizza oven kits have revolutionized the DIY landscape, transforming what was once a specialized masonry project into an achievable weekend warrior endeavor for passionate home cooks.
But here’s the reality: not all pizza oven kits are created equal. The market has exploded with options ranging from $500 modular systems to $5,000+ professional-grade packages, each promising authentic Neapolitan pizzas in 90 seconds. The difference between a disappointing purchase and a lifetime of perfect pies lies in understanding the nuances of thermal dynamics, material quality, and your own DIY capabilities. This comprehensive guide cuts through the marketing noise to equip you with the knowledge to select, install, and maintain a brick pizza oven kit that will become the heart of your outdoor living space for decades.
Top 10 Outdoor Brick Pizza Oven Kits
Detailed Product Reviews
1. GIRtech BRAVO Wood Burning Fire Brick Pizza Oven for Outdoor Cooking - FULLY DIY KIT - Includes Firebrick Set, Refractory Glue, Trowel, Gloves, Cover, Steel Gate, Assembly Instructions (3 hours)

Overview:
The GIRtech BRAVO Wood Burning Fire Brick Pizza Oven is a comprehensive DIY kit that brings authentic wood-fired cooking to your backyard. This fully-equipped package includes everything needed to assemble a durable, high-performance brick oven in just 3-4 hours, from firebricks and refractory glue to a trowel, gloves, and protective cover. Designed for outdoor use, it reaches 750°F operating temperature, perfect for Neapolitan-style pizzas, roasted meats, fish, vegetables, and baked goods.
What Makes It Stand Out:
Unlike modular metal ovens, the BRAVO uses genuine firebrick construction with refractory mortar, delivering superior heat retention and authenticity. The kit includes 26 precision-cut bricks (9 hearthstones, 17 shaped blocks) that interlock without additional machining. With a 620 sq. in. bottom area and 21.6" x 11.8" baking surface, it accommodates multiple dishes simultaneously. The included STOVEFLEX 1600 glue withstands temperatures up to 3070°F, ensuring decades of durability.
Value for Money:
At $855, this kit costs significantly less than pre-assembled brick ovens ($2,000-$5,000) while delivering comparable performance. The all-inclusive design eliminates guesswork and multiple trips to masonry suppliers. When factoring in the professional-grade materials and included accessories, it represents solid mid-range value for serious enthusiasts.
Strengths and Weaknesses:
Strengths include complete material inclusion, authentic brick construction, excellent heat retention, and manageable assembly time. Weaknesses involve the substantial weight requiring a stable foundation, permanent installation commitment, and the learning curve for mastering wood-fired temperature control. The steel gate could be more robust.
Bottom Line:
Ideal for dedicated outdoor cooks seeking authentic wood-fired flavor without professional installation costs. The GIRtech BRAVO balances quality, completeness, and price, making it a smart investment for backyard culinary enthusiasts ready to commit to a permanent fixture.
2. GIRtech BRAVO Wood Burning Fire Brick Pizza Oven for Outdoor Cooking - FULLY DIY KIT - Includes Firebrick Set, Refractory Glue, Trowel, Gloves, Cover, Steel Gate, Assembly Instructions (3 hours)
Overview:
The GIRtech BRAVO Wood Burning Fire Brick Pizza Oven is a comprehensive DIY kit that brings authentic wood-fired cooking to your backyard. This fully-equipped package includes everything needed to assemble a durable, high-performance brick oven in just 3-4 hours, from firebricks and refractory glue to a trowel, gloves, and protective cover. Designed for outdoor use, it reaches 750°F operating temperature, perfect for Neapolitan-style pizzas, roasted meats, fish, vegetables, and baked goods.
What Makes It Stand Out:
Unlike modular metal ovens, the BRAVO uses genuine firebrick construction with refractory mortar, delivering superior heat retention and authenticity. The kit includes 26 precision-cut bricks (9 hearthstones, 17 shaped blocks) that interlock without additional machining. With a 620 sq. in. bottom area and 21.6" x 11.8" baking surface, it accommodates multiple dishes simultaneously. The included STOVEFLEX 1600 glue withstands temperatures up to 3070°F, ensuring decades of durability.
Value for Money:
Priced at $959, this represents the higher end of the BRAVO’s market range. While still far cheaper than pre-built brick ovens ($2,000-$5,000), shoppers should verify they’re purchasing from an authorized dealer. The identical $855 version offers the same comprehensive kit, making price comparison essential. The value proposition remains strong, but the premium demands careful seller evaluation.
Strengths and Weaknesses:
Strengths include complete material inclusion, authentic brick construction, excellent heat retention, and manageable assembly time. Weaknesses involve the substantial weight requiring a stable foundation, permanent installation commitment, and the learning curve for mastering wood-fired temperature control. The steel gate could be more robust.
Bottom Line:
Verify seller authenticity before purchasing at this price point. For dedicated outdoor cooks seeking wood-fired authenticity, the BRAVO delivers exceptional quality, but the $855 alternative offers identical contents. Shop wisely to maximize this solid investment in backyard culinary capability.
3. Mattone Barile Grande DIY Wood Fired Pizza Oven - Build a Large Backyard Brick Oven with Locally Sourced Masonry Materials

Overview:
The Mattone Barile Grande DIY Wood Fired Pizza Oven is a form kit that enables building a large, authentic brick oven using locally sourced masonry materials. Unlike complete kits, this economical option provides the essential structural forms and instructions while requiring you to purchase firebricks, mortar, and insulation separately. This approach offers maximum customization for backyard chefs wanting a permanent, professional-grade cooking fixture tailored to their space.
What Makes It Stand Out:
This kit’s primary advantage is scalability and cost control. By sourcing materials locally, builders can create a substantially larger oven than pre-packaged kits allow, often at lower total cost. The form system eliminates complex masonry calculations, ensuring proper dome geometry and structural integrity without advanced skills. It’s ideal for those wanting a customized installation that integrates seamlessly with existing outdoor kitchens.
Value for Money:
At $229.99, the initial investment appears attractive, but total costs typically reach $800-$1,500 after purchasing firebricks, refractory mortar, insulation, and exterior finishes. While still cheaper than pre-built options, the hidden costs and labor requirements reduce the apparent savings. It’s best viewed as a middle ground between freehand building and all-inclusive kits.
Strengths and Weaknesses:
Strengths include lower base price, customization flexibility, potential for larger ovens, and educational building experience. Weaknesses involve significant additional material costs, extended construction time (days vs. hours), requirement for intermediate DIY skills, and no included accessories like peels or covers.
Bottom Line:
Perfect for experienced DIYers seeking a customized, larger-scale oven while controlling costs through local sourcing. Not recommended for beginners or those wanting quick assembly. If you have masonry confidence and time, this delivers professional results at substantial savings.
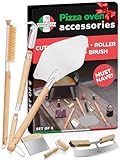
4. Senwosa Premium Pizza Oven Accessories Kit - 6-Piece Set for Home Pizza Making: Includes Pizza Peel, Oven Brush, Bubble Popper Turner, Rocker Cutter, Dough Roller & Scraper
Overview:
The Senwosa Premium Pizza Oven Accessories Kit is a comprehensive 6-piece toolset designed for home pizza makers using outdoor ovens. This all-in-one package includes a 12-inch aluminum pizza peel, 32-inch bubble popper/turner, oven brush, rocker cutter, dough roller, and scraper—everything needed to launch, rotate, retrieve, and serve wood-fired pizzas safely and professionally.
What Makes It Stand Out:
The kit’s universal compatibility with popular pizza oven brands makes it exceptionally versatile. The long wooden handles (up to 32 inches) provide crucial safety when working with 700°F+ ovens, while the angled aluminum peel design facilitates smooth pizza launching. Made from food-safe materials with professional-grade workmanship, these tools offer durability that exceeds typical consumer-grade alternatives.
Value for Money:
At $53.97, this set costs less than purchasing quality tools individually, where a single professional peel can exceed $40. For beginners transitioning from kitchen ovens to outdoor pizza making, it eliminates guesswork about which tools are essential. The included rocker cutter and dough accessories add value beyond basic peel-and-brush sets.
Strengths and Weaknesses:
Strengths include comprehensive selection, excellent safety features, universal compatibility, easy cleaning, and affordable pricing. Weaknesses involve the aluminum peel potentially sticking to wet dough (cornmeal required), basic quality compared to commercial-grade tools, and possible sizing issues with very small or oversized ovens.
Bottom Line:
An exceptional starter kit for new outdoor pizza oven owners. The Senwosa set provides essential safety and functionality at a compelling price point. While seasoned pizzaiolos may eventually upgrade individual pieces, this kit delivers everything needed to begin crafting authentic wood-fired pizzas immediately and safely.
5. Brick Oven Plans DIY Outdoor Cooking Pizza Patio Party Ribs Backyard Woodfired

Overview:
The Brick Oven Plans DIY package offers detailed instructions for constructing a wood-fired pizza oven in your backyard. This budget-friendly option provides architectural drawings, material lists, and step-by-step guidance for building a permanent brick oven from scratch, enabling custom integration with outdoor living spaces without the cost of pre-engineered kits.
What Makes It Stand Out:
At its core, this is an educational resource empowering true DIY construction. The plans presumably include foundation specifications, dome geometry calculations, ventilation requirements, and insulation details—knowledge typically requiring extensive research. For masonry-savvy builders, it eliminates design uncertainty while allowing complete material control and customization.
Value for Money:
At $14.95, this is the most economical entry point to brick oven ownership. However, the true cost extends to $1,000-$3,000 in materials and countless hours of labor. Unlike kits, there’s no customer support or pre-cut components. The value depends entirely on your skill level; it saves money only if your time and expertise are abundant.
Strengths and Weaknesses:
Strengths include minimal initial investment, maximum customization, educational value, and potential for premium results. Weaknesses involve requiring advanced masonry skills, significant material sourcing, extended construction timeline, no included components, and high error risk without experience.
Bottom Line:
Only recommended for experienced masons or ambitious DIYers with substantial construction knowledge. Beginners will find the lack of materials and support overwhelming. For those with the requisite skills, these plans offer incredible customization potential, but most homeowners are better served by form kits or complete DIY packages that provide materials and guidance.
6. Senwosa Pizza Oven Accessories Set - 3 Piece Pizza Making Kit with Pizza Peel, Pizza Oven & Stone Brush with Scraper, Turning Fork & Bubble Popper - Tools for Indoor Outdoor Brick Wood Gas Ovens

Overview:
The Senwosa three-piece accessories kit provides essential tools for any pizza oven enthusiast. This comprehensive set includes an aluminum pizza peel, adjustable turning fork, and a cleaning brush with integrated scraper—everything needed to launch, rotate, and maintain your pizza oven for optimal performance.
What Makes It Stand Out:
Safety takes center stage with extended 32-inch handles that keep hands comfortably away from intense heat. The versatile design works seamlessly across multiple platforms, fitting Ooni, Gozney, Blackstone, and conventional ovens over 12 inches. The heat-resistant stainless steel bristles combined with a sturdy scraper tackle stubborn residue effectively, preventing flavor transfer and ensuring consistently crispy crusts.
Value for Money:
At $45.97, this set offers reasonable value compared to purchasing tools separately. Mid-range pricing positions it as an accessible entry point for beginners while delivering professional-grade functionality. The quality materials suggest durability that justifies the investment over cheaper alternatives that might warp or fail under high heat.
Strengths and Weaknesses:
Strengths include comprehensive tool coverage, impressive safety features, and broad compatibility across oven brands. The extended handles provide excellent control and burn protection. However, the aluminum peel may be thinner than professional-grade options, potentially flexing with heavier pizzas. The brush’s long-term durability under repeated high-heat exposure remains to be seen, and storage can be cumbersome due to the lengthy handles.
Bottom Line:
This Senwosa kit delivers solid fundamentals for both novice and intermediate pizza makers. While not commercial-grade, it provides safe, functional tools that cover all essential pizza-making tasks. Perfect for family pizza nights and occasional outdoor entertaining.
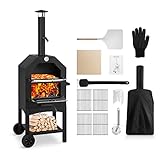
7. EDOSTORY Outdoor Pizza Oven, Wood Fired for Outside, Patio Maker With Stone, Peel, Grill Rack, and Waterproof Cover for Backyard Camping
Overview:
The EDOSTORY Outdoor Pizza Oven transforms backyard cooking into a versatile culinary experience. This wood-fired unit reaches 550°F in just 10 minutes, cooking pizzas in 6-7 minutes. Beyond pizza, it handles steaks, fish, bread, and vegetables, making it a multi-functional outdoor cooking station.
What Makes It Stand Out:
The integrated thermometer and adjustable chimney provide precise temperature and smoke control, while the detachable ash collector simplifies cleanup. Two large wheels and a side handle ensure easy mobility across patios or campsites. The powder-coated carbon steel shell offers superior heat retention and durability for consistent cooking performance.
Value for Money:
Priced at $179.99 with accessories valued at $199, this oven delivers exceptional value. The package includes a waterproof cover, 12-inch stone, peel, cutter, brush, oven glove, stands, baking trays, and carbon meshes. This all-in-one solution eliminates separate purchases, making it more economical than buying components individually.
Strengths and Weaknesses:
Strengths include rapid heating, excellent mobility, comprehensive accessory bundle, and sturdy iron construction. The adjustable ventilation system provides superior fire control. However, the 550°F maximum temperature may disappoint Neapolitan pizza purists seeking 800°F+ heat. The iron construction requires diligent maintenance to prevent rust, and the 12-inch stone limits pizza size.
Bottom Line:
The EDOSTORY oven excels as a versatile, mobile outdoor cooking solution. While not reaching professional pizza temperatures, its multifunctionality and generous accessory package make it an outstanding value for backyard enthusiasts and campers seeking more than just pizza.
8. HOW TO BUILD A WOOD-FIRED PIZZA OVEN: Step-by-Step Plans for an Outdoor Brick Oven & Grill

Overview:
This comprehensive guidebook provides detailed instructions for constructing a permanent wood-fired pizza oven and grill from scratch. Designed for DIY enthusiasts, it offers step-by-step plans that demystify the building process, enabling homeowners to create an authentic brick oven experience without professional masonry skills.
What Makes It Stand Out:
The book delivers practical, actionable plans specifically tailored for outdoor cooking structures, unlike generic masonry guides. It addresses critical factors like insulation, heat retention, and proper ventilation—elements essential for achieving 800°F+ temperatures. The grill integration adds versatility, allowing simultaneous pizza baking and traditional grilling.
Value for Money:
At $24.90, this book represents tremendous value compared to purchasing a pre-built oven costing $2,000-$5,000. It empowers homeowners to source local materials and customize dimensions to their space and cooking needs. The knowledge gained applies to future outdoor building projects, extending its value beyond a single build.
Strengths and Weaknesses:
Strengths include cost savings, customization freedom, and the satisfaction of building your own oven. The guide likely covers foundation work, dome construction, and finishing techniques. However, the project demands significant time, physical labor, and basic construction skills. Potential challenges include obtaining permits, sourcing proper firebricks, and ensuring structural safety without professional oversight.
Bottom Line:
Ideal for handy homeowners seeking a permanent, authentic pizza oven solution. This guide offers substantial savings and customization but requires commitment to a challenging multi-weekend project. Not suitable for renters or those wanting immediate results.
9. aidpiza Pizza Oven Outdoor 12" Wood Fired Pizza Ovens Pellet Pizza Stove for outside, Portable Stainless Steel Pizza Oven for Backyard Pizza Ovens

Overview:
The aidpiza portable pizza oven brings wood-fired flavor to any outdoor location. This compact 12-inch stove uses hardwood pellets to reach 662°F, cooking pizzas in minutes. Its stainless steel construction and folding legs make it ideal for backyard gatherings, camping trips, or tailgating events.
What Makes It Stand Out:
The built-in thermometer eliminates guesswork, displaying precise temperatures up to 662°F without requiring separate infrared tools. The folding leg design creates true portability, collapsing for easy transport and storage. Hardwood pellets deliver a balanced burn-smoke ratio, infusing food with authentic wood-fired flavor that gas alternatives cannot replicate.
Value for Money:
At $99.99, this oven sits at an attractive entry-level price point for wood-fired cooking. It offers significantly higher temperatures than comparably priced gas options while maintaining portability. The pellet fuel system provides cost-effective operation compared to propane, and the stainless steel construction ensures durability for the investment.
Strengths and Weaknesses:
Strengths include impressive portability, high heat output, authentic wood flavor, and straightforward temperature monitoring. The compact size suits small gatherings. However, pellet management requires practice to maintain consistent temperatures. The 12-inch cooking surface restricts pizza size, and the lightweight design may feel less stable on uneven surfaces. Wind can significantly affect performance.
Bottom Line:
The aidpiza oven excels for those prioritizing portability and authentic wood flavor over capacity. Best suited for couples, small families, or mobile pizza enthusiasts who don’t mind tending the pellet fire for optimal results.
10. Pizza Stone for Oven and Grill Set - 5PCS Pizza Making Accessories Kit - 15 inch Pizza Stone with Handles, Pizza Peel, Pizza Cutter, Dough Tool - Baking Stone for Bread - Large Rectangular Oven Stones

Overview:
This five-piece kit transforms conventional ovens and grills into pizza-making powerhouses. The 15-inch cordierite stone withstands temperatures up to 1500°F, ensuring crispy, evenly cooked crusts. The set includes an acacia wood peel, stainless steel cutter, dough tool, and removable handles—everything needed for home pizza production.
What Makes It Stand Out:
The stone’s exceptional 1500°F heat tolerance surpasses most competitors, preventing thermal shock cracking. Integrated handles double as a cooling rack, adding versatility. The rectangular shape accommodates various baked goods beyond pizza, including bread and pastries. Premium acacia wood on the peel provides an attractive serving option, while the complete kit arrives in gift-ready packaging.
Value for Money:
Priced at $47.11, this set offers remarkable value for a complete pizza system. Individual purchases of a quality cordierite stone, wood peel, and cutter would easily exceed $60. The inclusion of handles and dough tool makes this a comprehensive starter package for home bakers seeking professional results without specialized equipment.
Strengths and Weaknesses:
Strengths include superior heat resistance, versatile rectangular design, attractive wood peel, and excellent gift presentation. The stone distributes heat evenly for consistent baking. However, the 15-inch length may not fit smaller ovens, and cordierite requires careful preheating and cooling to prevent cracking. The peel’s smaller size demands precise launching technique.
Bottom Line:
An outstanding value for home cooks wanting to elevate their pizza and bread game. The exceptional heat tolerance and versatile design make it ideal for oven and grill use, though users must follow proper stone care protocols for longevity.
Why Choose a Brick Pizza Oven for Your Backyard?
Brick pizza ovens deliver a cooking experience that transcends mere convenience. Unlike metal or ceramic alternatives, brick structures develop a unique thermal fingerprint over time, absorbing flavors from countless fires and infusing them back into your food. The superior heat retention properties of properly cured refractory materials allow these ovens to maintain temperatures exceeding 800°F for hours after the flames die down, enabling you to bake bread, roast vegetables, and slow-cook meats long after your pizza party ends.
The aesthetic appeal is equally compelling. A well-crafted brick oven becomes a architectural anchor for your outdoor kitchen, creating a natural gathering point that elevates your entire backyard design. The investment also pays dividends in property value—landscape architects consistently rank outdoor pizza ovens among the top features that differentiate premium homes. But perhaps most importantly, building your own oven from a kit delivers a sense of accomplishment that store-bought alternatives simply cannot match.
Understanding Different Types of Pizza Oven Kits
Modular vs. Precast vs. Brick-by-Brick Kits
The DIY pizza oven market segments into three distinct categories, each catering to different skill levels and time commitments. Modular kits arrive as interlocking refractory concrete sections that stack like giant Legos, typically requiring 4-8 hours of assembly. These systems prioritize speed and simplicity, though you’ll sacrifice some customization flexibility.
Precast kits feature a single-piece or two-piece dome that eliminates the most technically challenging aspect of oven building—the arch. These heavyweight components (often 400+ pounds) demand mechanical lifting equipment but reduce construction time dramatically. The trade-off comes in transportation logistics and limited design options.
Brick-by-brick kits appeal to traditionalists seeking maximum customization. These packages include firebricks, refractory mortar, and detailed patterns but require advanced masonry skills. You’ll spend 20-40 hours carefully laying each brick, but the result is a completely personalized oven that showcases true craftsmanship.
Wood-Fired vs. Hybrid Fuel Options
Traditional wood-fired ovens represent the gold standard for flavor purists. The hardwood smoke imparts subtle nuances to your pizza while creating the intense, dry heat necessary for authentic leopard-spotted crusts. However, wood management demands practice—maintaining consistent temperature requires tending the fire and understanding log placement.
Hybrid kits incorporate gas burners as either primary or supplementary heat sources. A gas-assist feature lets you preheat the oven to 600°F in 30 minutes using propane, then switch to wood for the final flavor boost. Some advanced systems allow simultaneous gas and wood operation, giving you temperature precision without sacrificing authenticity. Consider your lifestyle: if weeknight pizzas appeal more than weekend projects, a hybrid system might justify its higher price tag.
Key Features That Define Quality
Thermal Mass and Heat Retention
The single most important specification is thermal mass—the oven’s ability to absorb and store heat. Quality kits use dense refractory materials weighing 4,000-6,000 pounds for a 32-inch oven. This mass determines how many pizzas you can cook sequentially and how long the oven stays hot for secondary cooking. Beware of lightweight “portable” kits under 1,500 pounds; they may reach pizza temperatures but cool rapidly, limiting functionality.
The floor thickness deserves special attention. A 2-inch firebrick hearth provides adequate thermal mass for occasional use, while 3-4 inch floors maintain consistent temperatures during marathon pizza sessions. Some premium kits feature interchangeable floor tiles, allowing you to replace worn sections without rebuilding the entire oven.
Insulation: The Secret to Efficiency
Insulation separates amateur ovens from professional performers. Quality kits specify at least 3 inches of ceramic fiber blanket insulation around the dome, plus 4-6 inches of vermiculite or perlite concrete underneath the hearth. This thermal barrier prevents heat from escaping downward and outward, directing energy into your cooking chamber where it belongs.
Insufficient insulation manifests as exterior dome temperatures exceeding 200°F—dangerously hot and wasteful. Well-insulated ovens keep exterior surfaces below 140°F even when interiors blaze at 900°F, protecting children and pets while reducing wood consumption by up to 40%. Always verify insulation specifications; some budget kits skimp here to cut costs.
Ventilation and Chimney Design
Proper draft management affects both performance and safety. The vent opening should measure approximately 60% of the oven door width, positioned directly above the entrance to capture smoke efficiently. Chimney height matters more than you might think—a 36-inch minimum above the dome creates adequate draw, while taller chimneys (48-60 inches) improve performance in windy locations.
Look for kits including adjustable dampers. These allow you to regulate airflow during firing and close the system when not in use, preventing moisture infiltration. Some designs incorporate secondary air intakes that introduce combustion air at the top of the chamber, creating cleaner burns and reducing wood consumption.
Sizing Your Oven: From Personal to Party-Size
Oven diameter directly impacts cooking capacity and heat-up time. A 28-inch internal floor suits couples or small families, heating to pizza temperatures in 45-60 minutes with minimal wood. The 32-inch size represents the sweet spot for most DIYers, accommodating two 10-inch pizzas simultaneously while still heating in under 90 minutes.
Step up to 36 or 40 inches if you regularly host gatherings of 15+ people. These larger ovens accept three pizzas at once or full-size sheet pans for bread baking. However, they require 2-3 hours to saturate with heat and consume significantly more wood. Remember that external dimensions add 8-12 inches to internal measurements for insulation and enclosure, so measure your patio space carefully.
Consider the oven mouth height as well. A 12-13 inch opening provides easy access for pizza peels while retaining enough heat. Taller openings (16+ inches) accommodate roasting pans but sacrifice efficiency for pizza-specific use.
Material Matters: Refractory Components Explained
Not all firebricks are created equal. Medium-duty firebricks containing 30-35% alumina withstand the thermal cycling of repeated firings without cracking. Avoid common red clay bricks—they’ll spall and deteriorate rapidly under intense heat. Quality kits specify ASTM C27 or C1261 rated firebricks, which maintain structural integrity through thousands of heating cycles.
Refractory mortar formulas separate good kits from great ones. Pre-mixed calcium aluminate cements (often labeled “heatstop” or “firecrete”) offer superior bonding at high temperatures compared to Portland cement-based mixes. Some kits include dry-mix refractory concrete for casting custom decorative elements, giving you creative freedom without requiring separate material sourcing.
Examine the dome material composition. High-purity refractory castables with low iron content resist thermal shock better than standard mixes. Premium kits might offer silicon carbide-enhanced floors that conduct heat more evenly, eliminating hot spots that burn pizza bottoms.
DIY Skill Level Assessment: What You’re Really Getting Into
Be brutally honest about your capabilities before selecting a kit. Modular systems require basic carpentry for the stand, simple tool operation, and careful following of instructions—think advanced IKEA assembly. If you can build a sturdy deck, you can handle a modular kit.
Precast domes demand mechanical lifting and precise leveling. You’ll need to rent engine hoists or coordinate several strong helpers. The foundation work involves concrete forms and rebar placement, while the enclosure requires masonry or stone veneer skills.
Brick-by-brick construction is not a beginner project. You’ll need experience with wet saws for cutting firebricks, knowledge of mortar consistency, and the patience to build a structural arch without support. One misplaced brick can compromise the entire dome’s integrity. Consider taking a weekend masonry workshop before attempting this level of project.
Foundation Requirements: The Bedrock of Success
Your pizza oven’s foundation must support 3-6 tons of weight while remaining stable through freeze-thaw cycles. Most kits specify a reinforced concrete slab measuring 5-6 inches thick, extending 6 inches beyond the oven footprint on all sides. This typically means excavating 12-18 inches below grade, adding compacted gravel base, and building forms for the pour.
Frost depth becomes critical in northern climates. Your foundation should extend below the local frost line to prevent heaving. Some kit manufacturers provide engineered drawings specifying rebar placement and concrete PSI ratings—never skip these details. The foundation represents the least glamorous but most essential part of your project; shortcuts here guarantee future problems.
Consider integrating a thermal break between the foundation and oven floor. A layer of calcium silicate board or compressed glass insulation prevents the massive concrete base from wicking heat away from your cooking chamber, improving efficiency by 15-20%.
Tools and Equipment You’ll Need Beyond the Kit
While kits include specialized components, you’ll need to source additional tools. Budget for a wet saw with a diamond blade for cutting firebricks and refractory materials—rental costs run $75-100 per day. A mixing drill with paddle attachment ensures proper mortar consistency, while a mortar hawk and pointing trowel enable precise joint work.
For modular and precast kits, rent an engine hoist or arrange for a forklift delivery. You’ll need a 4-foot level (preferably laser level) to ensure perfect alignment, and shims for fine adjustments. Don’t forget personal protective equipment: respirators for mixing refractory materials, heavy-duty gloves for handling hot components, and eye protection.
Consider investing in quality pizza peels (wood for launching, metal for turning), an infrared thermometer for surface temperature readings, and a long-handled wire brush for ash management. These tools dramatically improve your cooking experience and aren’t typically included in kits.
Installation Timeline: What to Expect
Realistic timeline planning prevents frustration. A modular kit on a pre-existing patio might complete in a single long weekend: Day 1 for stand assembly and oven placement, Day 2 for insulation and enclosure framing, Day 3 for finishing work. This assumes ideal weather and no learning curve.
Building from scratch with a precast dome typically spans 2-3 weekends. Weekend 1: foundation pour and cure. Weekend 2: stand construction and dome placement. Weekend 3: insulation, enclosure, and curing fires. Brick-by-brick projects demand 4-6 weekends of consistent work, plus several weeks for mortar curing between stages.
Weather windows matter. Plan your project for mild temperatures (50-80°F) with low humidity. Refractory mortars cure poorly below 40°F or above 90°F. Rain can wash out uncured mortar, while direct sun causes rapid drying and cracking. Build in buffer days for unexpected delays—every masonry project encounters them.
Weatherproofing and Long-Term Durability
Your outdoor oven faces constant thermal, moisture, and freeze-thaw stress. Quality kits include waterproofing strategies like integrated drip edges above the door and ventilated enclosures that allow moisture to escape. The oven door should seal tightly with high-temperature gasket material to prevent rain intrusion when idle.
Apply a breathable masonry sealer to any exterior stucco or stone veneer. Non-breathable sealers trap moisture, leading to spalling when water freezes. In harsh climates, consider a fitted oven cover for winter months. Some enthusiasts build removable roof structures that protect the entire oven area, extending the cooking season and reducing weathering.
Annual maintenance includes inspecting mortar joints for cracks, checking chimney cap integrity, and verifying door seal condition. Small cracks are normal and can be repaired with refractory caulk, but large fissures indicate structural issues requiring professional assessment.
Aesthetic Integration with Your Outdoor Space
Your pizza oven should complement, not dominate, your outdoor design. Modern kits offer various enclosure options: traditional stucco over metal lath, stacked stone veneer, or sleek metal cladding. Consider sightlines from your indoor kitchen and primary seating areas—position the oven mouth where the chef can interact with guests.
Counter space planning proves crucial. Flanking your oven with 18-24 inches of countertop on each side provides landing zones for pizza prep and cooked pies. Some kits integrate these wings into the design, while others require separate construction. Think about wood storage aesthetics too—built-in log compartments keep fuel handy while maintaining visual harmony.
Lighting transforms evening functionality. Install heat-resistant LED strips under the oven mouth arch to illuminate the cooking surface without casting shadows. Avoid placing ambient string lights directly above the chimney, as heat and smoke will degrade them rapidly.
Cost Breakdown: Budgeting for the Complete Project
The kit price represents only 40-60% of your total investment. A $2,000 modular kit typically requires an additional $800-1,200 for the foundation, stand materials, insulation, and enclosure finishes. Factor in $300-500 for essential tools if you don’t own them, plus $200-300 for accessories like peels and thermometers.
Hidden costs accumulate quickly. Delivery fees for heavy kits can reach $200-400. If your site lacks electrical access for power tools, budget for generator rental. Permits in some municipalities add $100-300, while engineered drawings (sometimes required for large ovens) cost $500-800.
Consider long-term operational costs. A well-insulated 32-inch oven consumes 20-30 pounds of hardwood per pizza session. At $15-25 per bundle, frequent use adds up. However, the same oven can slow-cook a pork shoulder overnight using residual heat, effectively costing nothing extra—a feature gas grills can’t match.
Maintenance and Seasonal Care
Proper curing before first use cannot be overstated. Build five progressively hotter fires over five days, never exceeding 300°F on day one. This slowly drives moisture from refractory materials, preventing catastrophic cracking. Skipping this step voids most warranties and guarantees structural failure.
After each use, brush ashes into a metal container with a tight-fitting lid—never use plastic. Remove food debris from the oven floor with a damp (not wet) cloth once the oven cools below 200°F. Monthly, inspect the chimney for creosote buildup, especially if you burn less-than-perfectly-seasoned wood.
Seasonal shutdown in cold climates involves removing all ash (which holds moisture), securing the door with desiccant packets inside, and covering the chimney cap. Spring startup requires a visual inspection and a small test fire to verify integrity before hosting your first gathering of the season.
Common DIY Pitfalls and How to Avoid Them
The number one mistake is inadequate foundation preparation. A slab that looks level but settles unevenly under 4,000 pounds creates stress cracks throughout the oven. Use a laser level and don’t rush the concrete cure—wait the full 28 days before loading weight.
Mortar consistency errors plague brick-by-brick builders. Refractory mortar should be peanut butter-thick, not soupy. Too wet, and it shrinks and cracks; too dry, and it won’t bond. Mix small batches and clean tools immediately—refractory cement sets faster than standard mortar.
Thermal insulation gaps destroy performance. When installing ceramic fiber blankets, avoid compression at seams. Overlap layers by 2 inches and use wire mesh to hold them in place before applying enclosure materials. Compressed insulation loses up to 50% of its R-value.
Finally, impatience with curing ruins countless projects. That first 900°F inferno seems tempting, but restraint during the first week determines your oven’s lifespan. Follow the manufacturer’s curing schedule religiously, using an oven thermometer to verify temperatures.
Enhancing Your Pizza Oven Experience
Once your oven operates flawlessly, consider upgrades that elevate functionality. A cast-iron door with glass insert lets you monitor internal temperatures without heat loss. Some DIYers add temperature probes embedded in the oven floor, connected to digital displays for precise heat management.
Wood storage solutions keep your fuel dry and accessible. Build a slatted box with ventilation gaps, positioned within arm’s reach of the oven mouth but not so close that radiant heat dries logs prematurely. For the ultimate upgrade, install a small potting bench adjacent to your prep area with built-in ingredient storage.
Community knowledge accelerates your learning curve. Join online forums where experienced builders share firing techniques, dough recipes, and maintenance tips. Many regions have active pizza oven clubs that host seasonal gatherings—nothing beats hands-on learning from someone who’s fired their oven 500+ times.
Frequently Asked Questions
How long does it realistically take to build a brick pizza oven kit?
For someone with moderate DIY skills, a modular kit takes 1-2 weekends, a precast dome requires 2-3 weekends, and a brick-by-brick build demands 4-6 weekends of consistent work. This doesn’t include curing time, which adds another week of daily small fires before cooking.
What’s the minimum safe distance from my house or fence?
Most building codes require 3 feet of clearance from combustible structures, but 4-5 feet provides comfortable working space and better smoke dissipation. Check local regulations, as some areas mandate 10+ feet from property lines. Always position the chimney away from overhanging trees and rooflines.
Can I use regular bricks instead of firebricks if I already have them?
Absolutely not. Common bricks contain trapped moisture and inadequate alumina content, causing them to crack, spall, and potentially explode under high heat. The cost savings aren’t worth the safety risk or premature oven failure. Always use medium-duty or higher firebricks rated for continuous high-temperature exposure.
How much wood will I burn per pizza session?
A properly insulated 32-inch oven uses 20-30 pounds of well-seasoned hardwood to reach and maintain pizza temperatures for 2-3 hours. Larger ovens or those with poor insulation may require 40-50 pounds. Starting with kiln-dried wood reduces consumption by 25% compared to air-dried logs.
Do I need a building permit for a backyard pizza oven?
Requirements vary dramatically by location. Many municipalities exempt outdoor cooking structures under 100 square feet, while others require permits for any permanent installation. Contact your local building department with your kit’s specifications before purchasing. Some homeowners associations have additional restrictions on height and aesthetics.
What’s the difference between refractory cement and regular mortar?
Refractory cement uses calcium aluminate instead of Portland cement, maintaining structural integrity above 2,000°F where standard mortar would fail. It also has lower shrinkage rates and better thermal shock resistance. Never substitute regular mortar in high-heat areas, though you can use it for non-heated decorative elements.
Can I cook anything besides pizza in these ovens?
Once you master pizza, your oven becomes a versatile outdoor cooking tool. Use residual heat (300-500°F) for baking bread, roasting vegetables, or cooking casseroles. The next morning’s 200°F oven is perfect for slow-cooking ribs or making jerky. Some enthusiasts even use cooling ovens for drying herbs or making yogurt.
How do I know if my oven has reached the right temperature?
Invest in an infrared thermometer to check floor temperatures—look for 750-850°F for Neapolitan pizza. The dome interior should show a white-hot “clearing” where carbon burns off, indicating 800°F+. Experienced builders also use the “hand test”: hold your hand just inside the door; if you can keep it there for only 1-2 seconds, you’re in the pizza zone.
What happens if it rains while I’m building the oven?
Moisture is refractory mortar’s enemy. If rain is forecast within 24 hours of application, cover the entire structure with tarps, ensuring ventilation to prevent condensation. Light mist won’t ruin cured sections, but heavy rain can wash out fresh mortar joints. In humid climates, use fans to accelerate curing and prevent surface mold on stucco.
How long will a DIY brick pizza oven last?
With proper construction and maintenance, a quality brick oven easily lasts 20-30+ years. The ancient ovens of Pompeii still stand after 2,000 years. The most common failure point isn’t the brickwork but the door hardware or exterior finish. Plan to reseal stucco every 5-7 years and replace door gaskets every 2-3 years for optimal longevity.