Becoming a parent transforms your relationship with cleanliness overnight. Suddenly, every surface, every bottle, every tiny pacifier becomes a potential vector for germs that could harm your vulnerable newborn. While traditional sterilization methods like boiling water on the stovetop get the job done, they demand constant supervision and precious time you simply don’t have between feedings, diaper changes, and attempts to sleep. Modern microwave ovens with dedicated sterilization cycles have revolutionized this daily chore, offering hospital-grade sanitization in minutes rather than half-hours. These specialized appliances don’t just reheat leftovers—they generate precise steam patterns and controlled power fluctuations that eliminate 99.9% of harmful bacteria without melting plastic or creating hot spots. This year’s advancements in sensor technology, capacity design, and safety certifications make choosing the right model more important than ever for health-conscious parents who refuse to compromise on their baby’s safety.
Top 10 Microwave Ovens for Sterilizing
Detailed Product Reviews
1. HORNO Angry Mama Microwave Oven Steam Cleaner and Disinfects With Vinegar and Water for Kitchens (Green)

Overview: The HORNO Angry Mama is a whimsical steam-cleaning tool that tackles microwave messes without chemicals. This green figurine uses vinegar and water to create steam, loosening baked-on splatters in 5-7 minutes. Its playful design transforms a mundane chore into a more entertaining task, making it approachable for busy households.
What Makes It Stand Out: The Angry Mama character is memorable and gift-worthy, distinguishing it from utilitarian cleaners. Operation is straightforward—fill to marked lines, microwave, and watch steam erupt from her head. Optional lemon juice provides natural deodorizing. At 5-7 minutes, it’s faster than many competitors, and the chemical-free approach appeals to eco-conscious families.
Value for Money: At $8.88, this sits in the budget-friendly sweet spot for kitchen gadgets. It’s reusable indefinitely, eliminating costs of spray cleaners. While cheaper than disposable wipes long-term, the plastic may eventually degrade. Compared to professional services or harsh chemicals, it offers significant savings with minimal environmental impact.
Strengths and Weaknesses: Strengths include adorable aesthetics, foolproof operation, chemical-free cleaning, and universal compatibility. It’s lightweight and stores easily. Weaknesses involve potential plastic warping after repeated high-heat exposure, limited capacity for large messes, and needing vinegar always on hand. The cute design may not suit minimalist kitchens.
Bottom Line: The HORNO Angry Mama delivers effortless microwave maintenance at an accessible price. Perfect for casual cooks who dread cleaning, it makes a practical stocking stuffer or housewarming gift. While not indestructible, its convenience and charm justify the minimal investment.
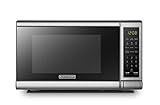
2. Chefman Countertop Microwave Oven 0.7 Cu. Ft., 700 Watts with 10 Power Levels, 6 Cooking Presets with One-Touch Express Cook, Eco Mode, Child Safety Lock, & Mute Button - Black

Overview: The Chefman Countertop Microwave packs impressive functionality into a compact 0.7 cubic foot frame. This 700-watt unit serves small spaces like dorm rooms and offices where full-size appliances won’t fit. Beyond basic reheating, it offers digital precision with 10 power levels and six one-touch presets for popcorn, pizza, and more.
What Makes It Stand Out: The feature set is exceptional for this price tier. The memory function stores custom routines, while the mute button silences beeps—perfect for shared spaces. The child safety lock and eco mode demonstrate thoughtful family-friendly design. The +30 seconds button and express cook options provide genuine convenience that many pricier models lack.
Value for Money: At $68.96, this dramatically undercuts comparable feature-rich compact microwaves that typically retail for $80-$100. The inclusion of premium touches like memory programming and mute functionality at this price represents genuine value. While 700W means slightly longer cook times than 900W+ units, the trade-off is reasonable for budget-conscious buyers.
Strengths and Weaknesses: Strengths include impressive digital features, space-saving footprint, safety controls, and quiet operation when muted. The black finish resists fingerprints. Weaknesses stem from lower wattage requiring cooking time adjustments and small capacity limiting plate sizes. The turntable may be unstable, and long-term durability of electronic components could be questionable.
Bottom Line: The Chefman microwave is a standout value for students, office kitchens, or small households needing more than basic reheating. Its robust feature set punches well above its weight class, making it the smart choice for tech-savvy users on a budget. Accept the power compromise and you’ll be rewarded with convenience.
3. TOPIST Angry Mama Microwave Cleaner Angry Mom Microwave Oven Steam Cleaner and Disinfects With Vinegar and Water for Kitchens, Steamer Cleaning Equipment Cleans the Crud in Minutes (Yellow)

Overview: The TOPIST Angry Mama offers the same steam-cleaning concept as competitors but emphasizes material quality. This yellow version promises to cut microwave cleaning time by half using vinegar and water steam. The design mirrors the original Angry Mama formula while explicitly addressing durability concerns that plague cheaper plastic alternatives.
What Makes It Stand Out: TOPIST explicitly markets its heat-resistant materials and dishwasher-safe construction, key differentiators suggesting longer lifespan. The 7-minute cycle is optimized for thorough steam saturation. The bright yellow color provides aesthetic variety. The brand’s confidence in cutting cleaning time “in less than half” backs the cute concept with performance promises.
Value for Money: At $9.99, it commands a $1.11 premium over the HORNO version. This modest upcharge is justified if the dishwasher-safe claim and enhanced heat resistance prove true, potentially doubling usable life. For households running daily microwave cycles, this durability premium pays for itself. Budget buyers may find basic functionality identical to cheaper alternatives.
Strengths and Weaknesses: Strengths include durable construction, dishwasher-safe convenience, proven Angry Mama design, and effective steam distribution. The heat-resistant plastic should resist warping. Weaknesses include the slightly longer 7-minute cycle versus 5-7 minute competitors, the $1+ price premium, and same fundamental limitation: it only loosens debris, doesn’t scrub. Plastic still raises environmental concerns.
Bottom Line: The TOPIST Angry Mama is the sensible upgrade for users who plan frequent use and value longevity. The dishwasher-safe feature and heat-resistant materials address primary failure points of budget steam cleaners. Spend the extra dollar if you’re a daily microwave user; casual cooks can save money with cheaper alternatives.
4. dgudgu Mushroom Microwave Cleaner Steam Ceramic Oven Cleaner Microwave Steam Cleaner Red Kitchen Microwave Cleaning

Overview: The dgudgu Mushroom Microwave Cleaner uses ceramic instead of plastic, addressing health concerns about heated plastics while adding decorative charm. This red, mushroom-shaped device operates on the same vinegar-and-water steam principle but leverages ceramic’s superior heat resistance and stability, offering a more durable and chemically inert solution for health-conscious consumers.
What Makes It Stand Out: The ceramic construction is the headline feature—no risk of BPA or plastic degradation. The mushroom design is refreshingly different from Angry Mama clones, appealing to nature-inspired kitchen aesthetics. It doubles as decorative art when not in use. The high-temperature resistance suggests indefinite reusability, positioning it as a premium, eco-conscious alternative.
Value for Money: At $11.99, it’s the most expensive option, commanding a 35% premium over plastic competitors. However, ceramic’s durability means zero replacement costs and no chemical leaching concerns. For buyers prioritizing material safety and longevity, this is excellent value. Those simply seeking functional cleaning may find the premium harder to justify over $9 plastic alternatives.
Strengths and Weaknesses: Strengths include superior material safety, aesthetic appeal, extreme durability, and high heat tolerance. It’s dishwasher safe and environmentally superior to plastic. Weaknesses include weight (ceramic is heavy), breakability if dropped, highest price point, and potentially slower heating due to material density. The design occupies more storage space.
Bottom Line: The dgudgu Mushroom Cleaner is the premium choice for health-conscious buyers and design enthusiasts. Its ceramic construction eliminates plastic safety concerns while adding kitchen charm. If material purity and longevity matter more than saving $3, this is your best investment. Accept the weight and price for peace of mind.
5. ZOSTLAND Volcano Microwave Cleaner- Microwave Oven Steam Cleaner,High Temperature Steamer Easily Crud in Minutes Steam Cleans and Disinfects with Vinegar and Water for Kitchen (Blue)

Overview: The ZOSTLAND Volcano Microwave Cleaner combines steam-cleaning with a volcanic design and unexpected dual functionality. This blue, PP plastic device cleans microwaves with vinegar steam while also serving as a refrigerator deodorizer when filled with baking soda. It’s a versatile, multi-room solution for kitchen maintenance beyond just microwave cleaning.
What Makes It Stand Out: The volcano aesthetic offers a fresh alternative to Angry Mama dominance, and the dual-use capability as a fridge deodorizer adds genuine utility. The use of “environmental protection PP material” addresses safety concerns. The ability to repurpose the device for ongoing odor control in the refrigerator is clever value engineering that competitors don’t match.
Value for Money: At $9.99, it matches the TOPIST price while offering added refrigerator functionality. This two-in-one capability makes it the best value proposition for buyers needing both solutions. The plastic construction keeps costs down versus ceramic, while the dual purpose eliminates separate baking soda purchases. For apartment dwellers with limited space, consolidating two functions justifies every penny.
Strengths and Weaknesses: Strengths include innovative dual functionality, cute volcano design, safe PP plastic construction, and versatile kitchen utility. It tackles two common kitchen problems. Weaknesses include plastic still being less durable than ceramic, the volcano theme having narrower appeal than neutral designs, and the refrigerator use being a secondary benefit some may not need. The 7-minute cycle is standard.
Bottom Line: The ZOSTLAND Volcano is the smart multitasker’s choice, solving microwave cleaning and fridge deodorizing in one $10 purchase. Its dual functionality makes it the most practical value in this roundup. If you need both solutions, this is a no-brainer. If you only care about microwave cleaning, simpler options exist.
6. Asltw Angry or Happy Mama Microwave Cleaner, Microwave Oven Steam Cleaner, Just Add Vinegar and Water, Easily Cleans the Crud in Minutes (Green)

Overview: The Asltw Angry or Happy Mama Microwave Cleaner offers a clever, chemical-free solution for one of the kitchen’s most dreaded chores. This quirky, mama-shaped device uses steam power to loosen baked-on food splatters and grease in just minutes. Simply fill with vinegar and water, microwave for 5-7 minutes, and watch as condensation softens even the toughest crud for effortless wiping.
What Makes It Stand Out: This cleaner’s personified design isn’t just decorative—the head acts as a vent to release hot steam evenly throughout the microwave interior. Unlike disposable wipes or harsh chemical sprays, it harnesses natural cleaning power through pure steam. The reusable construction means you can refill it indefinitely, and the non-toxic materials ensure no harmful fumes contaminate your food preparation space.
Value for Money: At $6.98, this is an exceptional long-term investment. A single bottle of commercial microwave cleaner costs nearly as much and lasts only a few uses. This device eliminates recurring purchases, paying for itself within weeks. Its durability ensures years of service, making it one of the most cost-effective cleaning tools in any kitchen arsenal.
Strengths and Weaknesses: Pros: Completely non-toxic and eco-friendly; eliminates scrubbing; reusable hundreds of times; fun design makes cleaning less tedious; extremely affordable. Cons: Requires vinegar which some may find smelly; limited to microwave cleaning only; steam can be dangerously hot; may not remove extremely burnt-on stains completely.
Bottom Line: For anyone seeking a safe, sustainable, and effortless microwave cleaning method, this little gadget delivers remarkable value. It’s particularly ideal for families with children or anyone sensitive to chemical cleaners.
7. Chefman Countertop Microwave Oven 0.9 Cu. Ft., 900 Watts with 10 Power Levels, 6 Cooking Presets with One-Touch Express Cook, Eco Mode, Child Safety Lock, & Mute Button - Black

Overview: The Chefman 0.9 Cu. Ft. microwave packs 900 watts of power into a compact footprint perfect for apartments, dorms, and small kitchens. With 10 power levels and six one-touch presets including popcorn, pizza, and vegetables, it balances functionality with space-saving design. The digital controls and memory function streamline daily cooking routines.
What Makes It Stand Out: This model’s mute button is a rare find in budget microwaves, allowing silent operation during late-night snacks. The eco mode reduces standby power consumption by 50%, while the memory function lets you program frequently used custom settings. The child safety lock on the handle provides superior security compared to standard button locks.
Value for Money: At $79.96, this microwave undercuts many competitors while offering premium features like express cooking presets and power management. Comparable models from premium brands cost $30-50 more for similar specifications. The energy-saving eco mode alone can recoup costs over time, making it a smart financial choice for budget-conscious buyers.
Strengths and Weaknesses: Pros: Compact size fits tight spaces; intuitive one-touch controls; rare mute function; effective child lock; energy-efficient eco mode; memory programming. Cons: 900W cooks slower than 1000W+ models; 0.9 cu ft capacity limits large dishes; interior light could be brighter; turntable occasionally wobbles with heavy items.
Bottom Line: This Chefman microwave excels for small households needing quiet, efficient operation without sacrificing essential features. It’s an ideal choice for students, renters, or anyone prioritizing countertop space and energy savings over maximum cooking speed.
8. TOSHIBA EM131A5C-SS Countertop Microwave Ovens 1.2 Cu Ft with 12.4" Removable Turntable Smart Humidity Sensor, 12 Auto Menus Mute Function ECO Mode Easy Clean Interior, 1000W, Silver

Overview: Toshiba’s 1.2 cubic foot microwave delivers 1000 watts of cooking power with intelligent features that justify its premium positioning. The smart humidity sensor automatically adjusts time and power for optimal results, while 12 auto menus handle everything from sensor reheat to pizza. The spacious 12.4-inch turntable accommodates large plates and casserole dishes.
What Makes It Stand Out: The humidity sensor technology is the star, eliminating guesswork and preventing overcooked edges or cold centers. Combined with an easy-clean interior coating and dedicated eco mode, this microwave prioritizes convenience. The mute function and two-stage child lock demonstrate thoughtful design for family households.
Value for Money: Priced at $148.99, this model sits in the mid-premium tier. While $50-70 more than basic 1000W microwaves, the sensor technology alone saves money by reducing food waste from poorly cooked meals. The larger capacity and durable construction offer long-term value that cheaper models can’t match, making it worth the investment for serious home cooks.
Strengths and Weaknesses: Pros: Smart sensor ensures perfect results; spacious interior; easy-clean coating; comprehensive 12-menu system; sturdy construction; quiet operation. Cons: Large footprint requires substantial counter space; silver finish shows fingerprints; higher price point; sensor can be overly cautious with frozen foods.
Bottom Line: For families and cooking enthusiasts who demand consistent, hassle-free results, this Toshiba microwave’s intelligent features and generous capacity make it a worthwhile upgrade. The sensor technology transforms it from a simple reheater into a reliable cooking appliance.
9. TOSHIBA ML-EM09PA(SS) Small Microwave Oven with 6 Auto Menus, Mute Function & Child Lock, LED Lighting, Perfect for Apartments & Dorms, 0.9 Cu Ft, 10.6 Inch Removable Turntable, 900W, Stainless Steel

Overview: Toshiba’s compact 0.9 cubic foot microwave targets apartment dwellers and students with a well-rounded feature set. The 900-watt unit includes six auto menus, 11 power levels, and thoughtful touches like LED lighting and a two-step child lock. Its stainless steel exterior adds durability and modern aesthetics to small-space living.
What Makes It Stand Out: The two-step child lock provides enhanced safety beyond standard single-button locks, requiring a specific sequence to activate. Eleven power levels offer finer control than typical 10-level models, while the mute function and bright LED interior light cater to dorm-room convenience. Toshiba’s reputation for reliability shines through the solid construction.
Value for Money: At $111.85, this microwave commands a $30-40 premium over budget competitors. However, the superior build quality, extended safety features, and brand trustworthiness justify the cost. For renters and students who need a dependable appliance that won’t fail mid-semester, the extra investment pays dividends in peace of mind.
Strengths and Weaknesses: Pros: Robust two-step child lock; excellent brand reliability; mute function; bright LED lighting; compact footprint; 11 precise power levels. Cons: Higher price for 900W/0.9 cu ft; smaller turntable limits plate size; fewer presets than some rivals; stainless steel shows smudges.
Bottom Line: This Toshiba microwave is ideal for safety-conscious consumers in tight living quarters. While not the cheapest option, its reliability and enhanced child lock make it perfect for families with young children or shared living situations where safety is paramount.
10. BLACK+DECKER EM720CB7 Digital Microwave Oven with Turntable Push-Button Door, Child Safety Lock, 700W, Stainless Steel, 0.7 Cu.ft
Overview: Black+Decker’s 0.7 cubic foot microwave emphasizes simplicity and brand reliability in an ultra-compact package. The 700-watt unit features pre-programmed buttons for popular foods, 10 power settings, and essential safety features. Its push-button door release and large LED display prioritize ease of use for basic reheating and defrosting tasks.
What Makes It Stand Out: The Black+Decker name carries decades of trust in small appliances, and this model delivers no-frills reliability. The straightforward control panel eliminates learning curves, while the push-button door is more accessible than handle designs for users with mobility issues. Its diminutive size fits where others simply cannot.
Value for Money: At $95.99, this microwave is priced fairly for the brand name but faces stiff competition from higher-powered alternatives. While 700 watts suffices for simple tasks, comparable 900W models cost only $10-20 more. The value lies in brand reliability and extreme space savings rather than raw performance or features.
Strengths and Weaknesses: Pros: Trusted brand reputation; extremely compact; simple operation; reliable child lock; push-button door; clear LED display. Cons: 700W power is noticeably slow; 0.7 cu ft very limiting; no mute function; basic feature set; turntable struggles with uneven loads.
Bottom Line: This microwave suits users who prioritize brand trust and minimal footprint above all else. It’s best for office kitchens, elderly users, or situations where space is absolutely critical. For general family use, spending slightly more for higher wattage proves more practical.
Understanding Microwave Sterilization Technology for Baby Bottles
How Microwave Sterilization Actually Works
Microwave sterilization harnesses the power of steam generated from water molecules excited by microwave radiation. Unlike standard reheating functions, true sterilization cycles create sustained temperatures of 212°F (100°C) throughout the entire chamber for a minimum of 5-8 minutes. This sustained heat denatures proteins in bacteria, viruses, and fungi, rendering them completely inactive. The key differentiator in baby-bottle-specific models is their ability to maintain this temperature consistently across all surfaces, including the hard-to-reach interior of bottle nipples and venting systems, without creating the super-hot spots that can warp BPA-free plastics.
The Science Behind Steam Sterilization in Microwaves
The process begins when the microwave’s magnetron emits radio waves at precisely 2.45 GHz, targeting water molecules in the small amount of water you add to the sterilizing container. Premium models feature inverter technology that provides continuous power delivery rather than pulsing on and off, creating a more stable steam environment. This matters because fluctuating temperatures can create condensation pockets where microbes survive. Advanced units also employ humidity sensors that detect when steam saturation reaches optimal levels, automatically adjusting power to maintain the sterilization threshold without boiling away all the water and risking damage to both bottles and the appliance itself.
Why Special Cycles Matter for Baby Bottle Safety
Generic microwave settings were never designed for sterilization—they’re calibrated for food reheating. Dedicated sterilization cycles incorporate three critical phases: a rapid heat-up phase to generate steam within 90 seconds, a holding phase that maintains exact temperature parameters for FDA-recommended durations, and a controlled cool-down phase that prevents pressure buildup and allows safe handling. Without these programmed phases, you risk incomplete sterilization from insufficient heat or plastic degradation from excessive exposure. The best models even factor in altitude adjustments, recognizing that water boils at lower temperatures in high-elevation locations, automatically extending cycle times to compensate.
Key Features to Look for in Bottle-Sterilizing Microwave Ovens
Dedicated Sterilization Cycle Settings
Look for models that explicitly label a “baby care,” “sterilize,” or “steam clean” function—not just a generic “beverage” or “sensor reheat” button. True sterilization cycles display specific time increments (typically 5, 8, or 10 minutes) and lock out power level adjustments to prevent user error. Some advanced units offer sub-cycles for different bottle materials: glass cycles that reach higher temperatures, plastic cycles with moderated heat, and combination cycles for mixed loads. The interface should illuminate the selected cycle and provide a countdown timer with audible alerts that differ from standard cooking notifications.
Wattage Requirements for Effective Sterilization
Effective sterilization requires sustained power between 800-1200 watts. Models below 800 watts struggle to generate sufficient steam quickly enough, leading to extended cycle times that can compromise plastic integrity. Conversely, units exceeding 1200 watts may create steam too rapidly, causing dangerous pressure buildup in sealed sterilizing containers. The sweet spot lies in 900-1100 watt models with variable power inverter technology that can ramp down once target temperature is achieved. Check the specifications for “sterilization wattage”—some manufacturers list a separate, lower power output for baby cycles to protect sensitive materials while maintaining steam production.
Turntable Design and Bottle Placement
Standard glass turntables often create unstable surfaces for sterilizer containers. Premium models feature recessed turntables with anti-slip rings or removable trays specifically designed to anchor sterilizing units. The rotation speed during sterilization cycles typically slows to 3-4 rotations per minute, ensuring even steam distribution without sloshing water out of container reservoirs. Some units offer a “stationary sterilization” mode that locks the turntable entirely, ideal for sterilizers with built-in water reservoirs that shouldn’t tilt. Consider the turntable diameter—minimum 12 inches provides stable support for most commercial sterilizer containers.
Steam Ventilation Systems
Post-sterilization moisture management prevents mold growth in your microwave and on your bottles. Advanced models incorporate dual-stage ventilation: active steam release during the final cycle phase through upper vents, and a post-cycle fan that circulates filtered air to dry interior surfaces. Look for stainless steel vent screens that resist corrosion from mineral deposits in steam, and check that vent placement won’t direct hot steam toward cabinetry. The best designs include moisture sensors that prevent door opening until internal humidity drops to safe levels, protecting you from steam burns.
Material Compatibility Sensors
Cutting-edge microwaves now include infrared sensors that detect material type (glass vs. plastic) and adjust power accordingly. These sensors prevent the common mistake of melting plastic bottles by automatically capping temperature when they detect petroleum-based materials. Some models even scan for metal fragments—a crucial feature if you accidentally include a bottle collar with metallic paint. The sensor interface typically displays a confirmation symbol (often a baby bottle or material icon) when it recognizes compatible items, giving you visual assurance before starting the cycle.
Safety Certifications and Standards You Should Know
FDA Guidelines for Microwave Sterilization
The FDA classifies microwave sterilizers as Class II medical devices when marketed specifically for infant feeding items. While the microwave itself isn’t regulated as a medical device, models that advertise sterilization functions must comply with 21 CFR 1030.10 performance standards. Look for language in product descriptions referencing “FDA-cleared sterilization cycles” or “meets FDA guidelines for infant product sanitization.” This ensures the manufacturer has validated their cycles through third-party microbiology testing, typically demonstrating a 6-log reduction in pathogens (99.9999% elimination).
BPA-Free and Food-Grade Material Requirements
The microwave interior itself must be constructed from food-grade stainless steel (304 grade or higher) that won’t leach metals under repeated steam exposure. Plastic components like door handles and control panels should be certified PBA-free, phthalate-free, and meet UL 94 V-0 flammability standards. Request the material safety data sheet (MSDS) from manufacturers—the reputable ones provide detailed breakdowns of all interior coatings and their stability under sterilization conditions. Be wary of “stainless steel look” interiors that are actually painted metal; paint can bubble and flake under sustained steam exposure.
UL Safety Ratings for Baby-Friendly Appliances
Underwriters Laboratories (UL) developed specific testing protocol UL 923A for microwaves with sterilization functions. This standard evaluates steam pressure management, door seal integrity under humid conditions, and electrical component corrosion resistance. A UL-listed microwave with a supplemental “UL Baby Care” mark has undergone 1,000+ cycle testing with sterilizer containers. Additionally, check for ETL or CSA certifications—these are equivalent to UL but often indicate the manufacturer has gone above minimum requirements. The certification label should be visible inside the door frame or on the back panel.
Capacity Considerations for Growing Families
Internal Cubic Footage for Sterilizer Accessories
While 0.9 cubic feet suffices for basic sterilizer containers, families using wide-neck bottles or planning to sterilize multiple pump parts simultaneously should target 1.2-1.6 cubic feet. Measure your sterilizer container’s height with lid—many require 7-8 inches of vertical clearance. Remember that internal dimensions differ from overall capacity; a microwave might be 1.4 cubic feet but have a low ceiling that accommodates only flat sterilizer trays. Look for “usable height” specifications and consider models with recessed ceilings that maximize vertical space without increasing footprint.
Multi-Level Rack Systems
Some premium microwaves include removable, dishwasher-safe rack inserts that create two sterilization tiers. This design allows simultaneous processing of bottles on the lower level and smaller items like pacifiers or teethers on the upper mesh tray. The racks must be constructed from microwave-safe silicone-coated metal that won’t arc. Check that rack supports are integrated into the cavity walls rather than resting on the turntable—this prevents wobbling and ensures even weight distribution. The best systems allow rack height adjustment in 1-inch increments to accommodate different sterilizer brands.
Batch Sterilization vs. Single Bottle Processing
High-capacity models (1.8+ cubic feet) enable batch processing of 6-8 bottles plus accessories in one cycle—crucial for multiples or daycare preparation. However, larger cavities can create steam distribution challenges. Look for models with dual magnetrons or wave stirrers that distribute energy evenly throughout the larger space. For smaller households, compact 0.7-0.9 cubic foot models with optimized cavity shapes can process 2-3 bottles efficiently while saving counter space. Consider your daily bottle volume: if you use 4+ bottles daily, batch capability reduces your sterilization frequency from multiple times to once daily.
Advanced Features That Make a Difference
Auto-Shutoff and Cool-Down Functions
Intelligent auto-shutoff mechanisms detect when water reservoirs run dry, preventing appliance damage and fire hazards. The best systems differentiate between “dry” and “complete”—they’ll shut off heating but continue the cool-down fan cycle. Look for models with thermal fuses that are steam-resistant; standard fuses can corrode and fail prematurely in high-humidity environments. The cool-down phase should be programmable: 5 minutes for immediate use, 15 minutes for complete drying. Some units even offer a “sterilize and store” mode that maintains a low-heat dry environment for up to 3 hours, keeping items sterile until you need them.
Humidity Sensors for Optimal Steam Levels
Precision humidity sensors monitor steam saturation in real-time, typically measuring relative humidity percentages above 95%—the threshold for effective sterilization. These sensors automatically extend cycle times if you open the door mid-cycle (to add a forgotten item) by recalculating required steam exposure. Advanced models display humidity levels on LCD screens, giving you visual confirmation that sterilization conditions were met. This data logging can be crucial for parents of immunocompromised infants who need to document sanitization protocols for medical providers.
Pre-Programmed Baby Care Menus
Beyond basic sterilization, comprehensive baby care menus include settings for warming breast milk (with temperature caps to preserve antibodies), heating formula to body temperature, and even sanitizing teething toys. These presets use lower power levels and gentler cycles appropriate for each task. The interface should allow you to save custom programs—useful if you develop a specific routine for your baby’s unique feeding schedule. Look for models that let you rename buttons, so “Beverage” becomes “Night Formula” for intuitive middle-of-the-night operation when you’re sleep-deprived.
Installation and Placement Best Practices
Countertop vs. Built-In Models for Nursery Access
While built-in models offer sleek aesthetics, countertop units provide flexibility to relocate as your baby grows. If considering a built-in, ensure the cabinetry design includes enhanced ventilation—steam cycles generate significantly more moisture than typical microwave use. For nursery placement (within recommended safety distances), choose models with “silent mode” that disables beeps and fan noise during baby sleep hours. Countertop models should have non-slip feet rated for steam exposure; rubber feet can degrade and become sticky. Weight matters too—heavier units (35+ pounds) resist sliding when you press control buttons one-handed while holding a baby.
Electrical Requirements and Safety
Sterilization cycles draw continuous power for extended periods, requiring a dedicated 15-amp circuit. Avoid using extension cords or power strips, which can overheat under sustained load. The plug should be a three-prong grounded type with GFCI protection if installed near sinks. Check the standby power consumption—some “smart” microwaves draw 5+ watts continuously, adding to energy costs. For international families, verify dual-voltage compatibility (110-240V) if you might relocate; transformer-based voltage conversion is unreliable for microwaves and voids warranties.
Ventilation Clearances for Steam Cycles
Microwaves with sterilization functions require 4-6 inches of clearance on top and sides—double the standard 2-3 inches. This prevents steam from damaging cabinetry and allows adequate air intake for cooling fans. The rear clearance is critical: minimum 3 inches from the wall to prevent steam from condensing on electrical outlets. Some models include optional venting kits that direct steam forward through the door frame rather than upward, useful for under-cabinet installations. Never install these units inside enclosed microwave cabinets unless the enclosure is specifically designed for high-humidity appliances.
Maintenance and Cleaning Requirements
Descaling for Mineral Buildup Prevention
Steam sterilization accelerates mineral deposition from water, requiring monthly descaling with citric acid or specialized microwave cleaners. Premium models include “descale” cycles that heat cleaning solution to specific temperatures for optimal scale removal. Check if the interior has a non-stick coating—some traditional descaling agents can damage these surfaces. The best designs feature removable steam vents that can be soaked separately, preventing clogging that leads to uneven heating. Hard water users should consider models with built-in water softening filters that need replacement every 3 months.
Interior Coating Durability
Standard painted interiors fail within 6-12 months of regular sterilization use. Look for electro-polished stainless steel interiors with a minimum 0.5mm thickness. Some manufacturers apply ceramic-based coatings that resist staining from milk residue that inevitably splatters during steam cycles. Test the coating by running your fingernail across an edge—if you feel a ridge between metal and coating, it’s a painted surface that won’t last. The door seal should be silicone-based, not rubber, and should be replaceable without a service call.
Filter Replacement Schedules
Microwaves with active ventilation systems use charcoal filters to absorb odors and prevent steam from carrying milk proteins into your kitchen. These filters saturate after 30-50 sterilization cycles and require replacement. Check filter costs before purchasing—some proprietary designs cost $25-40 each. The best models include filter life indicators that count actual cycles rather than just time elapsed. Washable metal grease filters, common above the cooking surface, are insufficient for sterilization steam; you need dedicated charcoal filtration for effective odor control.
Common Mistakes to Avoid When Sterilizing in Microwaves
Overloading and Uneven Sterilization
Cramming too many items creates steam shadows where bottles block each other from direct steam contact. The sterilization cycle becomes ineffective, and you may not realize it until your baby shows signs of tummy trouble. Follow the “two-finger rule”: you should be able to insert two fingers between each bottle and between bottles and container walls. Position nipples and collars loosely in the container’s accessory tray, never nested inside each other. If your microwave has a turntable, arrange items in a wagon-wheel pattern rather than clustered in the center for even steam circulation.
Incorrect Water Levels
Too little water produces insufficient steam; too much creates boiling water that splashes onto bottles, leaving mineral deposits and potentially causing burns when you open the container. The golden ratio is 200ml (about ¾ cup) for standard 4-bottle loads, increasing by 50ml per additional bottle. Use the measuring cup provided with your sterilizer container—it’s calibrated for your specific unit’s steam generation rate. Never use distilled water exclusively; the minerals in tap water actually help stabilize steam production. A 50/50 tap-to-distilled mix prevents heavy scaling while maintaining steam quality.
Using Non-Microwave-Safe Bottles
Even bottles labeled “BPA-free” aren’t necessarily microwave-safe. Check for a microwave symbol (usually wavy lines) molded into the bottle base. Glass bottles must be borosilicate or tempered—regular soda-lime glass can shatter from thermal shock. Avoid bottles with metallic paint, decorative elements, or foil-based volume markings. When in doubt, perform a test: microwave the empty bottle with water for 30 seconds; if it’s too hot to hold comfortably, it’s not suitable for the intense 8-minute sterilization cycle. Some premium microwaves include material scanners that detect incompatible plastics and abort the cycle before damage occurs.
Cost vs. Value Analysis
Budget-Friendly Features Worth Considering
You don’t need to spend $300+ for effective sterilization. Sub-$150 models offering dedicated 8-minute sterilization cycles, 900+ watts, and basic humidity sensors deliver excellent value. Prioritize mechanical reliability over smart features—a simple microwave that lasts 5 years outperforms a “smart” unit that fails after 18 months. Look for seasonal sales patterns: baby-focused appliances typically discount 20-30% during baby expo months (February, September). Refurbished units from major manufacturers often include full warranties and can save 40% if you verify they’ve been steam-cycle tested.
Premium Features That Justify Higher Prices
At $200-400, you’re paying for durability and precision. Stainless steel interiors, replaceable door seals, and commercial-grade magnetrons that withstand daily sterilization justify the investment for families planning multiple children. Advanced sensors that prevent plastic melting pay for themselves by saving one set of premium bottles ($50-80). Consider your usage frequency: if you’ll run 2-3 cycles daily for 12+ months, the $0.50-0.75 daily cost premium of a high-end model amortizes into negligible expense for peace of mind and reliability.
Long-Term Durability Expectations
A microwave used exclusively for sterilization should last 3-5 years with proper maintenance. However, models used for both cooking and sterilization typically fail within 2 years due to mixed-use wear. Steam cycles accelerate door seal degradation and interior coating failure. When evaluating warranties, note that “magnetron warranties” (often 5-10 years) rarely cover steam-related damage. Look for comprehensive 2-year warranties that explicitly include “high-humidity operation.” Read warranty exclusions carefully—many void coverage if used for “commercial or medical purposes,” which can be interpreted to include daily sterilization.
Environmental and Energy Considerations
Energy Consumption During Sterilization Cycles
A typical 8-minute sterilization cycle consumes 0.12-0.15 kWh—about $0.02 per cycle at average electricity rates. Inverter models are 20-30% more efficient than traditional transformers because they avoid power cycling losses. However, standby power consumption can add $5-10 annually if the unit isn’t unplugged. For eco-conscious parents, look for Energy Star certification specifically noting “low standby power” (under 1 watt). Some utilities offer rebates for Energy Star appliances, potentially offsetting 10-15% of purchase cost.
Eco-Friendly Steam vs. Chemical Sterilization
Microwave steam sterilization eliminates the need for chemical tablets or solutions that eventually enter waterways. It’s arguably more environmentally friendly than electric steam sterilizers that run for 15+ minutes, as microwaves heat only the water, not the entire appliance housing. However, the environmental cost of manufacturing a specialized microwave versus using a multi-purpose unit deserves consideration. If you already own a microwave with a sterilization cycle, using it is far greener than purchasing a dedicated bottle sterilizer. For maximum sustainability, choose models with minimal plastic components and recyclable metal interiors.
Water Usage Efficiency
Steam sterilization uses remarkably little water—just 200ml per cycle compared to 2-3 liters for stovetop boiling. Over a year of daily use, that’s a savings of over 1,000 liters. Some advanced models include water recycling features that capture and filter condensation for reuse in subsequent cycles, reducing consumption by another 40%. However, these systems require diligent filter maintenance to prevent bacterial growth in the reservoir. For most families, simply using the exact measured water amount provides the best balance of efficiency and safety.
Integration with Other Baby Feeding Systems
Compatibility with Popular Bottle Brands
While most sterilizer containers are universal, microwave cavity dimensions can limit which brands fit efficiently. Wide-neck bottles (like Dr. Brown’s Options+ or Tommee Tippee Closer to Nature) require 7+ inches of vertical clearance when loaded in sterilizer baskets. Measure your tallest bottle with nipple and collar assembled, then add 1 inch for steam circulation. Some microwave manufacturers partner with bottle brands to optimize cavity dimensions—look for “designed for [brand]” compatibility notes. If you use specialized anti-colic systems with venting tubes, ensure the sterilizer container includes dedicated tube holders that keep them separated during steam cycles.
Pump Parts and Accessory Sterilization
Breast pump valves, membranes, and connectors are more heat-sensitive than bottles and require lower-temperature cycles (around 180°F) to prevent silicone deformation. Premium microwaves offer “pump parts” presets that run shorter cycles (5 minutes) at reduced power. The sterilizer container should include a fine-mesh upper tray for small parts that prevents them from falling into the water reservoir. For working parents pumping 3-4 times daily, batch sterilizing all parts in one evening cycle saves significant time. Ensure your microwave’s capacity accommodates the entire day’s pump kit plus bottles for the next day.
Transitioning from Newborn to Toddler Feeding Gear
Your sterilization needs evolve as your baby grows. Sippy cup valves, straw brushes, and snack containers have different shapes and heat tolerances than newborn bottles. Microwaves with adjustable racks and programmable cycles adapt to these changing needs. Some models include “toddler” presets that sanitize chew toys and feeding spoons at lower temperatures. Consider future-proofing your purchase by choosing a model with enough capacity to handle toddler meal prep containers, potentially saving you from buying a second appliance later.
Troubleshooting Common Sterilization Issues
Wet Bottles After Cycle Completion
Finding bottles still wet after a full cycle often indicates insufficient cool-down time or poor ventilation. Ensure you’re running the complete cycle including the drying phase—some users interrupt when the timer beeps, missing the final 3-5 minute fan cycle. Check that steam vents aren’t clogged with mineral deposits; a toothpick can clear vent holes. If your model lacks active drying, crack the door for 2 minutes post-cycle before opening fully—this allows moisture to escape gradually rather than condensing back on bottles. Persistent wetness may indicate a failing door seal that’s allowing steam to escape during the cycle, requiring professional service.
Stubborn Milk Residue Removal
Sterilization kills bacteria but doesn’t remove dried milk fat. Pre-rinse bottles within 30 minutes of feeding to prevent residue from baking onto surfaces during steam cycles. For existing buildup, add a teaspoon of white vinegar to the sterilizer water—the acidity helps break down milk proteins without leaving chemical residues. If your microwave offers a “steam clean” function for the cavity itself, run it weekly with vinegar water to prevent milk protein from coating the interior, which can affect performance and create odors. Never use abrasive pads on bottle interiors; the micro-scratches harbor bacteria that even steam can’t reach effectively.
Odor Prevention Techniques
Milk proteins carried by steam can coat microwave interiors, creating sour smells. Wipe the cavity with a baking soda solution (1 tablespoon per cup of water) weekly, paying attention to the ceiling where condensation drips. Leave the door open for 30 minutes after the last daily cycle to fully dry the interior. Some models include catalytic converters that break down organic compounds in steam before venting—if yours doesn’t, placing a small bowl of activated charcoal in the cavity between uses absorbs odors. Replace microwave charcoal filters monthly, not just when the indicator lights up, as milk proteins clog them faster than cooking odors.
Warranty and Customer Support Factors
What to Look for in Appliance Warranties
Standard microwave warranties cover magnetrons for 5-10 years but often limit cavity and parts coverage to 1 year. For sterilization-heavy use, prioritize models offering 2-3 year comprehensive coverage that explicitly includes “steam-related component failure.” Read the fine print for usage limitations—some warranties cap daily cycles at 3 per day, which stay-at-home parents may exceed. Extended warranties through retailers can be worthwhile if they cover door seals and humidity sensors, which are most prone to steam damage. Keep your sterilizer container purchase receipt; some manufacturers require proof you used recommended accessories to honor warranty claims.
Manufacturer Support for Baby-Specific Features
Contact customer service before purchasing with a specific question about sterilization cycles. The quality of their response indicates future support reliability. Reputable manufacturers employ baby-product specialists who understand sterilization protocols, not just general appliance reps. Check if the company offers live chat support during late-night hours—when you’ll likely be using the appliance. Some premium brands provide direct phone lines to technicians who can remotely diagnose cycle failures via smartphone apps, saving you days of waiting for service appointments.
Return Policies and Trial Periods
Buy from retailers offering 60-90 day returns for appliances. This gives you time to test actual sterilization effectiveness, not just functionality. Keep all packaging for the first month in case you discover incompatibility with your bottle system. Some online retailers now offer “baby product guarantees” allowing returns even after use if you’re unsatisfied with performance. Test the sterilization cycle within the first week with a sterilization indicator strip (available at pharmacies) to verify the microwave reaches required temperatures—this provides objective proof if you need to return a unit that doesn’t perform as advertised.
Making Your Final Decision
Creating a Feature Checklist
Prioritize your non-negotiables: minimum wattage, dedicated cycle, and interior material. Then rank desirable features: capacity, sensor technology, and warranty length. Assign point values and score each model you’re considering. Don’t overlook practical factors like door opening direction—left-hinged doors may block nursery access in tight spaces. Measure your counter depth; some “compact” models protrude deeply and become tipping hazards. Download user manuals from manufacturer websites before buying to verify sterilization instructions are clear and comprehensive, not just a single paragraph.
Reading Between the Lines of Product Reviews
Focus on reviews from verified purchasers who mention “daily sterilization use” rather than general cooking reviews. Look for patterns in failure modes—multiple reviews mentioning door seal failure after 6 months indicate a design flaw. Be skeptical of 5-star reviews posted within days of purchase; sterilization issues typically emerge after weeks of use. Check the reviewer’s profile for other baby product reviews—their feedback is more valuable than generic appliance reviewers. Pay attention to how manufacturers respond to negative reviews; defensive or dismissive replies suggest poor long-term support.
Timing Your Purchase for Maximum Value
Microwave manufacturers release new models in March and September. Buying the previous year’s model in April or October can save 25-35% while providing nearly identical sterilization performance. Black Friday deals often include bundled sterilizer containers, but verify the included container is the size you need—bundled accessories are frequently smaller capacity. Consider purchasing 2-3 months before your due date to allow for testing and potential returns, but not so early that the warranty expires before heavy use begins. Some credit cards extend warranties by an additional year, effectively doubling coverage on models with 1-year manufacturer warranties.
Frequently Asked Questions
How long does a microwave sterilization cycle typically take?
Most dedicated cycles run 5-10 minutes depending on load size and material type. Plastic bottles require 8 minutes minimum to ensure steam penetrates all crevices, while glass bottles can achieve sterilization in 5-6 minutes due to higher heat tolerance. Always include the recommended 2-3 minute cool-down phase before handling.
Can I sterilize any type of baby bottle in the microwave?
Only bottles explicitly marked “microwave-safe” should be sterilized. This includes most BPA-free plastics, borosilicate glass, and silicone bottles. Avoid bottles with metallic components, decorative paints, or unknown plastic types. When in doubt, contact the bottle manufacturer directly—many maintain compatibility databases for popular microwave models.
What’s the difference between a regular microwave cycle and a dedicated sterilization cycle?
Regular cycles simply heat water to boiling and shut off, creating inconsistent steam exposure. Dedicated sterilization cycles use three phases: rapid steam generation, sustained temperature holding at 212°F, and controlled pressure release. They also lock power levels and include humidity sensors that regular cycles lack, ensuring FDA-recommended pathogen elimination.
Do I need to buy a separate microwave sterilizer container?
Yes, absolutely. Microwave sterilization requires a sealed container that traps steam around bottles at specific pressures. Never attempt to sterilize bottles loose in the microwave cavity—this creates burn hazards and fails to maintain sterilization temperatures. Purchase a container specifically designed for your bottle brand for optimal fit and steam flow.
How often should I sterilize baby bottles?
For newborns under 3 months, sterilize before first use and after each cleaning until your baby’s immune system matures. After 3 months, sterilizing once daily is sufficient if bottles are properly washed after each feeding. Always sterilize bottles after your baby recovers from illness, regardless of age, to prevent reinfection.
Is microwave sterilization as effective as boiling?
When performed correctly in a dedicated sterilizer container, microwave sterilization matches or exceeds boiling effectiveness. Steam reaches all surfaces simultaneously, while boiling requires items to be fully submerged and can leave air pockets. Microwave cycles also maintain temperature more consistently than stovetop boiling, which cools each time you add items.
Can I sterilize breast pump parts in these microwaves?
Yes, but use the “pump parts” or “delicate” cycle if available, which runs at lower temperatures (180-190°F) to protect silicone valves and membranes. Always separate small parts in the accessory tray, and never sterilize tubing unless the manufacturer explicitly approves—many tubes develop microscopic cracks from heat stress, compromising suction.
What happens if I accidentally run a sterilization cycle without water?
Modern microwaves with sterilization functions include dry-boil sensors that detect insufficient water within 60-90 seconds and shut down the cycle. However, older or budget models without this protection can damage the magnetron and melt plastic components. If this occurs, unplug the unit immediately and contact the manufacturer—don’t attempt another cycle until inspected.
How do I prevent bottles from melting during sterilization?
Always use the dedicated sterilization cycle (never full power), ensure proper water levels, and verify bottles are microwave-safe. Position bottles upright with nipples removed from collars to prevent trapped steam pressure. If bottles consistently deform, your microwave may be running too hot—use sterilization indicator strips to verify temperatures and contact the manufacturer if readings exceed 220°F.
Are there any bottles that should never go in a microwave sterilizer?
Never sterilize bottles containing metal components (some anti-colic venting systems have metal springs), bottles with cracked or cloudy plastic (heat stress can cause shattering), or any bottle older than manufacturer recommendations (typically 6-12 months for plastic). Disposable bottle liners are not sterilizable and should be discarded after single use.