There’s nothing quite as frustrating as watching a delicate beurre blanc sauce break because your cooktop can’t hold a steady, gentle simmer. Or seeing a hearty stew go from perfect to scorched in seconds flat. For beginners stepping into the world of serious home cooking, mastering the art of precision simmering is often the difference between culinary mediocrity and restaurant-quality results at home. The right electric cooktop doesn’t just heat your food—it becomes your silent sous chef, maintaining the exact temperature sweet spot where flavors meld, textures transform, and magic happens without constant babysitting.
But here’s the challenge: not all electric cooktops are created equal when it comes to the low-and-slow dance of precision simmering. While some boast impressive high-heat searing capabilities, they falter at the gentle whisper of heat needed for reducing stocks or candying citrus peel. As a beginner, you’re not just buying an appliance; you’re investing in a learning tool that will shape your cooking confidence for years. This guide dives deep into the features, technologies, and considerations that separate simmering champions from kitchen disappointments—no brand names, no sponsored rankings, just pure, expert-level insight to help you make an informed decision.
Top 10 Electric Cooktops for Beginners
Detailed Product Reviews
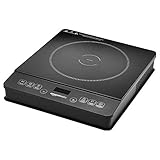
1. Infrared Double Burner Electric Cooktop - 1800W Portable Stove, Heat-up In Seconds, Countertop Cooktop for Dorm, Compatible with All Cookware

Overview: This 1800W infrared cooktop offers portable cooking for dorms, offices, and RVs. The stainless steel unit heats via infrared radiation, working with any cookware up to 7.1 inches diameter. It promises fast, even heating without requiring magnetic-bottomed pans, making it a flexible alternative to induction.
What Makes It Stand Out: Infrared technology enables universal cookware compatibility—aluminum, glass, ceramic, and stainless steel all work seamlessly. The vertical heating design reaches cooking temperature in seconds while distributing heat evenly. Safety features include automatic temperature cycling, thermal fuse protection, and flameless operation that eliminates carbon monoxide risk. An exceptional 18-month replacement policy provides long-term peace of mind.
Value for Money: At $89.99, the price reflects infrared versatility and durable construction. You’re paying for cookware freedom and faster heating than coil burners, though single-burner induction models offer more power for less. The stainless steel body withstands heavy use, justifying the mid-range cost for frequent users who own non-magnetic pans.
Strengths and Weaknesses: Strengths include universal cookware compatibility, rapid heating, compact portability, robust safety systems, and outstanding warranty coverage. The stainless steel build ensures durability. Weaknesses: the “double burner” name is misleading—features describe a single burner. It lacks precise temperature settings, and the 7.1-inch cookware limit restricts larger pots. No child lock is mentioned.
Bottom Line: Best for users prioritizing cookware flexibility and safety in compact spaces. The infrared technology and sturdy build make it a reliable backup solution, though the ambiguous burner description and moderate power may disappoint those needing multi-dish capacity.
2. MegaChef Electric Easily Portable Ultra Lightweight Dual Coil Burner Cooktop Buffet Range in Matte Black

Overview: This dual-coil burner cooktop provides basic electric cooking for under $20. Measuring 18 x 9.5 x 2 inches, it’s designed for travel, dorms, and temporary setups. Two independent burners with separate controls allow simultaneous cooking, offering essential functionality in an ultra-compact form factor that cools quickly for storage.
What Makes It Stand Out: The sub-$20 price point is remarkable for a dual-burner unit. Individual heat settings for each coil provide genuine multi-tasking capability. Its extreme lightweight design and rapid cool-down feature enhance portability. Operation is foolproof—plug in, adjust knobs, and cook—requiring no technical knowledge or special cookware.
Value for Money: At $19.98, this delivers exceptional cost-per-burner value. Coil technology is less efficient than modern alternatives, but the affordability is unbeatable for occasional use. Frequent cooks will face higher electricity costs and slower heating, but as a backup or travel solution, it’s practically disposable in price yet functional in performance.
Strengths and Weaknesses: Strengths include incredible affordability, dual-burner versatility, extreme portability, simple operation, and no cookware restrictions. It’s ideal for temporary living situations. Weaknesses: coil burners heat unevenly, respond slowly to temperature changes, and are difficult to clean. The 5.5-inch burner diameter limits cookware size, and safety features are minimal beyond basic overheat protection.
Bottom Line: A practical, no-frills solution for basic cooking needs in constrained spaces. Recommended for occasional use, travel, or emergency backup rather than daily cooking. The dual-burner convenience at this price is unmatched, but expect modest performance and durability.
3. Portable Induction Cooktop, Countertop Burner with Multi-Function, 2200w Electric Stove with Easy Clean Glass, 8 Modes Sensor Touch Cooker (HO2)

Overview: This Kiseely induction cooktop delivers 2200W of power in an ultra-thin 63mm profile. Eight cooking presets and sensor-touch controls on a crystal glass surface provide modern functionality for home or travel. The unit only activates with magnetic cookware, offering precision heating for serious cooks in compact spaces.
What Makes It Stand Out: The 2200W output surpasses most competitors under $50, enabling rapid boiling and high-heat searing. Eight power levels from 100W-2200W offer exceptional control. The <55dB low-noise operation is noticeably quieter than typical induction units. A 30-day free trial and powerful fan cooling system demonstrate thoughtful engineering.
Value for Money: At $45.99, this packs premium power and features into a budget-friendly price. You get more wattage than $70+ alternatives, though the limitation to magnetic cookware may require new pan purchases. The ultra-thin design adds portability value. For induction-ready kitchens, it’s among the best power-per-dollar options available.
Strengths and Weaknesses: Strengths include high 2200W power, eight cooking modes, ultra-portable thin design, quiet operation, easy-clean glass surface, and cookware sensor safety. Weaknesses: restricted to magnetic cookware only, excluding aluminum and glass. The lesser-known brand’s long-term reliability is unproven, and no child lock is mentioned. The power cord length is unspecified.
Bottom Line: Outstanding value for induction-compatible kitchens needing powerful, portable cooking. Best for users who own magnetic cookware or will buy it. The high wattage and slim profile suit serious cooks in small spaces, but cookware compatibility is the critical deciding factor.
4. Cusimax Hot Plate Electric,Countertop Infrared Triple Burner with 7″ Ceramic Glass Cooktop,Electric Hot Plate for Cooking,11 Level Temperature Setting

Overview: The Cusimax Triple Burner Infrared Cooktop provides three independent heating zones on a 7-inch ceramic glass surface. With 1800W total power split across left, center, and right panels, it targets users needing true multi-dish capacity. The stainless steel housing and ETL certification position it as a premium portable appliance for home kitchens.
What Makes It Stand Out: Three separate cooking zones offer stovetop-like versatility unmatched by single-burner units. Infrared technology ensures compatibility with all cookware types, while 11 temperature levels provide precise control. The automatic safety shutdown and overheat protection combine with durable crystalline ceramic and stainless steel construction for professional-grade reliability.
Value for Money: At $129.99, the triple-burner layout commands a premium. The price is justified if you regularly cook multiple dishes simultaneously. However, sharing 1800W across three zones limits per-burner intensity—you can’t boil, sear, and simmer at full power concurrently. For the cost, two high-wattage single burners might offer more flexibility.
Strengths and Weaknesses: Strengths include three independent burners, universal cookware compatibility, robust safety features, ETL certification, and easy-clean ceramic glass. The stainless steel body ensures durability. Weaknesses: shared power reduces individual burner strength, relatively large footprint, and highest price in this comparison. The 7-inch zones restrict larger cookware, and the total wattage is modest for three burners.
Bottom Line: Ideal for small apartments or as a supplementary cooktop where multi-dish convenience is paramount. The triple-burner layout excels at simultaneous cooking, but power users may find the shared wattage restrictive. Choose this for versatility over maximum heat output.
5. Amazon Basics 1800W Electric Portable Induction Cooktop, Induction Burner with Child Lock, Overheat Protection, Timer, 8 Power Settings, Up to 440°F, for Cookware with Diameter 5.7"-8.2", Black
Overview: The Amazon Basics 1800W Induction Cooktop combines brand reliability with practical portability. Eight power levels (300-1800W) and a 160-440°F temperature range cover most cooking methods. A 3-hour timer with LED display and comprehensive safety features—including child lock and auto-pause—make it suitable for families in RVs, studios, or small apartments.
What Makes It Stand Out: Amazon’s customer service infrastructure provides unmatched support confidence. The safety suite is exceptional: child lock, auto-pause when cookware is removed, overheat protection, and voltage warning system. Preset cooking modes simplify meal preparation. The tempered glass surface resists scratches and heat damage while enabling effortless cleaning.
Value for Money: At $50.06, this hits the sweet spot between affordability and trusted quality. You’re paying a modest premium over generic brands for Amazon’s quality control. While 1800W is less than some competitors, it’s sufficient for most tasks. The restricted 5.7"-8.2" cookware diameter is typical for induction but limits flexibility. Safety features justify the price for families.
Strengths and Weaknesses: Strengths include trusted brand backing, excellent safety features (child lock, auto-pause), preset modes, 3-hour timer, voltage warning, and durable tempered glass. Weaknesses: limited to magnetic cookware, restrictive pot size range, and lower maximum power than some similarly priced options. Not recommended for slow, low-temperature cooking tasks.
Bottom Line: A reliable, family-safe choice for induction-compatible kitchens. Amazon’s support and advanced safety features justify the slight price premium. Best for users wanting peace of mind and straightforward operation, though cookware limitations require advance planning.
6. OVENTE Countertop Infrared Single Burner, 1000W Electric Hot Plate with 7” Ceramic Glass Cooktop, 5 Level Temperature Setting & Easy to Clean Base, Compact Stove for Home Dorm Office, Silver BGI101S

Overview: The OVENTE BGI101S is a compact infrared single burner designed for minimalist cooking needs. At just 2.4 pounds, this 1000-watt unit delivers infrared heating through a sleek 7-inch ceramic glass cooktop, making it ideal for dorm rooms, offices, or small apartments where space is premium.
What Makes It Stand Out: Its infrared technology sets it apart from basic coil burners, providing faster, more even heating without requiring special cookware. The universal compatibility means your existing pots and pans work perfectly. Weighing less than a laptop, it’s exceptionally portable, and the crystallite glass surface wipes clean in seconds.
Value for Money: At $17.99, this is an unbeatable entry point for supplemental cooking. Traditional hot plates at this price point use inferior coil elements that heat unevenly and are difficult to clean. You’re getting premium infrared technology and a glass cooktop for the cost of a pizza.
Strengths and Weaknesses: Pros: Infrared heating ensures consistent results; universal cookware compatibility; featherlight portability; effortless cleaning; auto shut-off safety feature. Cons: 1000W power limits boiling speed; single burner restricts meal complexity; basic 5-level control lacks precision; small 7" cooking zone.
Bottom Line: Perfect for occasional use in tight spaces. While not a primary cooktop replacement, it excels as a reliable secondary burner for warming, simmering, and light frying tasks.
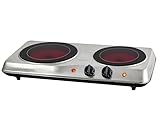
7. 2 Burner Electric Cooktop 24 inch, 110-120V Plug in 2000W Ceramic Cooktop, Portable Electrics Stove with Handles,Touch & Knob Control, Safety Lock, 9 Heating Levels, 240Mins Timer, Overheat Protection

Overview: This 24-inch portable cooktop brings professional-grade features to countertop cooking. Delivering 2000W across two ceramic burners with intelligent power management, it’s engineered for serious home chefs who need reliable portable cooking with precise control and robust safety systems.
What Makes It Stand Out: The intelligent PowerShare technology automatically distributes power between burners to prevent circuit overload—a game-changer for RVs and dorms. The hybrid control system combines tactile knobs with sensor touch, offering nine precise heat levels and a 240-minute timer. Safety features include child lock and overheat protection.
Value for Money: At $118.99, it’s a premium investment, but comparable dual-burner induction units cost twice as much and require specific cookware. You’re getting near-commercial performance with universal cookware compatibility and portability that built-in units can’t match.
Strengths and Weaknesses: Pros: Dual independent burners with smart power balancing; precise 9-level temperature control; extended timer; comprehensive safety features; portable with integrated handles; easy-clean ceramic surface. Cons: Higher price point; larger footprint requires counter space; 2000W shared power limits simultaneous high-heat cooking; may be feature-rich for casual users.
Bottom Line: Ideal for apartments, RVs, or as a permanent cooktop alternative. The advanced features justify the cost for anyone who cooks regularly and values safety, precision, and portability.
8. OVENTE Countertop Infrared Double Burner, 1700W Electric Hot Plate and Portable Stove with 7.75" and 6.75" Ceramic Glass Cooktop, 5 Level Temperature Setting and Easy to Clean Base, Silver BGI102S
Overview: The OVENTE BGI102S doubles down on infrared convenience with two ceramic glass burners in a sleek, portable package. This 1700-watt unit offers the flexibility of dual cooking zones while maintaining the easy-clean benefits and universal cookware compatibility of its single-burner sibling.
What Makes It Stand Out: You get two differently-sized infrared burners (7.75" and 6.75") that heat rapidly and evenly without induction’s cookware restrictions. At 4.6 pounds, it’s still highly portable, and the stainless steel housing with crystallite glass tops delivers a premium aesthetic that belies its sub-$35 price.
Value for Money: At $34.99, you’re paying less than double the single-burner price for twice the cooking capacity. Competing dual infrared burners typically start at $50+, making this exceptional value for multitaskers who need simultaneous cooking without breaking the bank.
Strengths and Weaknesses: Pros: Dual infrared burners for versatile cooking; rapid, even heating; universal cookware compatibility; lightweight portability; easy-wipe glass surfaces; attractive design. Cons: Shared 1700W power limits both burners on high; basic 5-level controls lack precision; no timer function; uneven burner sizes may limit pot combinations.
Bottom Line: Excellent middle-ground solution for small households. While power sharing requires some temperature management, it handles everyday tasks like boiling and sautéing simultaneously with impressive efficiency for the price.
9. OVENTE Electric Countertop Double Burner, 1700W Cooktop with 6" and 5.75" Stainless Steel Coil Hot Plates, 5 Level Temperature Control, Indicator Lights and Easy to Clean Cooking Stove, Black BGC102B

Overview: This OVENTE double burner takes a traditional approach with stainless steel coil elements, delivering 1700W of no-frills cooking power. The compact unit features two differently-sized hot plates (6" and 5.75") controlled by independent knobs, making it a straightforward solution for supplemental cooking needs.
What Makes It Stand Out: The coil design prioritizes durability and affordability over aesthetics. Metal heating tubes are inherently rugged and resistant to thermal shock, making this ideal for rough handling in dorm rooms or camping trips. The black stainless steel base hides stains better than lighter finishes.
Value for Money: At $30.73, it’s the most affordable double burner in OVENTE’s lineup, undercutting even the budget cast-iron model. For those prioritizing function over form, this delivers dual-burner convenience at a single-burner price point, though cleaning requires more effort than glass-top models.
Strengths and Weaknesses: Pros: Lowest-cost dual burner; durable coil elements; independent temperature controls; compact storage; stable non-slip feet. Cons: Coil design makes cleaning difficult; slower heating than infrared; less even heat distribution; smaller plate sizes limit cookware; exposed elements pose burn risk.
Bottom Line: A utilitarian choice for occasional dual-burner needs. While cleaning and heating speed trail behind infrared models, the rock-bottom price and proven coil technology make it a sensible backup for budget-conscious buyers.
10. OVENTE Electric Countertop Double Burner, 1700W Cooktop with 7.25" and 6.10" Cast Iron Hot Plates, Temperature Control, Portable Cooking Stove and Easy to Clean Stainless Steel Base, Black BGS102B

Overview: The OVENTE BGS102B features cast iron hot plates that provide superior heat retention and durability. This 1700-watt double burner combines the reliability of traditional electric stoves with modern portability, offering two differently-sized plates (7.25" and 6.10") for versatile cooking in compact spaces.
What Makes It Stand Out: Cast iron plates deliver steady, consistent heat that excels at searing and simmering, maintaining temperature better than coil or infrared elements when cookware is removed. The heavy-duty construction ensures years of reliable service, while the non-slip rubber feet keep it stable during vigorous stirring.
Value for Money: At $24.99, it’s the cheapest double burner option from OVENTE, making it an exceptional value for cast iron enthusiasts. While slower to heat than infrared, the superior heat retention and rugged durability compensate, especially for slow-cooking methods.
Strengths and Weaknesses: Pros: Excellent heat retention; cast iron durability; lowest price point; stable during use; stainless steel housing resists warping. Cons: Slow heating and cooling; heavy plates reduce portability; requires seasoning to prevent rust; uneven heating compared to glass tops; no timer or auto shut-off mentioned.
Bottom Line: Best suited as a permanent supplementary cooktop rather than a portable solution. The cast iron performance and bargain price make it ideal for those who prioritize heat retention and durability over speed and easy cleaning.
Understanding Precision Simmering: Why It Matters for Beginners
Before we dissect cooktop features, let’s establish why precision simmering deserves your attention. Many novice cooks conflate “low heat” with “simmer,” but the distinction is critical. A proper simmer maintains temperatures between 180°F and 205°F—hot enough to cook food through and extract flavors, but gentle enough to prevent aggressive bubbling that toughens proteins or clouds broths. For beginners, this controlled environment is forgiving; it buys you time to prep other ingredients, correct seasoning, or simply step away without disaster.
What Exactly Is Precision Simmering?
Precision simmering is the ability to maintain that narrow temperature window consistently, hour after hour. It’s what allows chili to develop complex depth without burning on the bottom, or chocolate to melt into a glossy ganache instead of seizing into a grainy mess. Unlike boiling’s violent turbulence, a true simmer shows subtle movement—tiny bubbles breaking the surface occasionally, a gentle quiver in the liquid. Electric cooktops excel here because they can be engineered for exact temperature control, but only if they possess the right technical foundation.
The Science Behind the Perfect Simmer
The physics is straightforward: water-based liquids can’t exceed 212°F at sea level without boiling vigorously. The simmering sweet spot lives just below this threshold. Quality electric cooktops use sensors and cycling mechanisms to hover in this range, applying micro-bursts of heat to counteract cooling from evaporation and ambient loss. For beginners, this means your cooktop needs both low-wattage capability and intelligent heat management—not just a knob that goes from 1 to 10.
Types of Electric Cooktops: Finding Your Perfect Match
Your journey begins with understanding the three primary electric cooktop architectures. Each brings distinct advantages and trade-offs for precision simmering, and your choice will fundamentally shape your cooking experience.
Traditional Coil Cooktops: Old-School Reliability
Coil cooktops—the classic spiral burners—offer surprisingly nuanced simmering control for the budget-conscious beginner. Their direct metal-to-cookware contact provides excellent feedback; you can literally see the coil glow dimly at low settings. The thermal mass of the heavy coil retains heat beautifully, smoothing out temperature fluctuations that plague some modern designs. However, they heat and cool slowly, requiring patience and foresight. The uneven coil pattern can create hot spots, demanding frequent stirring for sauces. For simmering, look for coils with multiple concentric rings; these allow outer sections to provide gentle ambient heat while the center maintains the core temperature.
Smooth-Top Radiant Cooktops: Modern Aesthetics Meet Function
Ceramic glass radiant cooktops hide heating elements beneath a sleek surface, offering easy cleaning and contemporary style. For simmering, the key differentiator is element design. Ribbon-style elements—flat, wide heating wires—distribute heat more evenly than traditional coil-style elements hidden beneath the glass. The glass itself becomes a heat reservoir, which helps maintain steady temperatures but also means slower response times. Beginners appreciate the visual feedback: many models display residual heat indicators that glow until the surface cools, preventing accidental burns when adjusting simmering pots.
Induction Cooktops: The Precision Powerhouse
Induction technology uses electromagnetic fields to heat cookware directly, bypassing the cooktop surface entirely. This is the gold standard for precision simmering. The response is instantaneous—dial back the power, and the temperature drops within seconds. Most induction units can maintain temperatures as low as 100°F consistently, perfect for melting butter or keeping delicate sauces warm without continued cooking. The learning curve is steeper; you must use magnetic cookware, and the silent operation lacks the visual cues of glowing coils. But for pure simmering control, induction’s granularity—often offering 15-20 precise power levels—gives beginners unmatched control.
Key Features That Define Simmering Excellence
Beyond basic type, specific features determine whether a cooktop merely claims simmering capability or truly delivers it. These are the non-negotiables for beginners who want repeatable success.
Element Size and Configuration: Matching Your Cookware
A common beginner mistake is using a massive element for a small saucepan. For precision simmering, the heating element should match your cookware’s base diameter within an inch. Oversized elements cycle excessively, creating temperature swings. Undersized elements concentrate heat, causing scorching. Look for cooktops offering dual-ring or expandable elements. These adapt to different pot sizes, ensuring even, gentle heat distribution. Some premium designs feature “melt” settings on specific elements—pre-programmed low-wattage zones optimized for delicate tasks.
Temperature Control Granularity: The Devil’s in the Details
A cooktop with only three low-heat settings can’t compete with one offering fifteen. Granular control means smaller jumps between power levels, allowing you to fine-tune the exact energy input needed. For simmering, you want power increments of 100 watts or less in the low range. Some advanced models feature “simmer” buttons that automatically cycle between multiple power levels, maintaining average temperature while preventing boil-overs. This pulsing technique—alternating between 300W and 800W every few seconds—achieves what a steady 500W setting cannot: responsiveness without volatility.
Power Boost vs. Simmer Settings: Understanding the Spectrum
Many cooktops boast high-wattage “power boost” features for rapid boiling. While impressive, this capability is irrelevant for simmering. What matters is the opposite end of the spectrum: how low can it go? Investigate the minimum wattage output. True simmering excellence requires elements that can sustain 300-500 watts continuously. Some induction models drop as low as 100 watts. Be wary of units where the lowest setting still cycles above 800 watts; they’ll struggle with delicate tasks like keeping hollandaise warm or reducing wine for a pan sauce.
Bridge Elements and Flex Zones: Versatility for Complex Dishes
Bridge elements connect two standard burners into one elongated heating zone. For beginners, this isn’t just about griddle pans—it’s about creating a larger, gentler heat field for wide stockpots or multiple small saucepans. Flex zones take this further, allowing you to place cookware anywhere within a defined area. These zones often have dedicated low-power modes that distribute heat more evenly than a single concentrated element, reducing the hot spots that ruin delicate reductions.
Wattage and Power Ratings: Decoding the Numbers
Manufacturers love flashing impressive wattage numbers, but for precision simmering, the relevant specs live at the bottom of the range. Understanding these numbers prevents disappointment.
Low-Wattage Performance: The True Test of Simmering
A cooktop’s ability to maintain stable temperatures below 500 watts separates pretenders from performers. Traditional coil elements typically bottom out around 400-600 watts, which can be adequate but not exceptional. Smooth-top radiants often struggle here, with some models cycling at 800+ watts even on “low.” Induction cooktops dominate this category, with premium models offering dedicated simmer modes at 150-300 watts. When researching, look for the “minimum power” specification in the manual—not the “maximum power” advertised on the box.
Dual-Ring and Triple-Ring Elements: Adaptive Power
Multi-ring elements let you activate only the inner coil for small pans, effectively reducing minimum wattage. A 2400-watt element might have a 600-watt inner ring perfect for simmering a single cup of sauce. This adaptability is crucial for beginners building their cookware collection. Check if the cooktop allows independent control of each ring; some budget models activate all rings simultaneously, defeating the purpose.
Control Interfaces: From Knobs to Touchscreens
How you interact with your cooktop directly impacts simmering precision. The interface determines how quickly you can adjust heat and how accurately you can set it.
Traditional Knob Controls: Tactile Feedback Advantage
Physical knobs offer intuitive, muscle-memory control. You can dial in minute adjustments without looking, feeling the subtle clicks between settings. For simmering, this tactile feedback helps you remember that “just past 2 o’clock” is your perfect risotto temperature. Knobs also allow analog adjustments—you’re not limited to discrete digital steps. The downside? They can be harder to clean, and grease buildup may affect smooth operation over time.
Digital Touch Controls: Precision at Your Fingertips
Touch controls provide exact power level readouts, often displaying actual wattage or temperature. Many feature dedicated “simmer” buttons with pre-programmed cycling algorithms. The learning curve involves understanding that a “level 3” on one cooktop may differ from another—there’s no universal standard. Look for models with “plus/minus” buttons that adjust in small increments rather than sliders, which can be imprecise. Some touch panels include timers that automatically reduce power after a set period, perfect for recipes requiring an initial boil followed by a long simmer.
Smart Connectivity: Is It Worth It for Beginners?
Wi-Fi-enabled cooktops allow smartphone control and monitoring. While this seems gimmicky, it offers genuine simmering benefits. You can adjust temperature remotely if you notice a boil-over starting, or receive alerts if the cooktop detects an empty pan heating. For beginners, the real value lies in recipe integration—some apps automatically set and adjust temperatures through each cooking phase. However, connectivity adds complexity and cost. Consider whether you’ll use these features or if they’d become another underutilized gadget.
Cooktop Materials and Durability
The surface material affects not just aesthetics but also simmering performance and long-term maintenance. A scratched or stained cooktop can impact heat distribution and your cooking confidence.
Ceramic Glass Surfaces: Maintenance and Performance
Most modern electric cooktops use Schott Ceran or similar tempered ceramic glass. For simmering, the glass’s smoothness ensures perfect contact with flat-bottomed cookware, eliminating hot spots caused by warped pans sitting unevenly on coil elements. However, glass retains heat, which can be a double-edged sword. It helps maintain temperature during brief power cycles but also means the surface stays dangerously hot long after you’ve turned off the heat. When simmering for hours, this residual heat can continue cooking food even after you’ve removed the pan—a pro technique if you understand it, a ruined sauce if you don’t.
Stainless Steel Trim and Build Quality
The durability of control panels and trim impacts longevity. In high-humidity simmering environments, cheap plastics can degrade. Look for cooktops with sealed control modules to prevent steam infiltration. The quality of heating element mounting beneath the glass affects temperature consistency; poorly mounted elements create uneven heating patterns visible as hot spots during long simmers.
Safety Features That Protect Your Culinary Journey
Beginners need guardrails. The right safety features prevent accidents during those long, unattended simmering sessions that develop deep flavors.
Hot Surface Indicators: Preventing Accidental Burns
Essential for smooth-top cooktops, these lights remain illuminated until the surface drops below 150°F. For simmering, they serve a second purpose: they indicate whether your cooktop is still radiating significant heat after you’ve reduced the power. If the indicator stays lit for more than 10 minutes after dialing back to “simmer,” your cooktop retains too much thermal mass, which can scorch delicate sauces.
Auto Shut-Off and Timer Functions: Peace of Mind
Many cooktops include timers that shut off the element after a set duration—crucial for beginners prone to forgetting that long-simmering bone broth. Advanced models feature motion sensors that detect if you’ve left the kitchen, reducing power automatically. Some induction units even sense if a pan is empty, shutting down to prevent damage. These features let you simmer confidently while multitasking.
Child Lock Features: Family-Friendly Cooking
If you have children, control lockouts prevent accidental setting changes. During a 4-hour simmer, one curious button press can spell disaster. Look for locks that secure both power levels and on/off functions. Some models require a specific touch pattern to unlock, preventing clever toddlers from figuring it out.
Installation Considerations for Optimal Performance
Even the best cooktop performs poorly if installed incorrectly. These technical details affect simmering consistency more than most beginners realize.
Electrical Requirements: Amps, Volts, and Circuit Breakers
Standard electric cooktops require 240V circuits, but amperage varies. A 30-amp unit may struggle to maintain stable low power across multiple elements simultaneously; the voltage can sag, causing temperature fluctuations. For serious simmering—especially with induction—opt for 40-amp or 50-amp service. This ensures stable voltage delivery when running multiple low-power elements for hours. If you’re replacing an existing cooktop, verify your circuit capacity before falling in love with a high-powered model.
Ventilation Needs: Keeping Your Kitchen Comfortable
Long simmering sessions generate significant steam and heat. While not directly a cooktop feature, your ventilation setup affects performance. Excessive steam can condense into control panels, causing malfunctions. Strong downdraft ventilation can actually cool cookware slightly, requiring you to compensate with higher power settings. For induction cooktops, ensure your ventilation doesn’t create electromagnetic interference, which can disrupt sensors. A range hood positioned 24-30 inches above the cooktop provides optimal capture without interfering with cooking dynamics.
Budget Breakdown: What to Expect at Every Price Point
Price correlates with simmering precision, but smart beginners can find excellent performance without premium costs. Understanding what each tier offers prevents overspending on unnecessary features.
Entry-Level Options: Simmering on a Budget
Sub-$500 cooktops typically offer basic coil or simple radiant designs. Simmering performance is adequate but requires technique. You’ll need to manually cycle the knob—turning it off and on every few minutes—to maintain delicate temperatures. These units lack dedicated simmer settings and often have coarse power increments. However, they teach fundamental heat management skills. If you choose this route, prioritize models with at least six distinct low-power settings and robust mechanical knobs that won’t slip from your chosen position.
Mid-Range Sweet Spot: Features That Matter
Between $600 and $1,200, you encounter serious simmering capabilities. Expect dual-ring elements, dedicated melt/simmer modes, and digital touch controls with fine granularity. Induction becomes accessible in this range, offering true precision. These cooktops include timers, hot surface indicators, and sometimes bridge elements. The build quality ensures consistent performance over years. For most beginners, this is the ideal investment zone—you get professional-level simmering control without paying for smart features you’ll rarely use.
Premium Performance: When to Invest
Above $1,500, cooktops offer flex zones, smartphone integration, and advanced sensors that automatically adjust power based on pan temperature. While impressive, these features address problems most beginners don’t yet have. The exception: if you regularly cook for large groups and need multiple precise simmering zones simultaneously. The law of diminishing returns hits hard here—a $1,800 cooktop may only be 10% better at simmering than an $1,100 model, but that 10% can matter for ambitious home cooks tackling complex multi-pot dishes.
Common Beginner Mistakes and How to Avoid Them
Even the best cooktop can’t compensate for technique errors. Recognizing these pitfalls accelerates your learning curve dramatically.
Using the Wrong Cookware: A Simmering Dealbreaker
Warped, thin-bottomed pans are simmering kryptonite. They create hot spots that scorch food despite low power settings. Invest in heavy, flat-bottomed stainless steel or enameled cast iron. For induction, ensure cookware is magnetic and perfectly flat—place a ruler across the base; any light showing underneath means uneven heating. Beginners often use non-stick pans for everything, but many non-stick coatings degrade under prolonged simmering. Reserve them for eggs and delicate fish; use stainless for sauces and braises.
Misunderstanding Heat Retention: Patience Is Key
Electric elements, especially radiant and coil, retain significant heat. A common mistake is reducing power too late. When your sauce reaches a simmer, dial back the heat 2-3 minutes before you think necessary. The residual heat will carry it to the target temperature. Conversely, when increasing heat, do so gradually. A sudden jump from level 2 to level 5 can overshoot by 50 degrees due to thermal lag. Think of your cooktop as a freight train, not a sports car—it takes time to change momentum.
Overlooking Preheat Times: Setting Yourself Up for Success
Beginners often rush the preheat, cranking heat to high then immediately reducing to simmer. This creates thermal shock and uneven heating. Instead, preheat your pan on the same low setting you’ll use for simmering. It takes longer—perhaps 5 minutes instead of 1—but the temperature distribution becomes beautifully uniform. For induction, this is less critical due to instant response, but the principle still applies: gentle preheating prevents food from sticking and ensures even cooking from the start.
Maintenance Tips for Long-Lasting Performance
A well-maintained cooktop delivers consistent simmering performance for a decade or more. Neglect leads to hot spots and control failures.
Daily Cleaning Routines: Protecting Your Investment
After each simmering session, wipe down the cooktop while it’s still slightly warm (but not hot). Sugary sauces and starchy liquids can bake onto the surface during long cooks, creating insulating spots that affect heat transfer. Use a ceramic cooktop cleaner and a soft cloth daily. For coil cooktops, remove drip bowls and wash them weekly; built-up grease can smoke and affect temperature sensors.
Deep Cleaning Protocols: Restoring Like-New Condition
Monthly, perform a thorough cleaning. For glass tops, use a razor scraper at a 30-degree angle to remove stubborn residue, followed by a polishing compound. This maintains the smooth surface critical for even heat transfer. For induction, clean the sensor area (usually a central dot on each zone) with isopropyl alcohol; grease buildup here can cause the unit to misread pan temperature, leading to erratic simmering. Coil elements can be removed and soaked in hot, soapy water—ensure they’re completely dry before reinstallation.
Preventing Scratches and Damage: Best Practices
Scratches on glass cooktops create stress points that can lead to cracking under thermal cycling. Always lift pots; never slide them, especially heavy cast iron. Use cookware with smooth, rounded bottom edges. Avoid glass or ceramic cookware on radiant cooktops; they can fuse to the surface if overheated. For induction, don’t slide magnetic pans either—this can scratch both the cooktop and the pan’s base, eventually creating air gaps that reduce efficiency.
The Learning Curve: Mastering Your New Cooktop
Every cooktop has a personality. Dedicate time to learning yours, and you’ll achieve simmering mastery faster than you thought possible.
Trial and Error: Documenting Your Simmering Sweet Spots
Create a simple log: for each recipe, note the element size, power level, and time to achieve a stable simmer. You’ll quickly identify patterns. Perhaps your front-left element runs 10% hotter than the rear-right. Maybe level 4.5 is your magic number for tomato sauce, while level 3.2 works for custard. This empirical approach transforms guesswork into repeatable technique. Many beginners find that photographing the control panel settings for successful dishes becomes an invaluable reference library.
Using Visual and Auditory Cues: Beyond the Settings
Rely on your senses, not just the numbers. A perfect simmer produces a gentle “blip-blip” sound—soft bubbles breaking the surface rhythmically. Visually, you should see movement but no rolling action. Steam should rise steadily, not in violent bursts. If you hear silence, your heat is too low. If you hear aggressive bubbling, it’s too high. These cues become second nature and will help you adjust even the most basic cooktop to achieve precision results.
Energy Efficiency: Simmering Without the Guilt
Long simmering sessions consume energy, but smart choices minimize impact on both your wallet and the environment.
Induction vs. Radiant: The Efficiency Showdown
Induction cooktops are 85-90% efficient, transferring most energy directly to the pan. Radiant smooth-tops manage 65-75%, while coil tops lag at 55-65%. Over a 3-hour simmer, induction might use 0.5 kWh compared to 0.9 kWh for radiant. That difference adds up across weekly cooking sessions. For beginners, this efficiency means less kitchen heat, reducing air conditioning loads in summer—a hidden cost saving.
Residual Heat Utilization: Smart Cooking Techniques
Leverage retained heat to your advantage. When simmering is nearly complete, turn off the element 5-10 minutes early and let residual heat finish the job. This works exceptionally well on radiant and coil cooktops. For dishes requiring a long simmer followed by a rest period (like braised short ribs), this technique can cut energy use by 20%. Just ensure food safety: the temperature must stay above 140°F to remain in the safe zone.
Warranty and Support: What Beginners Should Know
Your cooktop is an investment. Understanding protection options prevents costly surprises down the road.
Standard Warranty Coverage: Reading the Fine Print
Most manufacturers offer 1-year full warranties, but heating elements often have separate coverage—sometimes up to 5 years. For simmering, element longevity matters; constant low-power cycling can stress components differently than high-heat use. Check if the warranty covers “temperature control accuracy.” Some policies exclude this, claiming it’s a calibration issue rather than a defect. A 90-day satisfaction guarantee is valuable for beginners; it lets you test simmering performance and return the unit if it doesn’t meet expectations.
Extended Protection Plans: Are They Worth It?
Third-party extended warranties for appliances often have poor value, but manufacturer-offered plans can be worthwhile for premium induction cooktops. These complex units have more failure points—control boards, sensors, electromagnetic components. A 5-year plan costing 15% of the purchase price makes sense if it includes in-home service and covers all simmer-specific functions. For sub-$800 coil or radiant units, skip the extended warranty; replacement is often cheaper than repair.
Making Your Final Decision: A Beginner’s Checklist
Before you commit, run through this practical checklist:
- Minimum Power: Can it sustain <500 watts on at least one element?
- Control Granularity: Are there at least 10 distinct low-power settings?
- Element Match: Does it have an element that fits your most-used saucepan?
- Safety: Does it have hot surface indicators and auto-shutoff?
- Warranty: Is element coverage at least 3 years?
- Installation: Does your electrical service support its requirements?
- Cookware: Do you own (or are you willing to buy) compatible pots?
- Learning Curve: Does the control interface feel intuitive to you?
Trust your instincts. A cooktop that seems confusing in the showroom will frustrate you during a rushed weeknight dinner. Choose the model that makes you feel confident, not intimidated.
Frequently Asked Questions
What’s the difference between simmering and boiling?
Simmering occurs between 180°F and 205°F with gentle bubble movement, while boiling happens at 212°F with vigorous, rolling bubbles. Simmering allows flavors to develop without toughening proteins or evaporating liquid too quickly. The visual cue is key: simmering shows occasional bubbles breaking the surface; boiling looks like a jacuzzi jet.
Can I achieve a good simmer on a basic electric coil cooktop?
Absolutely, but it requires technique. Use the lowest setting, choose a heavy, flat-bottomed pan, and be prepared to manually cycle the heat—turning it off for 30 seconds every few minutes to prevent temperature creep. It’s more hands-on but teaches fundamental heat management skills that transfer to any cooking method.
Do I need special cookware for precision simmering?
You need quality, not specialty. Heavy-gauge stainless steel or enameled cast iron with perfectly flat bottoms are ideal. Avoid thin, warped pans that create hot spots. For induction, cookware must be magnetic. The key is weight: heavier pans retain heat better, smoothing out temperature fluctuations from element cycling.
How do I know if my cooktop maintains a consistent temperature?
Place 2 inches of water in a saucepan and set your cooktop to a low setting. After 10 minutes, use an instant-read thermometer to check the temperature every 2 minutes for 10 minutes. If it stays within a 5-degree range, you have excellent consistency. If it swings more than 10 degrees, your cooktop cycles too aggressively for true precision.
What wattage range is best for precision simmering?
Look for elements that can maintain 300-500 watts continuously. This provides enough energy to counteract cooling from evaporation without pushing into a boil. For delicate tasks like melting chocolate, the ability to drop to 100-200 watts is ideal. Avoid cooktops where the lowest setting exceeds 800 watts.
Are induction cooktops really better for simmering?
Yes, significantly. Induction offers immediate response and can maintain much lower temperatures consistently. The electromagnetic field heats only the pan, allowing precise control. However, the advantage diminishes if you don’t have compatible cookware or if you prefer the visual feedback of glowing elements. For pure performance, induction wins.
How long should it take to bring something to a simmer?
From cold, a covered pot should reach a simmer in 8-12 minutes on medium-low heat. Starting on high then reducing is faster but risks scalding the bottom. For beginners, the gentle preheat method—starting low and staying low—takes longer but prevents accidents and develops better flavors through gradual temperature increase.
Can I leave something simmering unattended?
For short periods (5-10 minutes), yes, if you use safety features like timers and auto-shutoff. For longer periods, check every 15-20 minutes to ensure liquid levels haven’t dropped too low. Even with the best cooktop, evaporation rates vary based on humidity, altitude, and cookware. Use a lid to reduce monitoring frequency and maintain consistent temperature.
Why does my simmer keep turning into a boil?
This usually means your cooktop’s minimum power is too high for your pan size. Try using a larger element at a lower setting, or move to a smaller burner. The issue can also be insufficient liquid; a shallow layer heats faster than a deep one. Add more liquid or use a heat diffuser—a metal plate that sits between element and pan, absorbing and distributing heat more gently.
What’s the ideal cookware size for simmering on electric?
Match the pan base to the element diameter within one inch. For most cooktops, a 6-inch element pairs perfectly with a 2-quart saucepan for sauces, while an 8-inch element suits a 4-quart pot for stews. Using a 10-inch pan on a 6-inch element wastes energy and creates uneven heating. When in doubt, go slightly smaller rather than larger—you can always move to a bigger element if needed.