Capturing that perfect steam rising from a freshly seared steak or the gentle simmer of a vibrant curry requires more than just a good camera—demands precise heat control that traditional hot plates and gas burners simply can’t deliver. Portable induction units have revolutionized how food photographers and content creators work, offering studio-level temperature accuracy in a compact, affordable package. But with dozens of options flooding the market under $90, separating the gems from the junk requires understanding nuanced features that standard reviews overlook.
This comprehensive guide cuts through marketing hype to reveal what truly matters when selecting a portable induction cooktop specifically for food photography. We’ll explore technical specifications, design considerations, and practical setup strategies that transform a budget-friendly appliance into a professional-grade styling tool.
Top 10 Portable Induction Units
Detailed Product Reviews
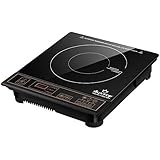
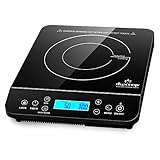
1. Duxtop Portable Induction Cooktop Burner, Induction Hot Plate with LCD Sensor Touch 1800 Watts, Silver 9600LS/BT-200DZ
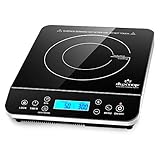
Overview: The Duxtop 9600LS represents the premium tier of portable induction cooking, offering unprecedented control with 20 preset power and temperature levels. This 1800-watt unit combines residential convenience with professional-grade precision, featuring a sleek LCD sensor touch panel and advanced safety systems. Weighing just over 5 pounds, it serves as an excellent primary cooking surface for small spaces or a powerful supplementary burner for elaborate meal preparation.
What Makes It Stand Out: This model’s exceptional 20-stage power and temperature granularity (100-1800W, 100°F-460°F) provides chef-level control rarely seen in portable units. The dedicated fast-boil button accelerates water heating by 50%, while the unique keep-warm function maintains 140°F for up to 30 minutes—perfect for sauces and side dishes. The 10-hour timer and child safety lock make it ideal for slow-cooking recipes and family kitchens.
Value for Money: At $116.99, this cooktop sits in the mid-premium range but justifies its price through superior control precision and build quality. Comparable commercial units cost 40-60% more, while cheaper alternatives typically offer only 8-10 power levels. The 83% energy efficiency translates to measurable electricity savings over time, offsetting the initial investment for regular users.
Strengths and Weaknesses:
- Strengths: Unmatched 20-stage control granularity; intuitive LCD touch interface; comprehensive safety features including auto-pan detection; extended 10-hour timer; energy-efficient performance; lightweight portability.
- Weaknesses: Premium pricing may deter casual users; potential high-pitched cookware noise with multi-clad pans; requires magnetic cookware; touch controls less glove-friendly than physical buttons.
Bottom Line: The Duxtop 9600LS is the definitive choice for serious home cooks seeking precision and versatility. While pricier than entry-level models, its granular control and advanced features make it worth every penny for daily use.
2. ChangBERT Induction Cooktop, Commercial Grade Portable Cooker, Large 8” Heating Coil, Premium Stainless Steel Countertop Burner with NSF Certified, 10 Hours Timer Powerful 1800W Professional Hot Plate

Overview: ChangBERT’s commercial-grade induction cooker brings restaurant-level durability to the portable appliance market. Engineered for continuous operation, this NSF-certified unit features an oversized 8-inch heating coil and robust stainless steel housing. The 1800-watt burner is designed to withstand the rigors of professional kitchens while remaining accessible for demanding home cooks who prioritize reliability over flashy features.
What Makes It Stand Out: The continuous-duty circuitry distinguishes this unit from consumer-grade alternatives, enabling non-stop cooking without thermal shutdown. Its unique power stabilization technology maintains consistent high output while reducing internal temperatures and operational noise. The expanded magnetic coil ensures superior heat distribution across large cookware, eliminating the hot spots common in smaller portable units. NSF certification guarantees compliance with commercial sanitation standards.
Value for Money: Priced at $99.99, this cooktop delivers exceptional professional value. Commercial induction units typically start at $200+, making this an accessible entry point for small catering businesses or serious home chefs. The durable construction and stable power output justify the 40% premium over basic consumer models, offering longevity that cheaper units cannot match.
Strengths and Weaknesses:
- Strengths: Commercial-grade durability with drop-test certification; stable high-power output for extended cooking; large 8-inch coil for even heating; glove-friendly tactile buttons; NSF/ETL commercial approval; easy-clean glass surface.
- Weaknesses: Fewer presets (9 power/18 temp) than premium consumer models; heavier at 7+ pounds; utilitarian aesthetic; limited advanced features like keep-warm modes.
Bottom Line: Perfect for food trucks, catering, or passionate home cooks who cook for hours. The ChangBERT prioritizes durability and consistent performance over bells and whistles, making it a smart long-term investment.
3. Duxtop 1800W Portable Induction Cooktop Countertop Burner, Gold 8100MC/BT-180G3
Overview: The Duxtop 8100MC offers reliable induction cooking at an entry-level price point, making it an ideal introduction to electromagnetic heating technology. This compact 1800-watt unit provides essential functionality without complexity, featuring a straightforward digital control panel and ten power levels. Its lightweight design and simplified operation appeal to occasional cooks, students, and RV enthusiasts seeking a no-fuss supplemental cooking solution.
What Makes It Stand Out: This model democratizes induction cooking by delivering Duxtop’s proven reliability at just $70.99—significantly undercutting most competitors while maintaining core safety features. The auto-pan detection and diagnostic error message system provide sophistication unexpected in this price bracket. Its rapid-cooling 7-blade fan system extends component life, addressing the longevity concerns common with budget appliances.
Value for Money: Exceptional value dominates this offering. At roughly 60% of the cost of premium portable induction cookers, it delivers 90% of real-world functionality. The 170-minute timer suffices for most recipes, and the ten temperature/power settings cover everyday cooking needs. While lacking advanced presets, it provides the essential induction benefits: speed, efficiency, and safety, making it the smartest budget choice available.
Strengths and Weaknesses:
- Strengths: Highly affordable from a reputable brand; lightweight and ultra-portable; comprehensive safety systems; auto-shutoff protection; easy-wipe cleaning surface; reliable auto-pan detection.
- Weaknesses: Limited 170-minute timer restricts slow cooking; only 10 power/temperature levels; basic LED display; no keep-warm or fast-boil presets; shorter warranty period than premium models.
Bottom Line: The Duxtop 8100MC is the practical choice for induction newcomers or occasional users. It sacrifices advanced features for affordability without compromising core performance or safety, making it unbeatable for the price.
4. ChangBERT Portable Induction Cooktop Enhanced Version, One-Click Max Power 1800W Large Heating Coil Burner, Precise Temperature Control, NSF Certified, Low Noise Hot Plate for Home & Commercial

Overview: ChangBERT’s Enhanced Version represents the pinnacle of their portable induction line, integrating professional-grade durability with consumer-friendly innovations. This flagship model builds upon their commercial foundation with a dual-IGBT control board, one-click max power function, and extended 12-hour timer. The dual digital display simultaneously shows power/temperature and timer status, addressing a common frustration with single-display units.
What Makes It Stand Out: The one-click max power button delivers instant 1800W output without scrolling through levels—a game-changer for high-heat searing and rapid boiling. The upgraded dual-IGBT circuitry provides superior temperature stability, maintaining precise heat levels for delicate sauces or prolonged simmering. The extended 12-hour timer enables overnight stock preparation and unattended slow cooking, while the dual display offers at-a-glance monitoring from any angle.
Value for Money: At $129.99, this premium model commands a 30% premium over the standard ChangBERT, but the enhancements justify the cost for serious users. The time saved through one-touch operation and the ability to run extended cooking cycles add tangible value. For commercial users, the productivity gains quickly offset the price difference, while home chefs gain professional capabilities unmatched by consumer brands.
Strengths and Weaknesses:
- Strengths: One-click max power for instant high heat; dual display for superior visibility; 12-hour timer for extended cooking; commercial NSF certification; stable precise temperature control; low-noise operation; durable 8-inch coil.
- Weaknesses: Highest price in portable category; may be over-featured for casual cooks; limited to 9 power levels despite premium positioning; heavier than consumer models.
Bottom Line: The Enhanced ChangBERT is the ultimate portable induction solution for professionals and serious enthusiasts. Its thoughtful upgrades transform it from a simple burner into a versatile cooking station worth the premium investment.
5. Amazon Basics 1800W Electric Portable Induction Cooktop, Induction Burner with Child Lock, Overheat Protection, Timer, 8 Power Settings, Up to 440°F, for Cookware with Diameter 5.7"-8.2", Black
Overview: Amazon Basics delivers a stripped-down induction cooker that prioritizes affordability and simplicity above all else. This 1800-watt unit provides fundamental electromagnetic heating with essential safety features, targeting budget-conscious consumers, dorm residents, and minimalists. Its compact black design integrates seamlessly into small spaces, while the pre-set cooking modes simplify operation for those intimidated by complex controls.
What Makes It Stand Out: The $50.06 price point makes this the most accessible induction cooktop from a major retailer, undercutting even store brands. The pre-set cooking modes (simmer, boil, fry, etc.) eliminate guesswork for beginners. Its targeted cookware diameter range (5.7"-8.2") prevents improper usage, and the comprehensive safety suite—including auto-pause and voltage warnings—exceeds expectations for this price tier.
Value for Money: Unbeatable for absolute budget seekers, though limitations are apparent. The 440°F maximum temperature and 3-hour timer restrict versatility compared to 460°F/10-hour competitors. However, it delivers core induction benefits—speed and efficiency—at 40% below entry-level alternatives. For occasional heating tasks rather than daily cooking, the value proposition is compelling. Serious cooks should invest more.
Strengths and Weaknesses:
- Strengths: Extremely affordable; simple pre-set operation; robust safety features including child lock; compact footprint; easy-clean tempered glass; reputable retailer backing.
- Weaknesses: Limited temperature range (160-440°F); short 3-hour timer; not suitable for low-temperature cooking; only 8 power levels; basic functionality excludes advanced features; questionable long-term durability.
Bottom Line: Purchase only for basic heating needs or extreme budget constraints. While functional, its limitations become frustrating with regular use. It’s a decent entry point to test induction cooking, but frequent cooks should spend $20-30 more for a Duxtop 8100MC.
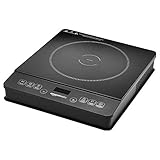
6. Duxtop Portable Induction Cooktop, Countertop Burner Induction Hot Plate with LCD Sensor Touch 1800 Watts, Black 9610LS BT-200DZ
Overview: The Duxtop 9610LS BT-200DZ is a feature-rich portable induction cooktop that delivers 1800 watts of precise cooking power. Designed for home kitchens, RVs, and dorms, this black countertop burner combines advanced digital controls with comprehensive safety features in a lightweight, compact package that runs on standard 120V household outlets.
What Makes It Stand Out: This model distinguishes itself with an exceptional 20 power levels and 20 temperature settings ranging from 100°F to 460°F, offering granular control rarely seen at this price point. The standout 10-hour countdown timer provides unmatched flexibility for slow cooking and precise recipes. Dedicated one-touch buttons for fast boil and keep warm functions add convenience, while the child safety lock requires a 3-second press, preventing accidental activation.
Value for Money: At $117.99, the Duxtop 9610LS occupies a sweet spot between budget burners and premium professional models. You’re paying for versatility and precision that cheaper alternatives lack, while avoiding the $200+ price tag of commercial-grade units. The extensive timer range and dual quick-access buttons alone justify the moderate premium over entry-level options.
Strengths and Weaknesses: Strengths include exceptional temperature granularity, lengthy timer, intuitive sensor-touch panel, and robust safety features including auto-pan detection. The lightweight design enhances portability. Weaknesses involve potential high-pitched noise from certain cookware due to multi-layer construction, and the requirement for magnetic-bottom cookware with minimum 5-inch diameter. The black glass surface shows smudges readily.
Bottom Line: The Duxtop 9610LS is an excellent choice for serious home cooks seeking professional-level control without commercial-grade pricing. Its extensive features and safety systems make it ideal for daily use, travel, or as an auxiliary cooking surface.
7. OMEO Portable Induction Cooktop Hot Plate Countertop Burner 1800 Watts Induction Burner with LCD Sensor Touch, LED Display, 10 Temperature Levels, Child Safety Lock, Auto Shutoff Function

Overview: The OMEO Portable Induction Cooktop delivers 1800 watts of cooking power in an ultra-affordable package designed for budget-conscious consumers. This compact countertop burner features essential modern conveniences including an LCD sensor touch panel, LED display, and critical safety features, making it suitable for dorms, RVs, and small apartments.
What Makes It Stand Out: Its remarkably low price point of $55.99 while maintaining 1800W power is the primary differentiator. The cooktop strips away complexity, offering 10 straightforward temperature levels from 140°F to 460°F that cover most cooking needs. The LED display provides clear real-time monitoring, while the child safety lock and auto-shutoff function deliver peace of mind without adding cost.
Value for Money: This is arguably the best entry-level value in portable induction cooking. At less than half the price of mid-tier competitors, OMEO provides comparable power output and essential safety features. While it lacks granular controls and extended timers of pricier models, it delivers core induction benefits—speed, efficiency, and safety—making it perfect for occasional use or first-time buyers.
Strengths and Weaknesses: Strengths include unbeatable affordability, simple operation, adequate temperature range, and essential safety locks. Its lightweight design maximizes portability. Weaknesses are limited temperature precision with only 10 levels, absence of advanced features like preset cooking modes or lengthy timers, and potentially less durable construction than premium brands. The 5-foot cord may be restrictive in some layouts.
Bottom Line: The OMEO cooktop is perfect for students, renters, or anyone needing occasional extra cooking capacity on a tight budget. It sacrifices advanced features for affordability but maintains core performance and safety standards.
8. Duxtop Professional Portable Induction Cooktop, Commercial Range Countertop Burner, 1800 Watts Induction Burner with Sensor Touch and LCD Screen, P961LS/BT-C35-D, Silver/Black

Overview: The Duxtop Professional P961LS/BT-C35-D elevates portable induction cooking to commercial standards. This ETL-listed countertop burner combines robust stainless steel construction with 1800 watts of power and 83% energy efficiency. Designed for demanding home chefs and light commercial use, it operates on standard 120V outlets while delivering professional-grade performance and durability.
What Makes It Stand Out: Professional construction sets this apart, featuring stainless steel housing, a 7-blade fan, and back tuyere for superior heat dissipation during extended cooking sessions. The angled LCD control panel improves visibility from a distance—a thoughtful professional touch. Like its consumer sibling, it offers 20 power and temperature presets, but wraps them in a package built to withstand rigorous daily use while maintaining energy efficiency superior to gas or electric alternatives.
Value for Money: At $167.99, this represents a 50% premium over the standard Duxtop model, justified entirely by build quality and cooling engineering. For home users cooking daily or small commercial applications like catering, the enhanced durability and heat management prevent performance degradation. It bridges the gap between consumer and NSF-certified commercial units costing $200+, offering professional features without certification.
Strengths and Weaknesses: Strengths include commercial-grade stainless steel construction, superior cooling system, excellent energy efficiency, and the same granular 20-level controls as the consumer model. The angled display enhances usability. Weaknesses include the substantial price increase for non-certified commercial use, heavier weight reducing ultra-portability, and the same cookware limitations as all induction units. Silver finish may clash with some kitchen aesthetics.
Bottom Line: Ideal for serious home cooks who demand durability and performance for daily use, or light commercial applications. The professional build quality justifies the premium for those who push their equipment hard.
9. Nuwave Pro Chef Induction Cooktop, NSF-Certified, Commercial-Grade, Portable, Powerful 1800W, Large 8” Heating Coil, 94 Temp Settings 100°F - 575°F in 5°F, Shatter-Proof Ceramic Glass Surface
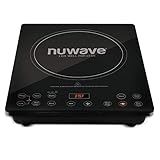
Overview: The Nuwave Pro Chef represents the pinnacle of portable induction technology with NSF commercial certification and unprecedented precision. This 1800-watt cooktop features a large 8-inch heating coil and remarkable temperature range from 100°F to 575°F, adjustable in precise 5°F increments. The shatter-proof ceramic glass surface and heavy-duty construction meet professional kitchen durability standards.
What Makes It Stand Out: The 94 temperature settings provide unmatched precision for delicate tasks like chocolate tempering or high-heat searing. NSF certification guarantees commercial-grade durability, having passed rigorous 1.5ft-lb drop tests. The “on-the-fly” adjustment capability allows immediate changes without restarting cooking cycles—a professional feature absent in consumer models. This level of control and certified toughness is unique in the portable category.
Value for Money: At $219.99, this is the most expensive option but delivers professional certification and precision that justifies the cost for serious users. For commercial kitchens, catering businesses, or culinary enthusiasts who demand exact temperature control, the premium is warranted. It competes with built-in induction ranges costing far more while maintaining portability. Home cooks may find the extensive features excessive for basic needs.
Strengths and Weaknesses: Strengths include NSF certification, exceptional 94-setting temperature precision, wide 575°F maximum heat, large heating coil, shatter-proof surface, and immediate setting adjustments. Construction quality is outstanding. Weaknesses are the high price point, potentially unnecessary precision for casual cooking, and the same induction cookware requirements. The complexity may overwhelm novice users.
Bottom Line: The ultimate choice for professionals and serious cooking enthusiasts who demand certified durability and exacting temperature control. Worth the investment for commercial use or passionate home cooks who value precision above all.
10. Mueller RapidTherm Portable Induction Cooktop Hot Plate Countertop Burner 1800W, 8 Temp Levels, Timer, Auto-Shut-Off, Touch Panel, LED Display, Auto Pot Detection, Child Safety Lock, 4 Preset Programs

Overview: The Mueller RapidTherm challenges the notion that low price means compromised features. This 1800-watt portable induction cooktop delivers remarkable functionality at just $41.99, making it the most affordable option in our comparison. ETL-approved and operating on standard 120V, it includes thoughtful features like four preset cooking programs and a pause function typically found on pricier models.
What Makes It Stand Out: Four dedicated preset programs—Hot Pot, Slow Cook, Boil, and Keep Warm—provide one-touch convenience unmatched at this price point. The pause feature temporarily stops cooking while preserving settings, a premium touch for such a budget unit. Despite the low cost, it includes auto-pan detection, child safety lock, and overheat protection with a durable blade fan, demonstrating Mueller’s commitment to value.
Value for Money: At $41.99, this represents exceptional value, offering features that rival $100+ competitors. The preset programs eliminate guesswork for common tasks, while the 8 temperature levels and 4-hour timer cover most home cooking needs. Mueller’s 24/7 customer support adds confidence. This is the smart choice for budget buyers who refuse to sacrifice modern conveniences.
Strengths and Weaknesses: Strengths include unbeatable price, useful preset programs, pause function, comprehensive safety systems, and ETL approval. The lightweight design enhances portability. Weaknesses are limited temperature granularity with only 8 levels, shorter 4-hour timer versus 10-hour competitors, and less established brand reputation compared to Duxtop or Nuwave. The cookware compatibility range (4.8"-10.2") is slightly more restrictive.
Bottom Line: The Mueller RapidTherm is the budget champion, offering surprising features and solid performance at an entry-level price. Perfect for occasional use, small spaces, or as a backup cooktop without breaking the bank.
Why Induction Cooktops Are a Game-Changer for Food Photography
Induction technology delivers instant, precise heat adjustments that let you orchestrate every visual element in your frame. Unlike electric coils that lag or gas flames that flicker and cast unwanted light, induction provides silent, smooth power transitions that maintain consistent steam patterns and controlled bubbling. The electromagnetic heating process warms only the pan, keeping the unit’s surface cool enough to handle safely between shots—crucial when you’re repositioning elements in a time-sensitive shoot. For under $90, you gain access to technology that was once exclusive to high-end commercial kitchens, making it possible to capture multiple dishes at their peak without breaking your equipment budget.
Understanding the $90 Price Point: What to Expect
The sub-$90 category represents a sweet spot where manufacturers balance cost with essential functionality. At this price, you’ll find single-burner units with digital controls, temperature ranges between 140°F and 460°F, and wattage outputs from 1,300 to 1,800 watts. Premium features like dual burners or smartphone connectivity typically exceed this budget, but you shouldn’t compromise on core performance. Focus on units offering at least 15 distinct power levels and temperature presets—these provide the granular control needed for styling delicate sauces or achieving aggressive sears. Beware of ultra-cheap models under $50 that often sacrifice temperature accuracy for flashy displays, resulting in hot spots that ruin both your food and your images.
Key Features That Matter Most for Photographers
Precise Temperature Control for Perfect Simmer and Sear
The difference between a lifeless, broken sauce and a glossy, Instagram-worthy reduction often comes down to just 10 degrees. Look for units with temperature increments of 10-15°F rather than broad 50°F jumps. This precision lets you hold chocolate at exactly 115°F for tempering shots or maintain a bare simmer at 180°F where gentle bubbles frame your ingredients perfectly. The best models maintain temperature within ±5°F variance, ensuring your styling window lasts long enough to capture multiple angles without rushing.
Wattage Range: Finding Your Sweet Spot
While 1,800-watt units promise faster heating, they can sometimes be too aggressive for small pans used in tight food shots. A variable wattage range from 200 to 1,600 watts offers maximum versatility—low enough to keep sauces warm during lens changes, high enough to generate authentic sear marks on proteins. Some advanced models feature “power boost” functions that temporarily spike to 1,800 watts for initial heating, then automatically dial back, preventing scorching during long shoots.
Digital vs. Analog Controls: Which Interface Works Best?
Touch-sensitive digital panels with LED displays provide cleaner aesthetics for overhead shots and eliminate physical knobs that cast shadows. However, tactile push-button controls offer better feedback when adjusting settings while looking through your viewfinder. Consider units with remote-control capabilities via infrared sensors—you can adjust heat without physically touching the unit, preventing camera shake and maintaining your composition. Backlit displays that dim automatically are invaluable for low-light mood shots where glowing controls would ruin the ambiance.
Size and Portability: Balancing Studio Space and Power
Single vs. Dual Burner Configurations
Single-burner units dominate the sub-$90 category for good reason—they concentrate budget into one high-quality heating element rather than splitting resources across two mediocre burners. For food photography, this actually works in your favor. You’ll rarely need simultaneous heating zones, and a single, powerful burner gives you more precise control over your hero dish. The compact footprint (typically 11-13 inches square) slips easily into camera bags for location shoots, while leaving ample surface area for styling tools, spray bottles, and garnishes within arm’s reach.
Weight Considerations for On-Location Shoots
Professional food photographers often shoot in restaurants, farms, or clients’ kitchens. A unit weighing under 6 pounds becomes genuinely portable, especially when paired with a lightweight carbon steel or induction-compatible pan. Heavier models might offer slightly better stability, but the trade-off in transport convenience rarely justifies the extra mass. Look for integrated cord storage and carry handles that don’t protrude—these design details make the difference between a studio tool and a true location workhorse.
Design Aesthetics That Enhance Your Food Shots
Minimalist Profiles for Clean Backgrounds
The best induction units for photography feature sleek, low-profile designs that disappear into your background. Units with glass-ceramic surfaces in deep charcoal or matte black reduce unwanted reflections and won’t compete with your food’s color palette. Avoid models with prominent brand logos or decorative elements—some photographers use gaffer tape to cover logos, but this can leave residue. Instead, seek out units with subtle, recessed branding that stays out of focus when shooting at wide apertures.
Surface Material and Reflectivity
A slightly textured ceramic surface diffuses reflections from studio lights better than high-glass finishes. This is critical when shooting overhead or at low angles where the cooktop surface might appear in the frame. Some units feature anti-reflective coatings that cut glare by up to 40%, making them worth a slight premium. Test potential units by photographing them under your typical lighting setup—what looks fine in the store might create a distracting hotspot in your studio.
Advanced Temperature Settings for Culinary Precision
Low-Temperature Holds for Melting and Tempering
Chocolate work, butter melting, and cheese pulls require sustained temperatures between 90°F and 120°F. Not all budget induction units reliably operate this low—many cycle on and off, creating temperature swings that ruin delicate ingredients. Seek models with dedicated “keep warm” or “melt” settings that use pulse-width modulation to maintain steady, gentle heat. These specialized modes prevent the magnetic field from fully disengaging, eliminating the pulsing that causes inconsistent results in long-exposure steam shots.
High-Heat Searing Capabilities
Capturing the moment a scallop develops its golden crust or oil shimmers just before smoking requires rapid temperature climbs above 400°F. Quality units in this price range should reach 450°F within 90 seconds. The ability to lock in a maximum temperature prevents overshooting—crucial when you’re focused on framing rather than monitoring a thermometer. Some models include “sear” presets that automatically adjust power output as the pan temperature rises, compensating for the Leidenfrost effect and ensuring even browning across your protein’s surface.
Safety Features That Protect Your Equipment and Studio
Auto-Shutoff Functions and Overheat Protection
Professional shoots involve constant distractions—adjusting props, changing lenses, directing stylists. An auto-shutoff that activates after 60 minutes of continuous use prevents accidents, but can interrupt long styling sessions. Look for units with customizable timer functions or “stay-on” modes that require deliberate activation. Overheat protection should trigger at the pan level, not just the unit’s internal temperature, preventing damage to non-stick coatings or delicate copper pans you might use for styling.
Child Lock Features for Professional Environments
While designed for homes, child lock functions are invaluable in studio settings where assistants might bump controls mid-shoot. The best implementations lock all buttons except the power switch, allowing emergency shutoff while preventing accidental temperature changes. Some units add a visual indicator—like a flashing LED—when locked, providing at-a-glance confirmation that your settings won’t drift during that perfect cheese pull sequence.
Noise Levels: Maintaining a Quiet Shooting Environment
Fan Systems and Acoustic Considerations
Internal cooling fans are necessary but can ruin video shoots with ambient noise. Premium budget units use temperature-controlled variable-speed fans that remain silent during low-heat operations and only spin up during high-power searing. Listen for high-pitched whines or rattles that indicate cheap bearings—these become more noticeable in quiet studio environments. Positioning the unit on a silicone mat can dampen vibration noise by up to 30%, a simple hack that makes budget units perform like premium models during video capture.
Vibration Reduction for Sharp Images
The electromagnetic field creates subtle vibrations that, while imperceptible to touch, can affect macro shots or long exposures. Units with rubber isolation feet minimize this transfer to your shooting surface. For extreme close-ups of simmering liquids, place a 1/4-inch cork board under the unit to absorb residual vibrations. This technique is especially effective when photographing carbonated beverages or delicate foam structures that reveal micro-movements.
Cookware Compatibility and Magnetic Requirements
Not all “induction-ready” pans perform equally. For photography, you need pans that respond instantly to temperature changes. Test cookware with a magnet—the stronger the attraction, the better the induction response. Carbon steel and cast iron offer the fastest heat response but can be heavy for handheld styling. Look for tri-ply stainless steel with thick magnetic bases that provide even heating without hot spots, crucial when you’re shooting a sauce reduction that needs to look perfect across the entire pan surface. Avoid aluminum or copper pans unless they have embedded steel plates—these create uneven heating patterns that show dramatically in close-up shots.
Power Supply and Electrical Considerations
Most portable induction units require a dedicated 15-amp circuit. In older buildings or on location, shared circuits with studio lights can trip breakers when the unit cycles to high power. Calculate your total load: a 1,800-watt induction unit draws 15 amps, leaving little headroom for continuous lighting. Consider using battery-powered LED panels or scheduling heating cycles between lighting setups. Some photographers run induction units through voltage regulators to prevent power fluctuations from affecting temperature stability—a worthwhile $30 investment that protects both your cooktop and your shot consistency.
Setting Up Your Induction Unit for the Perfect Shot
Positioning for Optimal Lighting Angles
Place your induction unit at a 45-degree angle to your main light source to create natural-looking highlights on liquids and sauces. This angle also minimizes reflections on the cooktop surface. For steam photography, position the unit so rising vapor catches rim lighting from behind—this requires precise temperature control to maintain consistent steam volume. Use the unit’s cool-touch edges to your advantage; you can safely prop reflector cards or small flags within inches of the cooking surface to shape light without fire risk.
Managing Cords and Cables in Frame
Nothing ruins a clean overhead shot like a dangling power cord. Look for units with rear-exit cords and strain-relief designs that keep cables tight against the unit’s body. Use 3M Command hooks to route cords along the underside of your shooting table, bringing power up through a drilled hole directly beneath the unit. For video, secure excess cable length with Velcro ties to prevent movement that might distract from your hero food. Some photographers invest in fabric-wrapped power cords in neutral colors that blend with wooden surfaces, a subtle detail that elevates production value.
Common Mistakes Food Photographers Make with Induction
Relying on the unit’s displayed temperature rather than verifying with an infrared thermometer is the number one error. Induction heats pans so efficiently that thin cookware can be 30-50°F hotter than the unit’s sensor reads. Another frequent mistake is using maximum power for initial heating, which causes violent boiling that splatters your carefully arranged garnishes. Instead, use medium-high settings and preheat gradually—this gives you a longer styling window once the target temperature is reached. Finally, neglecting to factor in the electromagnetic field’s effect on nearby electronics; keep camera bodies and memory cards at least 12 inches from active units to prevent data corruption.
Maintenance and Care for Longevity
Glass-ceramic surfaces scratch easily, destroying the clean aesthetic needed for overhead shots. Always lift pans—never slide them—across the surface. Clean with ceramic cooktop polish after each use; this fills micro-scratches and maintains the low-reflectivity finish. For stubborn styling product residue (like glycerin steam enhancers or oil sprays), use a plastic scraper followed by a vinegar solution—never abrasive pads. Store units vertically in padded bags to protect the glass surface and prevent fan intake vents from collecting dust. A quarterly blast of compressed air through vent slots keeps cooling systems efficient, preventing the overheating that causes premature shutdowns during critical shoots.
Troubleshooting Common Issues on Set
If your unit displays an “E0” or “no pan” error with compatible cookware, the pan’s base might be too small—most sensors require minimum 4-inch diameter contact. For uneven heating patterns, try rotating your pan 180 degrees halfway through cooking; this compensates for single-coil designs common in budget units. When steam production becomes inconsistent, the unit may be cycling due to overheating—place a small fan blowing across the unit’s underside to improve ventilation. If you experience intermittent shutoffs during long shoots, disable any eco-mode settings that prioritize energy savings over continuous operation.
Maximizing Value: Getting Professional Results on a Budget
The sub-$90 price point forces smart compromises. Prioritize temperature accuracy over maximum wattage—a 1,500-watt unit that holds steady at 275°F is more valuable than an 1,800-watt model that fluctuates ±20°F. Invest savings in accessories: a $15 infrared thermometer, a set of induction-compatible pans from restaurant supply stores, and heat-resistant silicone tools that won’t scratch surfaces. Consider buying refurbished units from reputable manufacturers; many come with full warranties and offer 20-30% savings. Finally, join food photography communities where members often sell gently used equipment upgrading to commercial kitchens—this is how many pros acquire backup units for multi-angle shoots without doubling their budget.
Frequently Asked Questions
Can I use portable induction units outdoors for natural light food photography?
Yes, but you’ll need a pure sine wave inverter rated for at least 2,000 watts connected to a deep-cycle battery. Standard modified sine wave inverters cause induction units to run inefficiently and may damage their electronics. For farm-to-table shoots, a 100Ah battery provides 3-4 hours of continuous operation at medium power.
How do I prevent the induction fan from blowing lightweight garnishes around?
Position a 12-inch square of fine mesh screening (like window screen material) over the unit’s vent, secured with magnets. This redirects airflow without restricting cooling. Alternatively, place the unit on a lower surface than your styling area, using the natural rise of heat to your advantage while keeping breezes away from delicate herbs and powders.
Will induction heating affect my camera’s memory cards or sensors?
The electromagnetic field diminishes exponentially with distance. Keep camera bodies and memory cards at least 12 inches from the active cooking zone. For overhead rigs directly above the unit, use carbon fiber mounting arms that don’t conduct electromagnetic fields, and shield your camera with a steel mesh Faraday cage if shooting within 6 inches.
Can I achieve a wok hei effect for Asian food shots with a portable unit?
Traditional wok hei requires 100,000+ BTU flames, but you can simulate it for photography. Use a flat-bottomed carbon steel wok on maximum power, preheat until smoking, then add minimal oil and ingredients. The key is capturing the moment of contact—have your camera ready, as the visual effect lasts only 15-20 seconds before the unit cycles down to prevent overheating.
Why does my chocolate seize even when the unit shows the correct temperature?
Induction’s rapid, efficient heating creates hot spots in pan bases, especially with thin cookware. The unit’s sensor reads the average glass temperature, not the actual pan surface. Always use a double-boiler setup or a thick, heavy-bottomed pan with an infrared thermometer pointed at the chocolate itself, not relying on the unit’s display.
How can I use induction for cold food styling?
Place a stainless steel bowl of ice water on the unit without turning it on. The metal base provides a stable, non-slip surface for arranging cold dishes. For “frozen” effects on room-temperature items, set the unit to its lowest power (around 100°F) and place a chilled metal plate on top—the gentle warmth prevents condensation while keeping food cool enough for stylized ice cream melts.
What’s the best way to capture steam without a fog machine?
Set your induction unit to 180-200°F with a shallow pan of water. Add a few drops of glycerin (from the pharmacy) to thicken the steam. The induction’s precise hold prevents violent boiling while maintaining consistent vapor production. Shoot with backlighting at a low angle, and use a fast shutter speed (1/250s or faster) to freeze the steam’s swirling patterns.
Can I run multiple induction units simultaneously for different dishes?
Yes, but each requires a separate 15-amp circuit. In a home studio, you’ll likely need to run extension cords from different rooms to avoid tripping breakers. Use units with different wattage ratings (e.g., 1,800W for searing, 1,300W for simmering) to balance electrical load and prevent simultaneous high-draw cycles.
How do I clean the unit if styling products spill on the hot surface?
Immediately power off and wait 30 seconds—the glass cools rapidly without a hot pan. Use a metal spatula at a 45-degree angle to scrape off sticky substances while the surface is still warm (not hot). Once cooled, apply ceramic cooktop cleaner with a microfiber cloth. Never use water on a hot surface; the thermal shock can crack the glass-ceramic top.
Are there any foods that simply don’t photograph well on induction?
Induction excels at controlled, even heating but struggles with true charring or open-flame effects. For grilled vegetables or charred proteins, use a butane torch as a styling tool after induction cooking. Also, very thick cuts that require oven finishing may develop uneven sear marks due to induction’s concentrated heating zone—use a press or smaller pieces for more consistent visual results.