Living the RV lifestyle means embracing freedom, adventure, and the art of compact living. But let’s be honest—cooking in a tiny kitchen on wheels can feel like a culinary compromise. That’s where induction technology swoops in like a game-changer, offering restaurant-quality precision in a footprint that respects your limited counter space. The challenge? Finding a rangetop that actually fits your RV’s unique constraints without draining your travel fund.
You’re not just looking for any induction cooktop—you need one under 24 inches wide, under $1200, and tough enough to handle life on the open road. This isn’t a simple Amazon search; it’s a strategic mission. Between power draw limitations, vibration concerns, and installation quirks that only mobile homeowners understand, the wrong choice can leave you with a useless glass slab and a hefty return shipping headache. Let’s dive deep into what separates the road-worthy contenders from the pretenders, so you can make a decision that keeps you cooking happily from Yellowstone to Key West.
Top 10 Induction Rangetops for RV Living
Detailed Product Reviews
1. 12 Inch Induction Cooktop 2 Burners, 120V 1800W Electric Stove with Bridge Function & 9 Power Levels, Built-in/Countertop Induction Burner for Kitchen, RV, Outdoor Camping

Overview: This versatile 12-inch induction cooktop delivers impressive functionality for under $100, making it an attractive option for space-conscious kitchens, RVs, and outdoor cooking setups. The unit features two burners with a combined 1800W output and can function as either separate cooking zones or one large zone via its bridge function.
What Makes It Stand Out: The bridge function is the star feature at this price point, typically found on premium models costing significantly more. This allows you to combine both zones for griddles or large pans. The slide touch control offers intuitive operation compared to traditional button interfaces, while three preset modes (Melt, Keep Warm, Simmer) eliminate guesswork for common tasks.
Value for Money: At $98.99, this cooktop punches well above its weight class. Competing models with bridge functions often retail for $200+, making this an exceptional value. The combination of safety features, flexible installation options, and preset cooking modes rivals units twice the price.
Strengths and Weaknesses: Strengths include the innovative bridge function, comprehensive safety features (child lock, auto shut-off), slide touch controls, and versatile built-in/countertop design. The primary weakness is shared power management—when both burners operate simultaneously, total output remains capped at 1800W, limiting high-heat cooking on both zones. Build quality may also not match premium brands.
Bottom Line: An outstanding budget-friendly choice for RV owners, small apartments, or as a supplemental cooking surface. The bridge function and safety features make it a standout value, though power-sharing limitations require realistic expectations for dual-burner cooking.
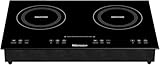
2. CAMPLUX RV Induction Cooktop 2 Burners 1800W, Electric Cooktop 120V Plug in, Portable Induction Stove with Sensor Touch, Timer, Safety Lock, Countertop/Built-in for RV, Mini Kitchen or Apartments

Overview: CAMPLUX targets the RV and compact living market with this purpose-built dual-burner induction cooktop. Designed for 120V outlets, it delivers 1800W of shared power across two heating zones, promising 40% faster cooking than conventional stoves while offering flexible installation as either a countertop or built-in unit.
What Makes It Stand Out: This model’s RV-specific design philosophy shines through its comprehensive safety package, including ETL certification, hot surface indicators, and overheat protection—critical for mobile environments. The 3-hour auto timer with automatic shutoff provides peace of mind during long cooking sessions or when distracted by road life.
Value for Money: At $229.99, this premium-priced unit costs more than double budget alternatives. You’re paying for certified safety features, brand reputation, and RV-optimized engineering. While feature-rich, the value proposition depends entirely on whether you need the ETL certification and brand support for mobile living.
Strengths and Weaknesses: Strengths include robust safety protections, faster heating claims, easy-clean glass surface, simple installation with included power cord, and flexible temperature/power level combinations. The shared 1800W power limitation remains a drawback, preventing simultaneous high-heat cooking on both burners. The premium price point may deter casual users.
Bottom Line: Ideal for serious RV enthusiasts and apartment dwellers prioritizing safety certifications and brand reliability. The high price is justified for mobile applications where safety and support matter, but home users may find better value elsewhere.
3. Mini Induction Cooktop, 500W /110V Mini Electric Countertop Burners Portable Small Induction Hot Plate Even Heating for RV Travel & Outdoor Abangdun

Overview: This ultra-compact induction cooktop from Abangdun carves out a unique niche for travelers, students, and those needing minimal cooking power. At just 500W and measuring 6.8 × 8.5 inches, it’s designed for small-portion heating rather than full meal preparation, making it a specialized tool rather than a primary cooktop.
What Makes It Stand Out: The extreme portability and low power draw make this perfect for off-grid scenarios, RVs with limited electrical capacity, or office kitchens. It heats 0.8QT of water to boiling in 15 minutes—adequate for coffee, tea, or warming small meals. The FCC certification and automatic shutoff when cookware is removed add safety reassurances.
Value for Money: At $47.97, it’s the most affordable option, but also the most limited. Value depends entirely on your use case: excellent for specific tasks like melting wax, brewing coffee, or heating soup, but inadequate as a primary cooking surface. For targeted applications, it’s fairly priced.
Strengths and Weaknesses: Strengths include exceptional portability, low power consumption, safety features, easy cleaning, and stable heating without cycling. Major weaknesses are the 500W maximum power (limiting cooking options), small compatible cookware size (3.9-6.5 inches), and inability to handle full-scale cooking tasks.
Bottom Line: Recommended only for specific scenarios: RV travel with limited power, office kitchens, or as a supplemental warmer. Not suitable for primary cooking needs. Purchase only if you understand and accept its significant limitations for small-portion heating tasks.
4. LP Living Plus 1800W Induction Cooktop Countertop Burner, 3 Hour Max Timer

Overview: LP Living Plus offers a straightforward single-burner induction cooktop that prioritizes simplicity and precise temperature control. With 1800W maximum output and ten temperature settings ranging from 140°F to 464°F, this unit targets users needing a no-frills, reliable supplemental burner for basic cooking tasks.
What Makes It Stand Out: The ten distinct temperature settings provide finer control than many competitors offering only power levels. The 3-hour maximum timer with auto-shutoff and pot detection safety features ensures safe operation, while the single-burner design eliminates power-sharing compromises found in dual-burner models.
Value for Money: At $94.99, it’s priced similarly to budget dual-burner units but offers only one cooking zone. While the build quality and temperature precision may justify the cost for some users, most shoppers will find better value in dual-burner alternatives. It competes directly with basic hot plates rather than full-featured induction cooktops.
Strengths and Weaknesses: Strengths include precise temperature control, straightforward operation, safety auto-shutoff features, and no power-sharing limitations since it’s a single burner. Weaknesses are the lack of advanced features (no presets, no bridge function), single-zone limitation, and relatively high price for a basic single burner.
Bottom Line: A decent choice for those needing a simple, precise single-burner solution. However, at this price point, most consumers would be better served by the dual-burner options available. Consider only if you specifically need a standalone high-power single burner with exact temperature control.
5. CAMPLUX RV Induction Cooktop and 22 Inches RV Range Hood Combo

Overview: This integrated solution combines CAMPLUX’s popular dual-burner induction cooktop with a 22-inch RV range hood, creating a complete cooking ventilation system designed specifically for recreational vehicles. The cooktop delivers 1800W shared power across two burners, while the range hood addresses ventilation requirements often overlooked in RV installations.
What Makes It Stand Out: As a factory-matched combo, this eliminates the guesswork of pairing a cooktop with an appropriately sized hood. The range hood presumably includes features like fan speeds and lighting (though details are limited), while the cooktop retains all of CAMPLUX’s RV-optimized safety features including ETL certification and automatic shutoff systems.
Value for Money: At $319.99, this represents a significant investment. The individual components (cooktop ~$230, range hood ~$90-120) suggest fair bundled pricing. However, value depends on needing both components simultaneously. If you require new ventilation anyway, the convenience factor justifies the premium.
Strengths and Weaknesses: Strengths include the integrated RV-specific design, comprehensive safety features, space-saving all-in-one solution, and elimination of compatibility concerns. Weaknesses are the high overall cost, limited information about range hood specifications, and the cooktop’s inherent shared-power limitation. The combo nature may force unnecessary purchases if you already own one component.
Bottom Line: Perfect for RV owners undertaking a complete kitchen renovation or new build who want a matched, certified system. The convenience and safety integration justify the cost for this specific scenario. For home use or RV owners with existing ventilation, purchasing components separately offers more flexibility and likely better value.
6. CAMPLUX Induction Cooktop and 12-Inch Propane RV Cooktop Combo
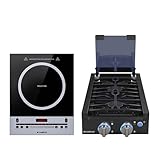
Overview: The CAMPLUX Induction Cooktop and 12-Inch Propane RV Cooktop Combo delivers portable electric cooking power tailored for recreational vehicles. This 1800W single-burner induction unit pairs with a compact propane cooktop, offering flexibility for RV enthusiasts who want the best of both fuel sources. Weighing just 5.7 pounds, it’s designed for countertop or built-in installation, making it ideal for space-constrained mobile kitchens.
What Makes It Stand Out: This unit heats 40% faster than conventional stoves with its Φ7.08-inch heating zone, while offering seven temperature levels (150-390°F) and seven power settings (300-1800W). The comprehensive safety package includes ETL certification, a child safety lock, hot surface indicator, overheat protection, and automatic shutoff with a three-hour timer. The smooth black crystal glass surface wipes clean effortlessly, and the 1.5-foot cord eliminates additional wiring costs.
Value for Money: At $269.99, this combo represents solid value for RVers seeking induction convenience without sacrificing propane backup. Comparable portable induction burners alone cost $150-$200, making the inclusion of a 12-inch propane cooktop a practical bundle for mobile living where power availability varies.
Strengths and Weaknesses: Strengths include exceptional portability, robust safety features, rapid heating, and dual-fuel versatility. The lightweight design simplifies installation and storage. Weaknesses are the limited temperature range compared to premium models, single-burner limitation, shared power design, and a frustratingly short power cord that restricts placement options. Seven power levels offer less precision than nine or ten-level competitors.
Bottom Line: Perfect for weekend campers and full-time RVers wanting safe, portable induction cooking to complement their propane system. The CAMPLUX combo excels in safety and convenience, though serious chefs may crave more precise temperature control.
7. CAMPLUX Induction Cooktop and 21-Inch Propane RV Range Combo

Overview: The CAMPLUX Induction Cooktop and 21-Inch Propane RV Range Combo positions itself as a premium dual-burner solution for serious mobile chefs. This 1800W unit features two induction burners with a shared power design, paired with a full-size 21-inch propane range. The versatile configuration supports both countertop and built-in installation, catering to larger RV kitchens where cooking space is paramount.
What Makes It Stand Out: Dual induction burners with nine temperature levels (120-460°F) and eight power settings (300-1800W) provide exceptional culinary control. The 40% faster heating capability and three-hour auto timer free you from constant monitoring. Safety remains paramount with ETL certification, safety lock, hot surface indicator, overheat protection, and automatic shutoff. The expansive 21-inch propane range complements the induction cooktop for true off-grid capability.
Value for Money: At $729.99, this is a significant investment. However, the dual-burner induction system combined with a full propane range justifies the premium over single-burner alternatives. Comparable dual induction cooktops cost $400-$500 alone, making this combo competitive for comprehensive RV kitchen upgrades.
Strengths and Weaknesses: Strengths include dual-burner flexibility, wider temperature range, robust safety suite, and generous propane range size. The smooth glass surface ensures easy cleaning. Weaknesses center on the shared 1800W power limit, which prevents simultaneous high-heat cooking on both burners. The large footprint may overwhelm smaller RVs, and the price point exceeds budget-conscious buyers.
Bottom Line: Ideal for full-time RVers and culinary enthusiasts who refuse to compromise on cooking capability. While expensive, the dual-fuel versatility and dual-burner convenience make this a worthwhile investment for spacious mobile kitchens.
8. CAMPLUX Induction Cooktop and 17-Inch Propane RV Range Combo

Overview: The CAMPLUX Induction Cooktop and 17-Inch Propane RV Range Combo strikes a balance between the compact 12-inch model and the expansive 21-inch version. This dual-burner 1800W induction cooktop pairs with a midsize 17-inch propane range, offering versatile cooking options for medium-sized RV kitchens. The flexible installation supports both countertop and built-in configurations.
What Makes It Stand Out: Featuring nine temperature levels (120-460°F) and eight power settings (300-1800W), this model provides precise heat control across two induction burners. The 40% faster heating performance, three-hour automatic timer, and comprehensive safety protections—including ETL certification, safety lock, and overheat protection—mirror its larger sibling. The 17-inch propane range delivers robust off-grid cooking capability without overwhelming limited space.
Value for Money: Priced at $689.99, this combo saves $40 compared to the 21-inch model while retaining identical induction features. For RVers who don’t need the extra propane cooking real estate, this represents excellent value. The dual-burner induction system alone commands $400+ in the market, making the bundled propane range a valuable addition.
Strengths and Weaknesses: Strengths include the dual-burner configuration, wider temperature range, complete safety suite, and space-efficient 17-inch propane range. The shared power design remains a limitation, capping simultaneous high-heat cooking. Installation requires careful planning due to the dual-fuel setup. The price, while lower than the 21-inch model, still demands serious budget consideration.
Bottom Line: An excellent middle-ground solution for RVers seeking dual-burner induction convenience with substantial propane backup. The 17-inch propane range offers practical size without sacrificing capability, making this combo ideal for most full-time mobile kitchens.
9. CAMPLUX Electric Induction Cooktop and 17 Inches Propane RV Range Combo

Overview: The CAMPLUX Electric Induction Cooktop and 17 Inches Propane RV Range Combo blends portability with permanent-range convenience. This 1800W single-burner induction unit, weighing just 5.7 pounds, partners with a 17-inch propane range for comprehensive RV cooking solutions. The compact design suits both countertop and built-in installations, ideal for versatile mobile kitchen layouts.
What Makes It Stand Out: Seven temperature levels (150-390°F) and seven power settings (300-1800W) provide adequate control for most cooking tasks. The unit explicitly supports magnetic induction cookware including cast iron, iron, and stainless steel (4.7-9.4 inches). Safety features include a three-hour timer, ETL certification, safety lock, hot surface indicator, overheat protection, and auto shutoff. The smooth crystal glass surface ensures effortless cleaning.
Value for Money: At $559.99, this hybrid offering bridges the gap between basic portable units and premium dual-burner systems. The inclusion of a 17-inch propane range adds significant value, though the single induction burner limits simultaneous cooking. It’s $290 less than the dual-burner 17-inch combo, appealing to budget-conscious buyers.
Strengths and Weaknesses: Strengths include the lightweight portability, explicit cookware compatibility, robust safety features, and generous propane range size. The easy-clean surface and simple installation are practical benefits. Weaknesses involve the single-burner limitation, narrower temperature range, shared power constraints, and short 1.5-foot cord that restricts placement flexibility. The induction burner lacks the precision of higher-end models.
Bottom Line: Well-suited for RVers prioritizing propane cooking with occasional induction convenience. The portable induction burner offers flexibility for outdoor cooking or supplemental indoor use, while the 17-inch propane range handles heavy-duty meal preparation.
10. Suburban Dual Element Induction Cooktop for RV, Smoothtop, LED Display, Electric Stovetop with Child Safety Lock, Easy to Clean, 120V/60HZ, Black (3309A)
Overview: The Suburban Dual Element Induction Cooktop (model 3309A) delivers dedicated induction performance for RV applications without propane pairing. This 1800W unit splits power between two cooking elements, offering true dual-burner capability for mobile kitchens. Designed specifically for RVs, cabins, and compact spaces, it functions as either portable or built-in appliance using standard 120VAC outlets.
What Makes It Stand Out: Ten heating levels across dual elements provide finer control than many competitors. The soft-touch control center features a clear four-digit LED display, while the smooth crystal cooktop enables effortless cleaning. Safety features include a 240-minute timer, automatic shutoff, and child lock—essential for mobile families. The 120V/60Hz design ensures compatibility with standard RV electrical systems.
Value for Money: At $299.00, this dedicated induction cooktop undercuts combo units while delivering dual-element convenience. Comparable dual-burner induction units start at $350, making this an exceptional value. The omission of propane components focuses investment where it matters for all-electric RVers.
Strengths and Weaknesses: Strengths include true dual-element cooking, superior ten-level power control, brand reputation in RV appliances, comprehensive safety features, and straightforward installation. The dedicated induction design simplifies operation. Weaknesses include lack of propane backup for off-grid scenarios, potential power management challenges in RVs with limited electrical capacity, and less temperature granularity compared to nine-level thermostatic controls.
Bottom Line: An outstanding choice for RVers committed to electric cooking or those with separate propane systems. The Suburban 3309A offers professional-grade induction control at a competitive price, making it a smart upgrade for modern mobile kitchens.
Why Induction Cooking is a Game-Changer for RV Life
Energy Efficiency on the Road
Induction cooking delivers approximately 90% of its energy directly to your cookware, compared to 40-50% for gas and 60-70% for traditional electric. For RVers running on limited battery banks or watching propane levels, this efficiency translates to more meals per kilowatt and fewer generator runs. The direct magnetic field heating means your interior stays cooler during summer cooking sessions—a massive comfort bonus when you’re parked in Arizona desert heat.
Safety Benefits in Compact Spaces
In a vehicle where every inch matters, induction offers unparalleled safety. The cooktop surface remains cool to the touch except directly beneath your pan, reducing burn risks in tight quarters. Most units auto-shutoff when cookware is removed, preventing accidental activation while driving. There’s no open flame to worry about, and the lack of combustible fuel eliminates carbon monoxide concerns—critical when your bedroom might be three feet from the kitchen.
Precision Temperature Control
Induction delivers instant, granular temperature adjustments that rival commercial kitchens. Simmering delicate sauces becomes foolproof, and boiling water happens in under two minutes. This precision means less energy waste and better results when you’re working with limited ingredients on the road. The ability to hold a precise low temperature for hours makes slow-cooking and sous vide style preparations possible even during travel days.
Understanding the 24-Inch Size Constraint
Measuring Your RV Kitchen Space
Before falling in love with any specifications, grab your tape measure. The “24-inch” designation refers to overall width, but cutout requirements vary wildly. Most units need an additional 1/8 to 1/4 inch clearance on each side for proper ventilation. Measure your existing cutout depth carefully—many RV countertops are shallower than residential standards. Don’t forget vertical clearance: you’ll need at least 2-3 inches of space below for ventilation and wiring, plus room above for pot clearance.
Two-Burner vs. Three-Burner Configurations
Within the 24-inch width limit, you’ll find both two-burner and compact three-burner layouts. Two-burner models typically offer larger, more powerful zones (up to 11 inches diameter) perfect for full-size skillets and stock pots. Three-burner versions sacrifice individual zone size for versatility—ideal for solo travelers or couples who rarely cook complex meals. Consider your cooking style: do you regularly prepare multi-component meals, or are you a one-pan chef?
Cutout Dimensions vs. Overall Dimensions
Manufacturers list both measurements, but they serve different purposes. The overall dimensions include the frame and control panel, while cutout specs show the hole size needed. Many RV-specific models feature smaller frames to maximize cooking surface area. Pay special attention to control panel placement—front-mounted panels require different cutouts than side-mounted ones. Pro tip: download the installation manual before purchasing to verify every dimension against your space.
Decoding the $1200 Budget Sweet Spot
What You Get at Different Price Points
Below $600, you’ll find basic two-burner units with 1500-1800W maximum output per zone and limited features. The $600-$900 range introduces power boost functions, bridge elements, and better temperature control algorithms. At $900-$1200, expect premium glass-ceramic surfaces, sophisticated power sharing between zones, robust child locks, and possibly smart connectivity. This upper tier also includes better warranties and customer support—crucial when you’re troubleshooting from a remote campground.
Hidden Costs to Factor In
Your $1200 budget needs to cover more than the unit itself. Factor in $50-$150 for proper installation hardware, especially vibration-dampening mounts. You might need an electrician to verify your RV’s wiring ($100-$200). Don’t forget cookware—if you’re switching from gas, your aluminum pans won’t work. Quality induction-compatible cookware sets run $150-$300. Finally, consider a voltage regulator ($80-$150) to protect your investment from campground power fluctuations.
Power Requirements and Electrical Considerations
Amperage Draw and Your RV’s Electrical System
Most 24-inch induction rangetops require a dedicated 20-40 amp circuit at 120V or 240V. This is where many RVers stumble. A two-burner unit running both zones on high can pull 3000-3600 watts—enough to trip a 30-amp main breaker if you’re also running air conditioning. Calculate your total electrical load carefully. Some models offer “RV mode” that caps power draw to 1800 watts total, allowing operation on standard 15-amp circuits at the cost of slower heating.
Generator and Shore Power Compatibility
Not all campground pedestals provide clean, stable power. Induction units are sensitive to voltage drops below 110V or spikes above 125V. When running on generator power, ensure your unit can handle frequency variations. Pure sine wave inverters are mandatory for battery-based systems—modified sine wave will damage the electronics. Look for models with built-in voltage protection that automatically shut down during unsafe conditions rather than burning out.
Energy Management Systems
Modern RVs often include energy management systems that shed loads automatically. Your induction cooktop needs to communicate with this system or be wired to allow manual load shedding. Some advanced units feature “soft start” technology that gradually ramps up power, preventing sudden spikes that confuse EMS units. Consider installing a separate sub-panel with its own breaker to isolate the cooktop from other high-draw appliances.
Key Features That Matter Most in RV Induction Rangetops
Power Boost Functionality
Power boost temporarily diverts energy from one zone to another, delivering up to 50% more power for rapid boiling. In an RV context, this is invaluable but requires careful management. A 3000W boost on a 30-amp system means you can’t run your microwave simultaneously. The best units allow you to customize boost duration or disable it entirely when running on limited power.
Bridge Elements for Flexible Cooking
Bridge technology connects two smaller zones to create one large cooking surface—perfect for griddles or oblong pans. For RVers, this means you can pack fewer specialty pans. When evaluating bridge features, check the minimum pan size detection. Some bridges require at least 6 inches of cookware coverage to activate, while more sensitive models work with smaller diameters.
Touch Controls vs. Physical Knobs
Touch controls offer sleek aesthetics and easy cleaning but can be accidentally activated during travel. Look for models with travel lock functions that require a three-second press to activate. Physical knobs provide tactile feedback and are less prone to accidental activation, but they create cutout complications and can snag on items in tight spaces. Some hybrid models offer removable knobs that store separately during transit.
Pan Detection Technology
Quality induction units detect not just presence but also pan size, automatically adjusting the heating field. This prevents energy waste and hot spots. For RV use, ensure the detection works with your specific cookware—some cast iron pieces with rough bottoms can confuse sensors. The best units include “keep warm” modes that cycle power intelligently when they detect a pan without active cooking.
Installation Essentials for RV Applications
Ventilation Requirements
Induction units generate significant heat from their internal electronics, not the cooking surface. In the confined space beneath an RV countertop, inadequate ventilation is the number one cause of premature failure. You need at least 3 square inches of vent opening per kilowatt of power, with active cooling fans for units over 2500W total. Install intake vents near the bottom and exhaust vents at the top to create natural convection.
Countertop Material Compatibility
The intense magnetic fields and heat from below can affect certain countertop materials. Solid surface countertops (Corian) work beautifully but require heat shields underneath. Laminate countertops need a thermal barrier to prevent delamination. Butcher block requires a non-combustible layer and careful sealing around edges. Stone countertops (granite, quartz) are ideal but heavy—verify your cabinet can support the combined weight of stone plus cooktop.
Securing for Travel
Your rangetop must withstand 3G forces during sudden stops and pothole impacts. Standard residential mounting clips won’t suffice. Use through-bolts with lock washers and nylon-insert nuts. Apply silicone gasketing around the entire perimeter to prevent water intrusion from sink splashes or spills. Some RVers add a removable travel bar that secures across the cooktop surface during transit, protecting the glass from shifting objects.
Durability and Build Quality Factors
Glass-Ceramic Top Thickness
Residential units typically use 4mm glass-ceramic tops, but RV applications demand 6mm minimum for impact resistance. Thicker glass better withstands flexing in mobile environments and resists cracking from thermal shock when you place a cold pan on a hot zone. The edge treatment matters too—beveled edges are less prone to chipping than squared edges.
Frame Construction Materials
Look for stainless steel or aluminum frames, not painted steel. Painted frames will chip and rust from road vibration and humidity. The frame should wrap completely around the glass edge, providing impact protection. Check that control panels are sealed against moisture intrusion—look for IPX4 water resistance ratings minimum. Plastic components should be glass-filled nylon, not ABS, for better heat and vibration resistance.
Warranty Considerations for Mobile Use
Here’s a critical detail: most residential warranties explicitly exclude mobile or marine use. You need a manufacturer that honors claims for RV installations. Read the fine print carefully—some warranties require professional installation by a certified technician. Look for at least a 2-year comprehensive warranty with 5-year coverage on the glass top. Keep detailed installation photos and receipts; manufacturers often request proof of proper installation before honoring claims.
Temperature Settings and Cooking Zones
Simmer Control Capabilities
True low-temperature simmering requires power cycling below 300W. Many budget induction units struggle to maintain temperatures below 140°F without shutting off completely. For RV cooking, where you might simmer chili while driving, look for models with dedicated simmer modes that pulse power intelligently. The best units offer 15-20 power levels versus the standard 9-10, giving you finer control at low temperatures.
Maximum Temperature Output
Most units peak around 450-500°F on the surface, but the effective cooking temperature depends on pan conductivity. For high-heat searing, you need at least 2000W per zone sustained, not just boosted. Check whether the unit can maintain maximum output for more than 10 minutes—some drop power by 30% after initial heating to protect internal components. This matters when you’re stir-frying or searing steaks.
Zone Size Flexibility
Look for zones that accommodate pans from 4 to 10 inches diameter. Some advanced models feature “flex zones” that automatically detect and heat any size pan placed anywhere on the surface. For RVers with limited cookware storage, this versatility means you can use that one odd-sized pan without efficiency loss. Pay attention to minimum pan size—some units won’t activate with pans smaller than 5 inches, problematic for small saucepans.
Control Panel Features and User Interface
Lock Functions for Travel
A simple button lock isn’t enough for RV use. You need a “travel lock” or “child lock” that requires a specific button sequence (usually 3-5 seconds) to deactivate. Better units include motion sensors that automatically engage lock mode when they detect vibration patterns consistent with vehicle movement. Some even integrate with RV ignition systems, locking automatically when the engine starts.
Timer Integration
Look for independent timers per zone, not a single shared timer. The ability to set a simmer timer for one pot while boiling pasta on another zone is invaluable. Advanced models offer delay-start timers, but use these cautiously in an RV—never start cooking unattended. The best integration is a timer that automatically reduces power to warm mode when complete, preventing burnt meals when you’re distracted by campground setup.
Display Visibility in Various Lighting
RV kitchens experience everything from blazing desert sun to dim interior lighting. LED displays should offer adjustable brightness—at least 5 levels. In direct sunlight, many displays become unreadable; look for units with high-contrast white-on-black displays or transflective screens. Some models include simple LED indicator lights instead of full displays, which remain visible in all conditions but offer less information.
Cleaning and Maintenance on the Road
Spill Containment Design
Unlike residential kitchens, you can’t easily wipe spills off the front edge in an RV—they fall into inaccessible gaps. Quality RV-oriented induction tops feature raised edges or integrated spill containment rims that prevent liquids from running underneath. The control panel should be sealed with a membrane overlay, not individual buttons, to prevent liquid intrusion into electronics.
Cleaning Product Recommendations
Avoid abrasive cleaners that scratch the glass surface—scratches become more visible under LED lighting and can lead to thermal stress cracks. Use ceramic cooktop cream cleaners and razor blade scrapers for stubborn residue. Never clean while the unit is hot; the thermal shock can crack the glass. Keep a dedicated cleaning kit in your RV with microfiber cloths, cooktop cleaner, and a plastic scraper.
Preventing Scratches During Travel
Even with travel locks, pans can shift and scratch the surface during transit. Place a soft silicone mat over the cooktop when traveling. Some RVers install a custom-cut piece of thin plywood that sits in a recessed lip around the cooktop. Never store heavy cast iron pans above the cooktop—they can fall and shatter the glass during sudden stops.
Noise Levels and Operational Sounds
Cooling Fan Operation
All induction units have internal cooling fans that run during and after cooking. In a quiet forest campground, a loud fan can be surprisingly annoying. Look for units with temperature-controlled variable speed fans rather than on/off fans. The fan should run for at least 10 minutes after cooking to cool electronics—some cheap units skimp on this, leading to premature component failure.
Electronic Buzzing Issues
At high power settings, induction units can produce a high-pitched buzzing or clicking, especially with lightweight or clad cookware. This is caused by vibrations in the pan base from the magnetic field. Thicker, heavier pans minimize this noise. Some premium units use higher-frequency inverters (above 25kHz) that are inaudible to most adults. Test with your actual cookware before committing—what’s a minor hum in a showroom can become maddening in a small RV.
Sound Dampening Solutions
If you’re sensitive to noise, install the unit with rubber isolation mounts instead of rigid brackets. This reduces vibration transfer to the countertop. Ensure the underside has adequate sound insulation—foam panels can absorb fan noise without blocking airflow. Never block ventilation openings to muffle sound; overheating will destroy the unit faster than noise annoyance.
Weight Considerations for RV Payload
Typical Weight Ranges
A 24-inch induction rangetop weighs between 25-45 pounds, significantly more than a propane cooktop of the same size. The glass top accounts for 40% of this weight. When calculating your RV’s cargo capacity, remember this adds to the kitchen’s static weight. For weight-conscious travelers, some newer models use aluminum chassis components instead of steel, saving 5-8 pounds without sacrificing durability.
Distribution Impact
In smaller RVs, kitchen weight distribution affects towing stability. A 40-pound cooktop installed in a rear kitchen can shift balance noticeably. Consider the unit’s center of gravity—deeper units (front-to-back) place more weight further from the axle. If you’re already near your GVWR, the weight difference between a $800 and $1200 unit might be significant enough to influence your decision.
Smart Features and Connectivity
Bluetooth/WiFi Capability
Smart connectivity seems gimmicky until you’re lying in bed wondering if you turned off the cooktop. Remote monitoring apps can verify status and even adjust settings from your phone. Some units integrate with RV automation systems like Firefly or Silverleaf, allowing central control of all appliances. However, connectivity adds complexity and power draw—consider whether you’ll actually use these features or just pay for them.
App Integration Benefits
Quality apps offer more than remote control. They provide energy usage tracking, helping you optimize battery consumption. Some include recipe modes that automatically set time and temperature for specific dishes. The most useful feature is diagnostic information—apps can alert you to voltage issues or overheating before damage occurs. Ensure the app works offline; many campgrounds have spotty WiFi.
Power Sharing Technology
This sophisticated feature dynamically allocates power between zones based on demand. With a 3000W total limit, you might run one zone at 2000W and another at 1000W, or shift all power to a single zone. For RVs with limited electrical service, this is more valuable than raw power output. The best implementations are user-adjustable, letting you set maximum total draw to match your available power.
Common Installation Mistakes to Avoid
Inadequate Clearance
The number one killer of RV induction cooktops is insufficient airflow. Residential installations recommend 2 inches below; RVs need 3-4 inches due to confined spaces and higher ambient temperatures. Don’t install directly above the furnace or water heater exhaust. Avoid placing the unit against exterior walls where temperature extremes stress components. The cutout should be slightly larger than specified to allow for frame flexing during travel.
Improper Wiring
Never use wire nuts or residential-style push-in connectors in an RV. These vibrate loose. Use crimped spade connectors with heat-shrink insulation. The power cable needs strain relief and should be secured every 6 inches to prevent fatigue failure. If you’re not comfortable with 240V wiring (for some models), hire a professional. A loose neutral wire in an RV can create dangerous voltage conditions that destroy electronics.
Ignoring Vibration Factors
Standard anti-vibration mounts aren’t designed for 60mph pothole impacts. Use marine-grade mounts rated for 4G forces. The cooktop should be installed with a slight gap (1/16 inch) around the perimeter, filled with flexible silicone instead of rigid caulk. This allows the frame to flex without stressing the glass. Check mounting bolt torque after your first 500 miles of travel—vibration will cause them to loosen.
Making Your Final Decision
Creating a Feature Priority List
Start by listing your non-negotiables: power draw limits, minimum zone size, warranty coverage for mobile use. Then rank desirable features: bridge function, smart connectivity, number of power levels. Be realistic—no unit has everything. A full-time RVer who boondocks weekly needs different priorities than a weekend warrior who always has shore power. Your cooking style matters more than spec sheets.
Where to Shop for RV-Specific Models
Avoid big-box home improvement stores; their selection is residential-focused. RV specialty retailers understand mobile installation requirements and often stock models with RV-appropriate warranties. Online marketplaces offer wider selection but require careful vetting. Look for sellers who specifically mention “RV compatible” or “marine grade” in descriptions. Manufacturer websites sometimes have outlet sections with previous-generation models that meet your specs at significant discounts.
Reading Between the Lines of Specifications
Manufacturers often list “peak” power rather than sustained output. A unit rated “3600W” might only sustain 2800W after 5 minutes. “17 power levels” sounds impressive until you realize levels 1-5 are essentially useless warm settings. Check user manuals for actual amperage draw charts at different settings. Look for UL or ETL certification—CSA certification alone may not meet US RV electrical standards. Finally, download the installation manual before buying; if it doesn’t address mobile installation, the manufacturer hasn’t designed it for RV use.
Frequently Asked Questions
Can I run a 24-inch induction rangetop on my RV’s battery system? Yes, but with significant caveats. You’ll need a substantial battery bank (minimum 400Ah lithium or 600Ah AGM) and a pure sine wave inverter rated for at least 3000W continuous output. Even then, sustained cooking will drain batteries quickly. Most boondockers use induction sparingly—quick meals only—or run the generator while cooking. For full-time off-grid cooking, consider a hybrid approach: propane for long simmers, induction for fast heating.
Will my existing RV cookware work on induction? Only if it’s magnetic. Test your pots and pans with a refrigerator magnet—if it sticks strongly, the cookware will work. Cast iron, enameled cast iron, and most stainless steel (18/0 or magnetic 18/8) are compatible. Aluminum, copper, and glass won’t work unless they have a magnetic base bonded to them. Many RVers find they need to replace 30-50% of their cookware when switching to induction.
How do I protect my induction cooktop during travel? Engage the travel lock function, remove all cookware, and place a silicone mat or custom-cut plywood cover over the surface. Secure the cover so it can’t shift. Install the unit with rubber isolation mounts and check mounting hardware torque regularly. Some RVers add a plexiglass shield mounted on hinges that folds down to protect the glass from shifting cabinet contents.
What’s the difference between 120V and 240V models for RVs? 120V models (1800-2400W total) plug into standard RV outlets but offer less cooking power. They’re easier to install and compatible with all campground pedestals. 240V models (3000-3600W total) require special wiring but deliver residential performance. However, many 50-amp RV sites don’t have true 240V available—they’re two 120V legs. You’ll need a step-up transformer or special RV electrical system to use 240V units.
Can I install an induction rangetop myself, or do I need a professional? If you’re comfortable with RV electrical systems and have experience with cutouts, DIY installation is possible. However, professional installation ($150-$300) ensures proper ventilation, secure mounting, and warranty compliance. Many manufacturers require professional installation for mobile use warranty coverage. At minimum, have a certified RV technician inspect your work before first use.
How does altitude affect induction cooking performance? Altitude doesn’t affect induction heating directly—the magnetic field works the same at 10,000 feet. However, water boils at lower temperatures at altitude, so your “boil” setting will be less effective for pasta. The unit’s internal cooling is less efficient in thin air, so fan noise may increase and high-power settings may derate sooner. Most units compensate automatically, but expect slightly longer cooking times above 5,000 feet.
What happens if I have a power surge at a campground? Quality induction units include surge protection that shuts down the electronics during voltage spikes. However, repeated surges can degrade this protection. Install a whole-RV surge protector ($80-$200) at the pedestal for primary protection. For maximum safety, add a voltage regulator specifically for the cooktop circuit. This is especially important in older campgrounds with questionable wiring.
Can I use my induction cooktop while driving? Technically possible but strongly discouraged. Most units have motion sensors that will shut down during movement. Even if disabled, the risk of hot liquid spills during sudden maneuvers is significant. Additionally, running high-power appliances while the engine charges the house batteries can create electrical conflicts. Save cooking for stationary moments—it’s safer and more enjoyable.
How long do RV induction rangetops typically last? With proper installation and care, expect 8-12 years of service. The glass top is usually the first failure point—cracks from impact or thermal stress. Electronics typically last longer, though vibration can loosen connections over time. Units designed for marine use often last longer in RVs due to better vibration dampening and moisture protection. Regular cleaning of ventilation channels extends lifespan significantly.
Are portable induction units a better option for RVs? Portable units offer flexibility and lower cost ($50-$150), but lack the integration and power of built-in models. They’re ideal for occasional use or as a supplement to propane. However, they take up valuable counter space, have less sophisticated controls, and typically max out at 1800W. For full-time RV living, a properly installed built-in unit provides a better cooking experience and adds resale value to your rig. Many RVers start with portable to test the technology before committing to a built-in installation.